Connecting a Serial ATA (SATA) hard drive to your computer is a straightforward process that can be done in just a few steps. SATA has become the most common type of hard drive in modern PCs, replacing the older Parallel ATA (PATA) standard. In this guide, I’ll walk you through everything you need to know to install and connect a new or old SATA drive to your desktop computer or laptop.
What is a SATA Hard Drive?
SATA stands for Serial ATA and it refers to both a specific type of hard drive and the data transfer interface they use. Some key things to know:
- SATA hard drives have much higher transfer speeds compared to older PATA drives. SATA started at 150MB/s and new versions go up to 16GB/s.
- The SATA data connection uses a much thinner serial cable versus the wider parallel cables used for PATA drives.
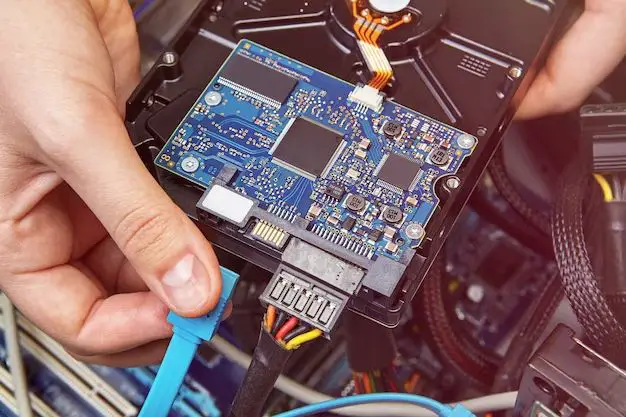
- SATA cables connect to a hard drive and motherboard using small L-shaped SATA connectors. These are very easy to attach and detach.
- Modern motherboards have SATA ports built-in to connect SATA hard drives and SSDs. Most have multiple ports to allow adding more drives.
In summary, SATA is an interface that allows for fast communication between a hard drive and computer. Nearly all modern internal hard drives will use SATA, while very old ones likely use the obsolete PATA/IDE standard.
Steps to Connect a SATA Hard Drive
Connecting and installing a SATA hard drive involves a few key steps:
- Choose an open SATA port on the motherboard – Most motherboards have at least 4 SATA ports, often labeled SATA1, SATA2, etc. Choose an unused port that doesn’t already have a drive connected.
- Attach one end of the SATA cable to the drive – SATA cables have a small L-shaped connector on each end. Attach one to the back of the hard drive, matching the L shape and angle of the SATA port on the drive.
- Plug the other end of the SATA cable into the motherboard port – Take the other end of the SATA data cable and plug it into the open SATA port on your motherboard you chose in step 1.
- Attach power from the PSU to the drive – Hard drives need power from the computer’s PSU. Use a spare power cable that will fit the drive. This is often a 15-pin SATA power connector.
- Mount the hard drive into the case – Place the drive in the desired bay and use screws to mount it securely.
- Boot up computer and find the drive – Turn your computer back on. If the drive is brand new, you may need to partition and format it before it’ll show up.
And that’s it! Those are the basic steps to hook up any SATA hard drive or SSD to your desktop PC. The process is very similar for installing a drive in a laptop. The key things to remember are finding an open SATA port, using the proper SATA data and power cables for your specific drive, and booting back up to find the drive in your system.
Choosing the Right SATA Cables
When connecting a SATA device like a hard drive or SSD, you need two types of cables:
- SATA Data Cable – This skinny cable carries all data between the drive and motherboard. They have a small L-shaped SATA connector on each end.
- SATA Power Cable – Wider cable that draws power from the PSU to the drive itself. Usually a 15-pin connector.
The SATA data cable is fairly straightforward. Any SATA cable should work for any drive or motherboard SATA port. However, there are a few things to watch for when selecting a SATA power cable:
- Number of connectors – Cables often have more than 1 power connector to drive multiple devices.
- Cable length – Longer cables are important for larger cases.
- Angled connectors – Helpful when installing drives in tight spaces.
- SATA power pinout – Some devices need the old 15-pin layout versus the newer 15-pin version.
For most basic hard drive installations, an inexpensive SATA data cable and SATA power cable with multiple connectors will get the job done just fine. Try to get 6 inch to 1 foot length cables if possible. If connecting drives in a smaller form factor PC, angled connectors or low profile cables can help everything fit.
Example SATA Cables for Hard Drive Connections
| Cable Name | Description |
| Monoprice 18-Inch SATA III Cable | Affordable 18 inch SATA 6Gbps cable |
| Cable Matters 3 Pack 90 Degree SATA III Cable | Right angle SATA cable for tight fits |
| StarTech 15-inch SATA Power Splitter Cable | One SATA power input to two drive outputs |
As you can see, there are lots of options for SATA data and power cables. Focus on getting quality cables that are long enough for your case size and have the type of connectors you need.
Installing a Hard Drive on a Desktop PC
Desktop computers provide an easy installation process for adding more internal SATA hard drives. Here is a step-by-step guide to installing a new drive into a typical desktop PC tower:
- Open the case – Unscrew and remove the side panel to gain internal access.
- Locate open drive bays – Look for open 3.5″ or 2.5″ drive bays depending on your drive type.
- Secure the hard drive – Place the drive in the bay and use screws to mount it securely.
- Attach SATA cables – Plug one end of the SATA data cable into the drive and connect the other end to an open SATA port on motherboard.
- Attach SATA power – Use a spare SATA power connector from the PSU to power the drive.
- Replace case panel – Securely screw the case side panel back on.
- Boot PC and find drive – Start up the computer. Make the drive usable by partitioning and formatting it as needed.
The process involves locating an available drive bay, physically mounting the hard drive, then connecting the necessary SATA cables to integrate it with the rest of the system components. Most desktop cases make installing additional hard drives very straightforward. Just be gentle when handling the drive itself and make all connections firmly and securely.
Installation Tips
Here are some helpful tips when installing SATA hard drives into a desktop computer case:
- Handle hard drives carefully by the edges and don’t jolt or drop them.
- Use the screws or rails included with the case or drive for proper mounting.
- Keep all SATA connections snug and secure but don’t overtighten.
- Use cable ties or loops to improve airflow and reduce clutter.
- Place drives in lower bays first if space is limited.
Following basic installation best practices will ensure your new drive gets connected cleanly and properly within your PC case. Just take your time and be careful with each step.
Installing a Hard Drive on a Laptop
For laptops, the installation process for an additional internal SATA hard drive involves fairly similar steps to a desktop. However, working within a compact laptop chassis presents some added challenges. Here is a general procedure:
- Remove bottom cover – Unscrew and take off the removable bottom panel or cover.
- Locate HDD bay – Find the open 2.5″ drive bay, often near other installed drives.
- Insert drive into caddy – Place the 2.5″ drive into a laptop hard drive caddy or enclosure.
- Secure caddy into bay – Insert the caddy into the open bay and fasten it with screws.
- Attach SATA cable – Connect the SATA data cable to the drive and an open motherboard port.
- Replace bottom cover – Put the bottom cover back on and screw it back into place.
- Boot up and find drive – Start up laptop again. Partition and format the new drive as needed.
The standard SATA data and power cables are smaller to fit within a laptop’s cramped internals. And you often need to remove the bottom cover rather than side panel. But otherwise connecting up a new hard drive follows very similar steps versus a desktop PC. Just be extra cautious working inside a laptop since components are tightly packed together.
Tips for Laptop Hard Drive Installation
Some best practices when installing or replacing a hard drive in a laptop:
- Use the correct small form factor drive for your laptop’s bay size.
- Always use a caddy/enclosure designed for the specific laptop model.
- Follow manufacturer’s instructions closely for that laptop.
- Check connectors carefully so you don’t damage existing cables.
- Take pictures before removing old drive as reference.
- Be extremely gentle and don’t force components.
Working inside a cramped laptop leaves very little margin for error. Go slowly and be cautious not to use force when handling small pins and connectors. Following details in the laptop’s service manual can provide model-specific guidance.
Initializing and Formatting a New Hard Drive
After you complete the physical connections, you still have a couple steps before a brand new internal SATA hard drive can be used for data storage on your computer:
Initializing the Drive
Initializing prepares a new blank hard drive to be used by your operating system of choice, such as Windows or MacOS. It writes boot data and partitioning information to the drive.
To initialize a drive:
- Open Disk Management in Windows or Disk Utility on Mac
- Find the new drive and right click on it
- Choose “Initialize Disk”
- Select the partitioning scheme (GPT recommended for most users)
This will take a completely blank slate and initialize it as an unallocated disk volume ready for formatting and usage.
Formatting the Volume
After initializing the disk, you then need to format the volume to create a usable file system:
- Right-click the Volume and choose “New Simple Volume”
- Walk through the formatter prompts:
- Specify volume size
- Assign drive letter
- Choose file system (NTFS is default for Windows)
- Give the volume a name
- Click “Finish” to format volume
Once formatting is complete, the new hard drive will now appear as normal usable storage space available within your operating system. After that, you can start copying over files and programs to make use of that new space.
Using an External SATA Drive
So far we’ve focused on internal hard drives installed within a desktop or laptop computer itself. But you can also use external enclosures and adapters to connect your SATA drives via USB, eSATA, Thunderbolt or other external interfaces. Here are some examples:
External Hard Drive Enclosures
- Converts internal SATA drive to external USB hard drive
- 2.5″ and 3.5″ enclosures available
- Plug & play usage after connecting enclosure to PC
- Provides portable and flexible storage
USB to SATA Adapters
- Connect internal SATA drives externally via USB
- Great for data transfer or drive imaging
- Typically found in USB 3.0 versions
- Requires external power source for desktop drives
SATA to eSATA Adapters
- Allows external connection through eSATA interface
- Supports hot swapping compatible drives
- Provides similar performance to native internal SATA
- Need eSATA port on computer or must add adapter card
There are lots of ways to repurpose old SATA hard drives or access data on internal drives without opening up your computer. External drive enclosures are the most common and convenient method. But USB and eSATA adapters serve other useful purposes as well.
Troubleshooting Hard Drive Connection Issues
After going through the steps to install a new SATA hard drive, you hopefully won’t run into any issues. But if you do see any problems getting your drive properly recognized and accessible, here are some troubleshooting tips:
Drive Not Detected in BIOS or OS
If your PC isn’t recognizing the newly connected hard drive, try these steps:
- Confirm all cables are firmly connected to the drive and motherboard.
- Try a different SATA cable and port.
- Check that the power supply cable is connected.
- Ensure the drive is compatible with your motherboard’s BIOS.
- Try the drive in an external enclosure to see if it’s recognized.
Unable to Access Drive
If you see the drive but receive errors trying to access it, try:
- Verifying the drive has been partitioned and formatted.
- Checking for drive errors within Disk Management.
- Resetting or reassigning the drive letter.
- Updating storage drivers in Device Manager.
- Testing the drive on another computer.
Slow Drive Performance
For unexpectedly slow speeds from your connected hard drive, check:
- Using a SATA 3 cable and port for a SATA 3 drive.
- Older drives may be limited to lower SATA speeds.
- Defragmenting the drive if it is very full.
- Disabling indexing if the OS drive is nearly full.
- Updating BIOS, chipset, and storage drivers.
These tips should help isolate and troubleshoot any common problems getting your SATA hard drive properly up and running after connection. Most issues stem from loose connections, driver conflicts, or faulty hardware.
Conclusion
We’ve stepped through the full process for connecting Serial ATA hard drives to desktop PCs and laptops. While SATA technology may seem complex, actual physical installation comes down to just a few key steps:
- Choosing an open SATA port on the motherboard
- Attaching the SATA data and power cables
- Mounting the hard drive securely in the case
- Powering back up to initialize and format the drive
The same general procedure applies whether you are installing a fresh new hard drive or connecting an old one from another system. And external enclosures provide plenty of options for connecting drives externally via USB, eSATA or other interfaces.
Just remember to always handle drives gently, make firm cable connections, and follow any model-specific installation instructions. With those tips in mind, you should have no problems getting those SATA cables hooked up and a new drive added to your desktop or laptop.