The BIOS (Basic Input/Output System) is firmware stored on the motherboard that initializes and tests the system hardware components and loads the operating system when you turn on your computer. It provides an interface to configure low-level system settings and perform diagnostic tests on devices like the CPU, RAM, hard drives, etc.
Accessing the BIOS setup utility allows you to view information about connected storage devices like hard disks and run tests to check for issues or failures. This makes the BIOS a useful tool for diagnosing hardware problems, especially with internal devices like hard drives that are otherwise difficult to examine directly once the operating system has loaded.
Accessing BIOS
BIOS stands for Basic Input Output System and is the firmware interface that connects a computer’s hardware components with the operating system. To access BIOS at startup on most PCs, you need to press a specific key just after turning on the computer and before the operating system loads. The key varies between computer manufacturers, with common options being F2, F10, F12, Delete, or Esc.
For example, on many Dell desktops and laptops you can enter BIOS by pressing F2 repeatedly after powering on the machine [1]. Lenovo ThinkPad laptops generally use F1 or Enter to open the UEFI BIOS menu at bootup [2]. Whereas on an HP desktop, tapping F10 during startup will get you into BIOS [3].
The key to press usually flashes briefly on the boot screen. If not, check your computer’s manual or support site to find the proper key combination. Repeatedly tapping the key as the computer starts is often required. Note that some computers require you to tap the key before displaying video output, so beginning as soon as power is pressed can help.
Navigating BIOS
BIOS menus are navigated using the keyboard, as the mouse does not work in this pre-boot environment. The most common keys used are the arrow keys, Enter key, Esc key, and sometimes the F1-F12 function keys.
Use the left and right arrow keys to move between different menu options horizontally. The up and down arrows move vertically between different menu options or settings. Press Enter to select a menu option or confirm a setting change. The Esc key will often take you back to the previous menu.
The F1 key is commonly used to open the integrated help documentation within the BIOS. The F9 key will reset BIOS settings to default, while F10 saves changes and exits the BIOS. Other function keys may have specific uses depending on the system manufacturer.
Navigating BIOS can be cumbersome due to the reliance on arrow keys. If a keyboard has faulty keys, an external USB keyboard may be needed to properly navigate the BIOS. Some manufacturers provide alternative ways to navigate if the arrow keys don’t function, such as using keys like Insert and Delete to move horizontally in place of left/right arrows.
Overall, the key to navigating BIOS is understanding that arrow keys move between menus and selections, Enter confirms choices, and Esc goes back. Checking the motherboard manual can provide details on any special keys used for that manufacturer’s BIOS.
Viewing Hard Disk Information
To view information about the hard disk connected to your computer in BIOS, you first need to access the BIOS setup utility during boot. On most computers, you can access BIOS by pressing the F2, F10, Del or Esc key during the initial boot process.
Once in BIOS, navigate to the main menu and look for options related to “System Information”, “System Configuration” or “Integrated Peripherals”. There should be a sub-menu or screen dedicated to storage devices or hard disks.
On this screen, you will find details about the make, model, capacity, firmware version, interface type (SATA, IDE, etc.) and sometimes the SMART status of your hard drive. The layout and terminlogy may vary between computer manufacturers, but the key hard disk details are normally available.
For example, on a Dell Inspiron you may see the hard drive listed under “System Information” > “Primary Hard Drive”. A Lenovo ThinkPad displays the hard disk under “Config” > “Storage”. Refer to your computer or motherboard manual for the exact location of hard disk info in BIOS.
SMART Status
SMART (Self-Monitoring, Analysis and Reporting Technology) is a monitoring system that tracks indicators of drive reliability and predicts potential hard disk failures. The SMART status can be checked in BIOS to get insights into the health of the hard drive.
To view the SMART status in BIOS:
- Restart your computer and enter BIOS setup by pressing the BIOS key (F2, F10, Del etc.) during boot.
- Navigate to the “Smart Information” or “HDD SMART Status” section in BIOS.
- The SMART status will be displayed as “Enabled” or “Disabled”. Enabled means SMART monitoring is active.
- If available, view the “SMART Health Status” which indicates the drive condition as “OK”, “Caution” or “Failure Imminent”.
An “OK” SMART status means the drive is in good condition as per the SMART attributes monitoring. A “Caution” status indicates some attributes are outside normal range and potential drive failure is predicted by SMART.[1] A “Failure Imminent” status means immediate drive replacement is recommended.
While an “OK” SMART status is reassuring, some types of hard disk problems like bad sectors or logical issues will not be detected by SMART. So SMART status should not be the only indicator for drive health.[2]
Error Checks
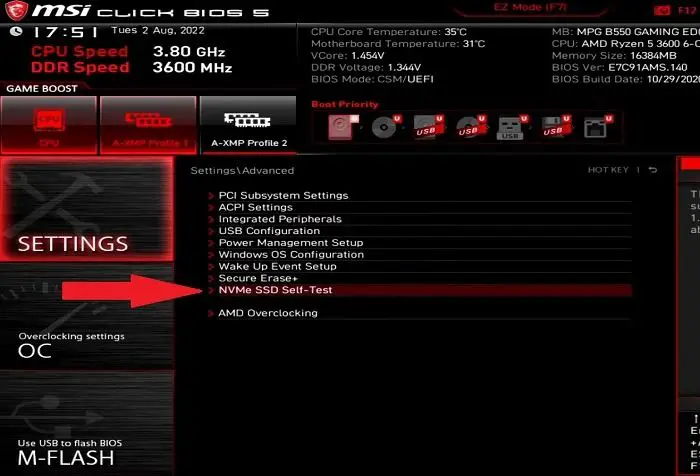
Most BIOS have built-in utilities to check the hard drive for errors and bad sectors. This allows you to run diagnostics on the hard drive without booting into the operating system. Here are some common error checking options in BIOS:
Run a Short Drive Self Test – This performs a quick scan of the hard drive to identify any errors. It usually takes just a few minutes to complete.
Run an Extended Drive Self Test – This is a more comprehensive test that scans every sector on the hard drive to identify any bad sectors. It can take over an hour to complete depending on the drive size.
View SMART Status – The SMART (Self-Monitoring, Analysis and Reporting Technology) system monitors drive attributes like reallocated sectors, spin retries, etc. Checking SMART status in BIOS will show if any thresholds have been exceeded.
Run Check Disk – Some BIOS allow you to initiate a check disk (chkdsk in Windows) from the BIOS menu before booting into Windows. This scans the drive and repairs logical file system errors.
Using these built-in utilities is a convenient way to check drive health from BIOS. However, for more advanced diagnostics, you may need to use the disk manufacturer’s dedicated tool.
Benchmarking
The BIOS includes built-in benchmarking and testing tools to analyze hard drive performance. One common tool is SMART (Self-Monitoring, Analysis and Reporting Technology), which monitors different drive attributes like read error rate, spin-up time, and overall drive health (HP Support). Enabling SMART in BIOS will show various drive metrics and allow you to run SMART self-tests like short drive self tests or extended comprehensive tests. This helps identify any issues or underperforming drives.
In addition to SMART, some BIOS also include proprietary benchmark tests to measure transfer speeds and access times. These give a general performance rating that can be compared against ratings for other drives. While limited compared to benchmarks in operating systems, built-in BIOS tools provide a quick way to get high-level insights without needing to boot into the OS. Just note that different manufacturers may use different benchmarking methodologies, so use caution when comparing drives across different systems.
Advanced Diagnostics
Some BIOSes offer more advanced diagnostic tools to troubleshoot hard drive issues. These may include options like:
- Drive self-tests – Runs comprehensive checks of read/write functionality.
- SMART extended self-tests – Tests components like electrical and mechanical performance.
- Benchmarking – Provides performance metrics to compare against baselines.
- Repair tools – Attempts to fix and recover bad sectors or file system errors.
For example, on Dell computers you can run the Dell Hard Drive Diagnostics from within the BIOS by going to the “Advanced” tab, “Service” section, and selecting “Dell Hard Drive Diagnostics.” This will launch a tool to assess drive health and run repairs (Dell Support).
While the BIOS diagnostics provide basic to intermediate testing, third-party disk tools often offer more advanced options. If the BIOS tools are insufficient, booting from a disk utility ISO image may be necessary for comprehensive diagnostics.
Limitations
Using the BIOS for hard disk diagnostics has some inherent limitations. The BIOS is stored on the motherboard in read-only memory (ROM) and has limited capacity. As a result, the diagnostic tools available in the BIOS are basic and may not detect all potential hard disk issues.
Some key limitations include:
- Limited testing capabilities – The BIOS can typically only do basic read/write tests and SMART status checks. More advanced diagnostics require third-party tools.
- No support for newer technologies – The BIOS may lack support for newer hard drive types like SSDs or NVMe drives. UEFI offers improved support.
- Difficulty updating – Since the BIOS is stored in ROM, updates require flashing the firmware which can be complex. This makes it hard to add new diagnostic features.
- Lack of detailed reporting – BIOS diagnostics provide limited feedback on issues detected.
Due to these constraints, the BIOS should not be relied on as the sole tool for diagnosing hard disk health. While useful for basic checks, third-party diagnostics tools are often needed for more thorough testing and detailed reporting.
When to Use Third-Party Tools
While BIOS and Windows already provide basic hard disk diagnostics, there are times when you may need to use more advanced third-party disk diagnostic tools for more comprehensive testing and troubleshooting:
If you suspect there are bad sectors or physical defects on the hard drive that the built-in tools did not detect, programs like HDDScan and SeaTools allow you to do more in-depth surface scans and repairs.
When you need to test the drive thoroughly before deployment or sale, tools like HD Sentinel provide benchmarking, temperature monitoring, and predictive failure analysis.
If you want to periodically check the health status of your drive or be alerted about imminent failure, advanced tools like GSmartControl give you more control and customization for scheduling tests and health monitoring.
When troubleshooting performance issues, using a specialized tool like CrystalDiskMark helps measure read/write speeds to identify bottlenecks.
In summary, while BIOS and Windows provide basic hard drive diagnostics, using third-party tools is recommended for more advanced testing, benchmarking, monitoring, and repairs.
