What is an SSD?
An SSD, or solid-state drive, is a type of computer storage device that uses flash memory to store data, rather than spinning platters like a traditional hard disk drive (HDD). SSDs have much faster read and write speeds compared to HDDs, making them ideal for improved system performance. Enabling your SSD in Windows 10 will allow you to take full advantage of its speed boost.
Why should I enable my SSD in Windows 10?
There are a few key reasons why you’ll want to make sure your SSD is enabled and optimized in Windows 10:
- Faster boot times – With an SSD, Windows can load files instantly for a much quicker boot process.
- Faster load times – Applications and files stored on the SSD will open much more quickly.
- Better performance – Enabling SSD optimizations will allow your system to fully leverage the SSD’s fast speeds.
- Longer SSD lifespan – Optimizing settings like TRIM can help maintain your SSD’s health and performance over time.
Overall, enabling your SSD will make your Windows 10 experience much snappier and responsive. The optimizations allow Windows to fully take advantage of the SSD’s strengths.
Checking if your SSD is detected in Windows 10
Before optimizing your SSD, you’ll first want to check that Windows 10 has detected it properly. Here’s how:
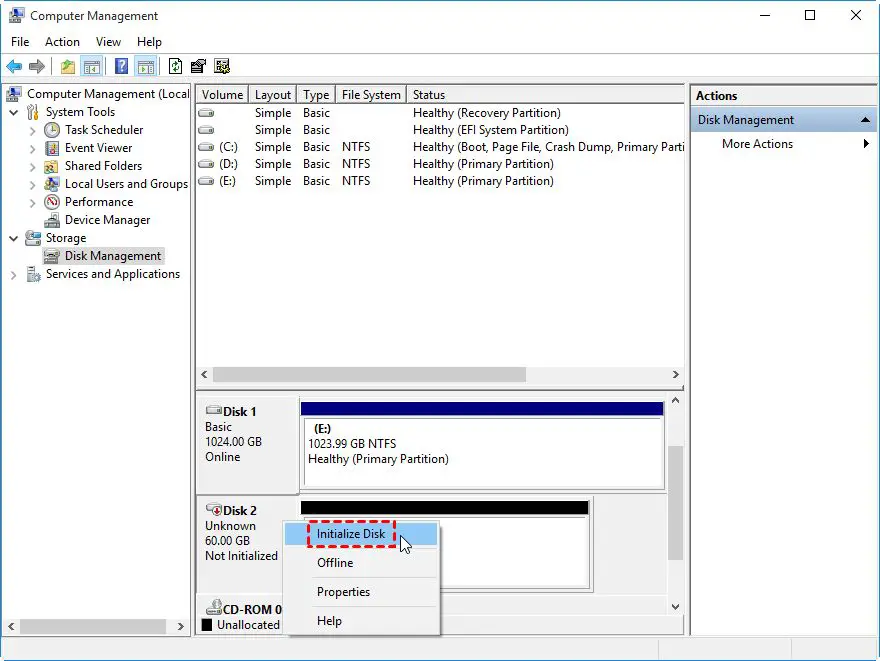
- Open the Start menu and type “Disk Management.”
- Click on the Create and Format Hard Disk Partitions option.
- This will open the Disk Management tool.
- Here you should see all connected disk drives listed.
- SSDs will be labeled as “Solid state drive” under the Disk label.
- If you see your SSD listed here, then Windows has detected it.
If your SSD is not showing up here, you may need to check your connections or refer to your motherboard manual for proper SSD configuration and detection. The SSD will need to be detected before optimizing it further.
Enabling AHCI mode
To fully optimize an SSD, you should enable AHCI mode in Windows 10. AHCI stands for Advanced Host Controller Interface, and is the recommended storage driver mode for SSDs.
Here is how to enable AHCI:
- Type “msconfig” into the Windows search bar and open the System Configuration utility.
- Go to the Boot tab and click on Advanced options.
- Check the box next to “AHCI.”
- Click OK to save the changes.
- Restart your computer for AHCI mode to take effect.
Enabling AHCI will allow features like hot swapping and native command queuing to work with your SSD. For optimal performance, make sure AHCI mode is on.
Enable TRIM in Windows 10
TRIM is an essential command for SSD optimization that helps maintain speed and lifespan. What TRIM does is notify the SSD which blocks of data are no longer in use and can be wiped internally. This prevents unused data from continuing to take up capacity.
To enable TRIM for your SSD in Windows 10:
- Type “defragmentation” into the Windows search bar.
- Click on “Change settings” under the Optimize Drives section.
- In the Optimize Drives window, locate your SSD under the list.
- Make sure the box next to “Turn on automatic optimization for all drives” is checked.
- If it isn’t checked, check it and click OK.
With those steps complete, TRIM will now run automatically on a weekly basis to keep your SSD optimized. The TRIM command will help maintain fast speeds and maximize usable capacity.
Enable Write Caching
Another important SSD optimization is enabling write caching. Write caching allows data writes to be temporarily stored in the SSD’s cache before transferring to long-term storage. This helps boost write speeds.
To enable write caching:
- Go back to the Disk Management utility.
- Right click on your SSD and choose Properties.
- Go to the Policies tab.
- Check the box next to “Enable write caching on the disk.”
- Click OK to apply the change.
With write caching enabled, Windows can optimize how data is written to maintain maximum SSD performance. Just make sure to avoid removing the SSD before safely ejecting to prevent data loss.
Update your SSD firmware
Keeping your SSD firmware updated is also recommended for full compatibility and performance. SSD makers will periodically release firmware updates that apply bug fixes or speed enhancements.
To update firmware:
- Go to the support page for your specific SSD model.
- Check if any firmware updates are available for download.
- Download and run the company’s SSD update software/utility.
- Follow the directions to install new firmware onto the SSD.
Updating to the latest firmware code can help unlock performance improvements or fix compatibility issues with Windows 10 updates. Always check the SSD maker’s website for any available updates.
Disable Superfetch and Prefetch
Superfetch and Prefetch are two Windows services that aim to speed up boot times and application launches by preloading commonly used data into memory. These are less beneficial for SSDs though and may even overhead.
To disable Superfetch and Prefetch:
- Open the Start menu and search for “services.”
- Open the Services app.
- Scroll down and open the Properties for Superfetch.
- From the Startup type dropdown, choose Disabled.
- Click Stop to stop the service.
- Repeat the process for Prefetch to disable it as well.
- Restart your computer for the changes to fully take effect.
With Superfetch and Prefetch disabled, Windows will reduce unnecessary read and write operations from running on your SSD. This can eliminate overhead and give a slight performance boost.
Disable Indexing
Indexing is another Windows service that can impact SSD performance. The index process maintains a database of system files to help speed up searches. Like with Superfetch, indexing is less useful for SSDs.
Here is how to disable indexing:
- Open File Explorer and click on “This PC” in the left pane.
- Select the C: drive.
- In the top menu ribbon, click on the Manage tab.
- Click on Change indexed locations.
- Uncheck C: drive and click OK to stop indexing your system drive.
With indexing disabled for the primary SSD, Windows will do less background management leading to reduced overhead. Searches may take slightly longer however.
Enable Disk Write Caching
For AHCI SSDs, enabling disk write caching can further optimize performance. Write caching allows the disk controller to accumulate write commands before dumping to the SSD in batches.
To enable disk write caching:
- Go back to the Device Manager utility.
- Expand the Disk drives category.
- Right click on your SSD drive and select Properties.
- Go to the Policies tab.
- Check the box next to Enable write caching on the device.
- Click OK to save the change.
Always safely eject the SSD before removing after enabling write caching to avoid any data loss. With caching enabled, write speeds will increase for most workloads.
Enable NTFS Compression
Compressing files with NTFS typically produces minimal gains for SSDs. But enabling compression on folders containing items like pictures, videos, documents, and music can optimize space while minimizing any performance impact.
Here’s how to enable NTFS compression:
- Open File Explorer and navigate to the desired folder.
- Right click on the folder and select Properties.
- Click Advanced and check the box next to Compress contents to save disk space.
- Click OK to apply compression to the folder.
NTFS compression works best for rarely modified folders that have compressible contents. This can help save storage space while having negligible effects on SSD responsiveness.
Set Power Plan to High Performance
Windows includes various power saving modes under its power plan settings. For optimal SSD speeds though, you’ll want to switch to high performance mode instead.
Here’s how to select high performance power:
- Type “power plan” into the Windows search box.
- Click on Power & sleep settings.
- Click Additional power settings.
- Under Selected plan, choose High performance.
- Click OK to activate the high performance power plan.
This will disable any disk power saving states and keep the SSD running in an active high performance mode at all times when plugged in.
Disable Hibernation
Hibernation saves the contents of your RAM to the C: drive upon shutting down. Since SSDs boot so fast, hibernation has limited usefulness and takes up drive space.
To disable hibernation:
- Open an admin Command Prompt window.
- Run command: powercfg -h off
- Now hibernation mode will be disabled.
With hibernation disabled, your SSD will have more usable space available to it. For quick boots, it’s better to do a full restart rather than resume from hibernation on SSDs.
Disable Virtual Memory
Virtual memory uses hard drive space as temporary memory when RAM fills up. This can impact SSD write cycles and performance. If you have sufficient RAM, disabling virtual memory may optimize speed.
To disable virtual memory:
- Open System > Advanced System Settings
- Under Performance, click Settings.
- Go to the Advanced tab and click Change under Virtual Memory.
- Uncheck Automatically manage paging file size for all drives.
- Set both initial and maximum page file size to 0 MB.
- Click Set and then OK, and restart your PC.
Without virtual memory, Windows will be limited to available physical RAM. Make sure you have at least 4 GB before disabling.
Update SSD Drivers
Periodically checking for updated SSD driver software can also provide performance improvements. Updated drivers allow the SSD to fully support the latest Windows 10 releases.
To update SSD drivers:
- Open Device Manager.
- Expand Disk drives and right-click your SSD.
- Select Update driver.
- Click Search automatically for updated driver software if available.
- Restart your PC after the SSD driver update completes.
Always keep your SSD drivers fully up-to-date for Windows compatibility and optimal speeds. Check back after major Windows updates.
Realign SSD Partitions
If your SSD partitions become misaligned over time, it can degrade read/write performance due to unnecessary overhead. Realigning the partitions can fix SSD optimization issues.
To realign partitions:
- Open Command Prompt as admin and run: diskpart
- Type list disk and identify your SSD’s disk number.
- Select this disk via: select disk X (replace X with your disk number)
- Type: clean
- Convert to GPT: convert gpt
- Create new primary partition: create partition primary
- Format the partition: format fs=ntfs quick
- Assign the letter: assign
- Exit diskpart
This will completely realign your SSD partitions, fixing any issues. Just be sure to backup data first before realigning.
Securely Erase SSD Before Disposal
Before disposing of or selling an old SSD, you’ll want to perform a secure erase of the contents. Simply deleting files or formatting won’t be enough to prevent recovery of your private data.
To securely ATA erase an SSD:
- Type cmd into the Windows search box.
- Right-click Command Prompt and Run as Administrator.
- Enter command: diskpart
- Type: list disk and identify your SSD disk number.
- Select the SSD via: select disk X (replace X with disk number)
- Run command: clean
- Exit diskpart
This will perform a full disk overwrite erasing all data. The SSD can now be safely disposed/sold without data security risks.
Conclusion
Optimizing your SSD is crucial to get the full performance benefits in Windows 10. By enabling AHCI mode, TRIM, write caching and other options, your SSD will run faster and last longer. Keep drivers and firmware updated as well. Follow this guide’s steps to make sure your SSD reaches its true potential.
