Formatting or erasing the built-in startup disk on a Mac clears all data and restores the disk to its factory settings. This process removes all files, applications, and the existing macOS installation. Formatting is commonly performed in order to:
- Resolve performance issues caused by a bloated drive filled with unused files.
- Wipe a Mac before selling it to erase personal data.
- Install a fresh copy of macOS to fix software issues.
- Reset a Mac to its original state.
Before formatting, it’s critical to back up any files you want to keep. The process will permanently erase everything on the startup disk. Once completed, you’ll need to reinstall macOS to use the Mac again.
Back Up Your Data
Before erasing your Mac’s startup disk, it is absolutely crucial that you back up your data. As Tim King of Solutions Review wrote, “The single most important thing you can do to prevent data loss is to back up your data regularly.” https://solutionsreview.com/backup-disaster-recovery/world-backup-day-quotes/. Once you erase the startup disk, all data will be permanently deleted and non-recoverable. So make sure to copy all important files, photos, documents and other data to an external hard drive or cloud storage before proceeding.
Backing up beforehand avoids the risk of losing precious memories and information. Rasmussen University recommends, “Before erasing your startup disk, backup all your files to iCloud, an external hard drive or USB flash drive.” https://rasmussen.libanswers.com/faq/32524. Be sure to double check that the backup was successful before erasing the disk. Taking this preventative step will give you peace of mind that your data is safe.
Check Compatibility
Before erasing the startup disk, you’ll want to make sure your Mac is compatible with this process. Only Intel-based Macs allow erasing the built-in startup disk. To check if your Mac has an Intel chip:
1. Click on the Apple menu and select About This Mac.
2. In the Overview tab, look for the “Processor” or “Chip” section.
3. If it says “Intel Core i3”, “Intel Core i5”, “Intel Core i7”, or any other Intel chip name, your Mac is compatible.
The following Mac models have Intel chips and are compatible with erasing the built-in startup disk:
- MacBook (Early 2015 or newer)
- MacBook Air (Mid 2012 or newer)
- MacBook Pro (Mid 2012 or newer)
- Mac mini (Late 2012 or newer)
- iMac (Late 2012 or newer)
- iMac Pro (All models)
If your Mac is not listed above or does not have an Intel chip, you will not be able to erase the built-in startup disk. You would need an external bootable disk instead.
Prepare for Erase
Before erasing your Mac’s startup disk, it’s important to properly prepare your computer.
First, make sure to shut down your Mac completely. Go to the Apple menu and select Shut Down. Wait for the computer to power off fully.
Next, you’ll need to boot your Mac into Recovery Mode. To do this, turn on your Mac and immediately press and hold Command-R. Keep holding the keys down until you see the Apple logo or a spinning globe. This will boot your Mac into Recovery Mode.
Once in Recovery Mode, you’ll see a window with different options for utilities. This mode allows you to erase your startup disk before reinstalling macOS. [1]
With your Mac powered on in Recovery Mode, you are now ready to use Disk Utility to erase the startup disk.
Launch Disk Utility
To launch Disk Utility on a Mac:
1. Restart your Mac and hold down the Command and R keys simultaneously after you hear the startup chime. This will boot your Mac into macOS Recovery.
2. When the macOS Utilities window appears, select Disk Utility from the options.
3. Disk Utility will open. You can also find Disk Utility in the Applications > Utilities folder when booted normally into macOS.
Disk Utility allows you to manage internal and external drives on your Mac. With it, you can erase, format, partition, and repair disks.
Select Startup Disk
To erase the startup disk on your Mac, you first need to identify which internal disk you want to erase. The startup disk is usually named “Macintosh HD” and will have the macOS system files installed on it.
According to Apple Support, you can identify the current startup disk by going to Apple Menu > System Preferences > Startup Disk. The disk shown under “System” is the current startup disk.
If you have multiple internal disks, you may need to reboot your Mac and hold down the Option key during startup to view all available startup disks. The disk you want to erase should be labeled “Macintosh HD.” Do not select disks with names like “Recovery” or “VM” as these are not the main system disk.
Once you have identified the correct internal “Macintosh HD” disk to erase, make note of its name or drive identifier so you can select it in the next step using Disk Utility.
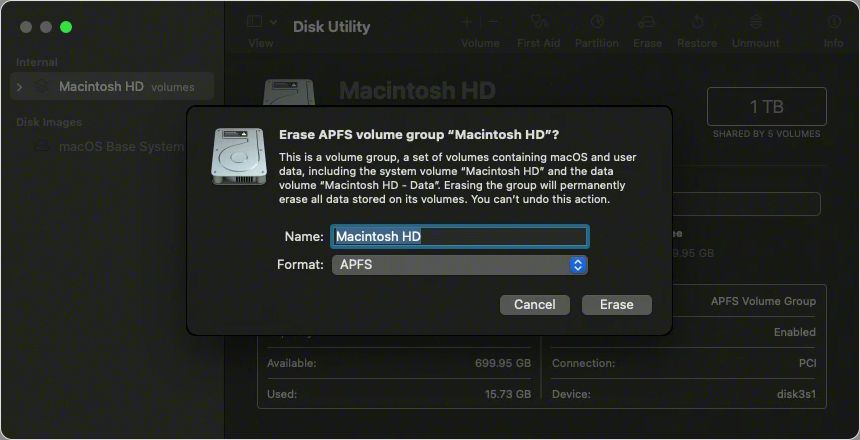
Erase Disk
To erase the disk in Disk Utility:
- In the sidebar, select the disk drive that you want to erase, which is typically named “Macintosh HD.” This is the built-in startup disk.
- Click the “Erase” button at the top of the Disk Utility window. Don’t erase the volume named Macintosh HD – Data, just Macintosh HD.
- Enter a name for the disk. This will be the new name of your startup disk.
- Select a format for the disk. For most uses, choose “APFS.” Older versions of macOS may need “Mac OS Extended (Journaled).”
- Click the “Erase” button at the bottom of the window. This will permanently erase all data on the startup disk.
- Disk Utility will ask you to confirm erasing the disk. Click “Erase” again.
- The process may take several minutes depending on the size of your disk. Once completed, the disk will be erased and formatted under the new name.
After erasing, you can proceed to reinstalling macOS on the fresh empty disk. Erasing the disk ensures you start with a clean slate.
Format Disk
After erasing the disk, you’ll need to choose a format for the empty drive. The two main options are APFS (Apple File System) and Mac OS Extended (HFS+). APFS is the newer file system introduced in macOS High Sierra in 2017. It includes features like strong encryption, space sharing, fast directory sizing, and improved file system fundamentals. APFS is recommended for all Macs with solid state drives (SSD) and for Macs running High Sierra or later.
Mac OS Extended is an older but compatible format optimized for hard disk drives (HDD). It supports Time Machine backups and works with older versions of macOS prior to High Sierra. Mac OS Extended is a reliable option if you need full compatibility with older Macs or boot drives. But for most uses today, APFS is best.
To choose a format in Disk Utility, click the drive, click Erase, select the desired format (typically APFS), give the drive a name, then click Erase. This will format the empty drive.
Exit Disk Utility
After successfully erasing the startup disk, the last step is to exit Disk Utility. This will close the app and return you to the macOS utilities screen or your desktop, depending on where you initially launched Disk Utility.
To exit Disk Utility on a Mac:
- Click the Disk Utility menu in the upper left corner
- Select “Quit Disk Utility” from the dropdown menu
Disk Utility will close immediately. If you launched it from the macOS Utilities screen, you will be returned there. If you launched Disk Utility from your desktop or Applications folder, you will go back to the Finder.
Once you have exited Disk Utility, you can proceed to reinstalling macOS if you erased your startup disk, or resume using your Mac as normal.
For more information, see Apple’s support article on how to quit apps on your Mac.
Reinstall macOS
After erasing the startup disk, you will need to reinstall the macOS operating system. Here are the steps to reinstall macOS:
First, restart your Mac and hold down the Command and R keys simultaneously after you hear the startup chime. This will boot your Mac into macOS Recovery mode.
Next, when the macOS Utilities window appears, select Reinstall macOS from the utilities window and click Continue. Follow the onscreen instructions to reinstall the latest macOS version that was installed on your Mac.
The system will reboot after the installation is complete. You may need to go through some initial setup steps like creating a new admin account. Your Mac now has a fresh install of macOS.
For more details, refer to Apple’s support document on how to reinstall macOS.
