Formatting an external hard drive wipes all existing data and prepares the drive for use with a new file system. This can provide several benefits:
- Fixes errors – Formatting can fix disk errors and bad sectors.
- Changes the file system – Allows you to convert between file systems like FAT32 and NTFS to ensure compatibility.
- Prepare for first use – External hard drives often come formatted with a generic file system that should be formatted before use.
- Erase data – Formatting completely erases all existing data, which can be useful when repurposing or selling a drive.
- Improve performance – A fresh format helps optimize the drive for performance.
This guide will walk through using the command prompt on Windows to completely format an external hard drive.
Prerequisites
Before formatting an external hard drive using Command Prompt, there are a couple prerequisites:
Administrative access to computer – You’ll need an administrator account on the computer in order to access Command Prompt and format drives. Standard user accounts don’t have the necessary permissions.
External hard drive plugged in – The external hard drive you want to format needs to be connected to the computer via USB port before beginning the formatting process. Make sure the drive is recognized by the computer before proceeding.
Back Up Important Data
It’s critical to back up your important files and data before formatting an external hard drive. Formatting will erase everything on the drive, so you’ll lose anything that’s not backed up.
According to Wondershare, “Creating a backup is the necessary step to secure the data before any process of reformatting the device or drive.”
Cited from: https://recoverit.wondershare.com/computer-backup/backup-files-before-reformatting-in-windows.html
There are a few options for backing up your data before formatting:
- Copy files to an external hard drive or USB flash drive
- Back up to cloud storage like Google Drive or Dropbox
- Use backup software to create a system image
The key is to ensure you have copies of all your files in a different location before you format the external hard drive. Otherwise, you risk permanent data loss. It’s better to be safe than sorry when it comes to protecting your important documents, photos, videos and other files.
Open the Command Prompt
To open the Command Prompt in Windows, follow these steps:
On Windows 11 or Windows 10:
- Press the Windows key or click the Windows icon in the taskbar to open the Start menu.
- Type “cmd” in the search box and click on “Command Prompt” in the results.
- The Command Prompt window will open.
Alternatively, you can use these keyboard shortcuts:
- Press Windows key + R to open the Run dialog box. Then type “cmd” and press Enter.
- Press Windows key + X to open the Power User menu and select “Command Prompt”.
- Press Ctrl + Shift + Enter to open Command Prompt with admin privileges.
On older Windows versions like Windows 7:
- Click the Start button or press the Windows key.
- Type “cmd” in the search box and click on “Command Prompt”.
The Command Prompt allows you to enter text-based commands to perform various system tasks like managing files and folders, running programs, and configuring Windows. It’s an essential tool for formatting drives and partitions.
List Available Drives
The next step is to list the available drives in the system using the Diskpart command-line tool. This will show us the drives that are connected to the computer and their basic details.
To list available drives, type the following command and press Enter:
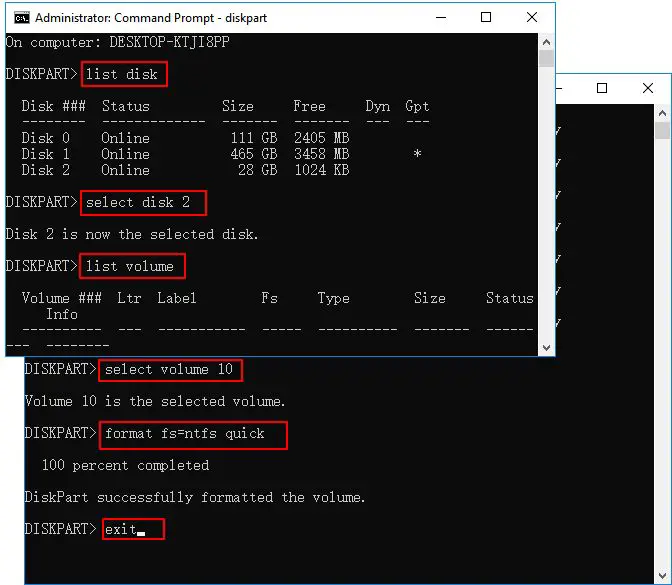
list disk
This will display all the drives connected to your PC along with some information like disk size, disk status, etc. According to Windowschimp, the list disk command in Diskpart shows the basic details of the disks in your system. It is important to note the disk number of the drive you want to format at this stage.
For example, if disk 1 is the external hard drive you want to format, note down disk 1 for the next steps. The list disk command is crucial before running other diskpart commands to understand which disk number belongs to which drive.
Select the Drive to Format
The next step is to select the specific drive you want to format in Diskpart. This is done using the “select disk” command followed by the number of the disk you want to select. To find the disk number, you can use the “list disk” command in Diskpart which will display all available disks and their corresponding numbers.
For example, if you wanted to select disk 1, you would type:
select disk 1
If this command gives you an error like “diskpart failed to select the specified disk”, it usually means the disk is currently mounted and in use by the operating system. You’ll need to unmount the disk partition first before Diskpart can select it.
Overall, the select disk command allows you to specify the target drive to perform further Diskpart operations like cleaning, creating new partitions, and formatting the drive. It’s a required step before formatting a disk with Diskpart. Just be sure to identify the correct disk number to avoid accidentally formatting the wrong drive. For more details, refer to this Diskpart command reference.
Clean the Drive
The clean command in Diskpart wipes the drive by writing zeros to every sector, effectively removing all data and partitions. According to TechTarget, “When you have an entire disk to wipe clean, you can use the diskpart clean command to convert all the stored data into unallocated space.”1 The clean command is very powerful and should be used with caution, as it will permanently erase all data on the drive.
Wondershare notes that “You can use the Diskpart clean command to convert all the stored data into unallocated space when you have a whole disc to wipe clean. By writing zeros to each sector, the data is rendered unrecoverable.”2 Essentially, the clean command overwrites all sectors with zeros, eliminating any chance of recovering data from the drive afterwards.
According to Recoverit, “With the DiskPart Clean command, you can delete all the data within the disk, along with any disk partitions that may be present.”3 So clean will wipe both the data and the partition table, leaving you with a blank slate to create new partitions. It’s a quick and convenient way to completely erase a drive when needed.
Create New Partition
To create a new primary partition on the drive, use the create partition primary command in DISKPART. This will allow you to specify the size of the partition you want to create.
The basic syntax is:
create partition primary [size=size_in_MB]
For example, to create a 100GB partition, you would run:
create partition primary size=102400
You can adjust the size parameter as needed to create a partition of the desired capacity. According to Microsoft’s documentation, “DiskPart marked the current partition as active” will be displayed after running this command to indicate success [1].
Some things to note about create partition primary:
- It will create the partition in the unused space on the drive.
- You must specify a size for the partition in MB.
- There are also options like align=n to adjust partition alignment if needed.
- The drive must be initialized first before creating partitions.
Overall, the create partition primary command allows you to efficiently carve out partitions of any size on a drive from the Windows command line.
Format the Partition
Once you have created a new partition on the external hard drive, the next step is to format it. This will set up the file system so that Windows can read and write data to the drive.
To format the partition, use the “format” command in DiskPart. The basic syntax is:
format fs=ntfs quick
This will format the partition to use the NTFS file system. The “quick” parameter tells it to perform a fast format.
For example:
format fs=ntfs quick
After running this command, DiskPart will format the partition. Once completed, you will be able to store files on the external hard drive.
For more details on the format command, see this reference: https://www.cnblogs.com/wxylog/p/6254992.html
Assign a Drive Letter
The final step is to assign a drive letter to the newly formatted partition so that Windows can access it. This is done using the assign letter command in Diskpart.
To assign a drive letter, type the following command and press Enter:
assign letter=X
Where X is the drive letter you want to assign. Drive letters A and B are usually reserved for floppy drives. You can assign any available letter from C to Z.
According to Diskpart, after assigning the drive letter, the partition will appear in Windows Explorer with that drive letter.
If the letter you selected is already in use, Diskpart will warn you and not assign it. You can run the list volume command again to check which letters are available.
The drive letter assignment in Diskpart is permanent. Even if you remove the drive and reconnect it, it will retain the same letter. To change the drive letter, you will have to use the assign letter command again.
