What is NVMe?
NVMe (Non-Volatile Memory Express) is a high-performance communication standard developed specially for solid state drives (SSDs). It was designed from the ground up to take full advantage of the low latency and internal parallelism of SSDs over a fast PCIe interface.
Compared to the older AHCI protocol used for SATA SSDs, NVMe reduces latency and allows much higher input/output operations per second (IOPS). This results in significantly faster read and write speeds, making NVMe SSDs much better suited for high performance applications.
Whereas SATA SSDs connect via the slower SATA interface and are limited to 600MB/s in SATA III, NVMe SSDs connect via PCIe which has much greater bandwidth. NVMe SSDs can reach sequential read/write speeds over 3500MB/s.
According to TechTarget, NVMe is a logical device interface developed by NVM Express Inc. to capitalize on the benefits of nonvolatile memory in SSDs. The NVMe standard was ratified in 2011 and defines an interface model for PCIe-based SSDs to deliver high bandwidth and low latency storage access.
Benefits of NVMe
NVMe stands for Non-Volatile Memory Express, and it offers several benefits over traditional hard disk drives (HDDs) and solid state drives (SSDs) that connect via SATA:
Faster speeds – NVMe drives communicate directly with the CPU via PCIe lanes, which provides much higher bandwidth than SATA. This enables NVMe SSDs to achieve incredibly fast sequential read/write speeds up to 3,500/3,000 MB/s.[1]
Lower latency – The NVMe protocol helps reduce latency and allows for improved input/output operations per second (IOPS). NVMe SSDs can achieve up to 550,000 IOPS for random reads and up to 90,000 IOPS for random writes.[2]
Higher IOPS – With its parallelism, NVMe drives can support up to 64K queues and 64K commands per queue. This results in higher performance and IOPS.
Lower power consumption – Since data transfer is more efficient with NVMe, it consumes less active and idle power compared to SATA drives. This leads to longer battery life in laptops.
Overall, NVMe storage provides a significant boost to system performance with faster speeds, lower latency, higher IOPS, and lower power draw.
[1] https://www.kingston.com/en/blog/pc-performance/top-reasons-upgrade-nvme-ssd
[2] https://www.netapp.com/data-storage/nvme/what-is-nvme/
Requirements for NVMe
To use NVMe drives, you need an NVMe supported motherboard and NVMe SSD. Most modern motherboards have built-in NVMe support, but you should verify your motherboard specifications to ensure compatibility.
NVMe requires your system to be booted in UEFI mode rather than legacy BIOS mode. You can check this in your motherboard firmware settings. Enabling UEFI mode allows your operating system to recognize NVMe drives at boot time.[1]
On the drive side, you need an M.2 NVMe SSD. These come in various form factors like M.2 2280 or M.2 2242. Ensure your motherboard has an M.2 slot that matches the physical size of your NVMe drive.[2]
It’s also important to check your motherboard manual to determine which M.2 slots support NVMe. Some boards disable SATA ports when NVMe is enabled, so you want to install your NVMe drive in a fully compatible slot.
Accessing Disk Management
To access Disk Management on Windows 10 or 11, first open the Start menu and search for “Create and format hard disk partitions.” Right click on the top result and select “Run as Administrator.” This will launch the Disk Management utility with administrator privileges, which are required to make changes to disks and volumes.
You can also access Disk Management through Control Panel. Open Control Panel, select System and Security, and then under Administrative Tools select Create and format hard disk partitions. Again, be sure to right click and Run as Administrator when launching Disk Management this way.
Disk Management requires admin access in order to initialize disks, create partitions, format volumes, and make other changes. So always be sure to launch it with administrator privileges. Once open, Disk Management provides a graphical overview of all connected storage devices and volumes for managing disks and partitions.
Sources:
Initializing the NVMe Drive
Before the NVMe drive can be used, it needs to be initialized. This is done in Disk Management in Windows.
To initialize the NVMe drive:
- Open Disk Management (press Windows Key and type “diskmgmt.msc” and hit Enter)
- Right click on the unallocated space on the NVMe drive and select “New Simple Volume”
- This will start the New Simple Volume Wizard.
- Follow the prompts in the wizard:
- Specify the size of the volume
- Assign a drive letter
- Select file system (NTFS is recommended)
- Give the volume a name
- Check the quick format box
- Click finish to complete the wizard.
The NVMe drive will now be initialized and show up in File Explorer ready to use. Microsoft Docs has further details on initializing disks in Disk Management.
Creating a New Partition
Once the NVMe drive is initialized, the next step is to create a new partition on it. This will allow you to format the drive and allocate the full storage capacity to a single partition.
To create a new partition, right-click on the unallocated space on the NVMe drive in Disk Management and select “New Simple Volume”. This will launch the New Simple Volume Wizard.
In the wizard, specify the size of the partition, which should be the maximum available size to use the full capacity. Make sure to assign it a drive letter like F: or G: so the drive will be accessible in Windows.
Then, choose the file system. For NVMe drives, the best option is NTFS because it is optimized for SSDs. FAT32 has limitations on maximum file sizes whereas NTFS does not.
Finally, make sure to check “Perform a quick format” and click Next. This will swiftly format the partition without zeroing out data.
Once complete, you will see the new NVMe partition with the assigned drive letter in Disk Management. The drive will be ready to store your data.
For more details, refer to the step-by-step guide on EaseUS.
Formatting the NVMe Drive
Once you have created a new partition on the NVMe drive, the next step is to format it. Formatting prepares the drive to store files by creating a file system.
To format the NVMe drive partition:
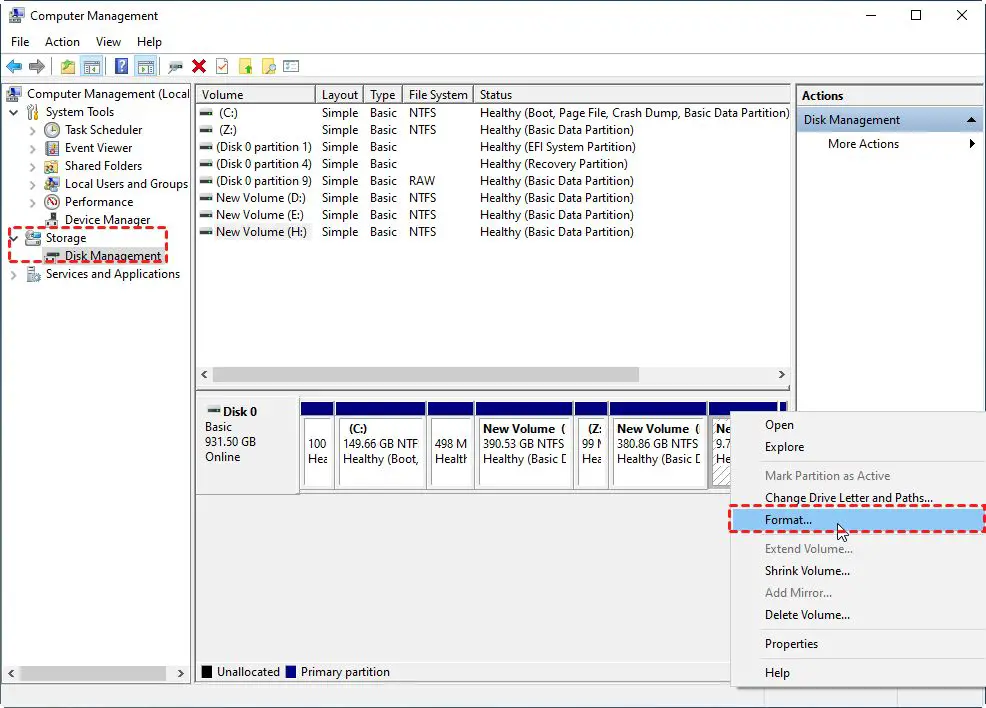
- Right click on the newly created partition in Disk Management.
- Select “Format…” from the context menu.
- In the Format window, accept the default settings. These will format the drive using NTFS file system with default allocation unit size.
- Click “OK” to begin the formatting process.
The formatting will only take a few seconds to complete on an NVMe drive. Once done, the partition will show the filesystem type and status as “Healthy”.
The drive is now formatted and ready to store your files and folders. You don’t need to change any options from default when formatting an NVMe drive for daily use.
Checking Disk Status
After formatting the NVMe drive, it’s important to verify that the disk shows up as “Healthy” in Disk Management. This confirms the drive was formatted successfully and is ready for use.
To check the disk status, open Disk Management again by typing “diskmgmt.msc” in the Run dialog box (Windows key + R). All disks connected to your system will be listed here.
Locate the NVMe drive you just formatted. The status should be listed as “Healthy” in the bottom section. If it shows as “Unformatted” or any other status, the formatting did not complete properly and you may need to repeat the steps.
You can also double check the file system, which should show the format you selected, such as NTFS or exFAT. The disk capacity should match the NVMe drive size as well.
According to Microsoft, verifying the disk status is healthy confirms you have successfully prepared the NVMe drive for use.
Benchmarking NVMe Performance
Once you have formatted and set up your NVMe drive, it’s important to benchmark its performance to ensure it’s operating at optimal speeds. Two of the best free tools for benchmarking NVMe drives are CrystalDiskMark and ATTO Disk Benchmark.
CrystalDiskMark is a simple yet powerful benchmarking tool that measures sequential and random reads/writes in MB/s. It provides detailed metrics on your NVMe drive’s capabilities. To use CrystalDiskMark:
- Download and install the software.
- Select your NVMe drive.
- Choose the benchmark tests you want to run.
- Click “All” to run a full benchmark suite.
ATTO Disk Benchmark is another excellent free tool for testing NVMe speeds. It measures transfers in MB/s and IOPS (input/output operations per second). ATTO is easy to use – simply select your NVMe drive, choose the tests, and start benchmarking.
These utilities provide quantifiable performance measurements to compare your NVMe against the manufacturer ratings. Look for sequential read/write speeds above 3,000 MB/s and high IOPS for optimal NVMe performance.
Tips for Maintaining Performance
To keep your NVMe drive performing at its best, follow these tips for maintenance:
Keep firmware updated – Check for firmware updates from your drive manufacturer periodically and install any updates available. Firmware updates can fix bugs, improve performance, and enhance drive reliability. See the manufacturer’s website for instructions on updating firmware.
Monitor disk health – Use built-in Windows tools like Disk Management or third party utilities to monitor your NVMe drive’s health stats like used lifetime, temperature, wear level, and error rates. Keep an eye out for excessive wear or overheating issues.
Optimize Windows for SSDs – Adjust settings in Windows like TRIM, AHCI mode, write-caching, and power management to enable optimizations for SSDs. Disable defragging, indexing, and Superfetch which are designed more for traditional hard drives. See this guide for tips.
Maintain adequate free space – NVMe drives need at least 10-15% free space for garbage collection, caching, and wear leveling. Monitor free space and delete unused programs and files periodically.