An SD card, or Secure Digital card, is a small removable flash memory card used for storing photos, videos, and other data on devices like digital cameras, phones, and computers. SD cards are commonly used for portable storage and transferring files between devices. You may need to format an SD card when you first get it to prepare it for use, if you want to delete all data off a used card, or if the card becomes corrupted or unresponsive.
DiskPart is a command-line disk partitioning utility included with Windows operating systems. It allows you to clean, create, delete, extend, and format disk partitions. Diskpart can be used to format an SD card and prepare it for use on Windows devices.
When to Format an SD Card
There are a few common situations where formatting an SD card is recommended or required:
Fixing corrupted or unreadable SD cards: If your SD card becomes corrupted or unreadable by your device, formatting it can wipe the card clean and restore functionality. Formatting clears any errors and resets the file system. According to EaseUS, “When SD card shows as unspecified or not initialized on Windows PC, or SD card cannot be read by phone, camera or PC, you should format the SD card to have a try” (Source).
Preparing a new SD card for first use: Brand new SD cards often come pre-formatted, but some may prompt you to format them before first use. This ensures full compatibility with your device and preps the card to save files properly. As EaseUS explains, “Inserting a new SD card into your Android device will prompt you to format the card. This is necessary for the card to work properly…” (Source).
Removing data before selling or gifting the card: Before passing an SD card along to someone else, you’ll want to format it to wipe all personal data. Formatting erases all files so the next user starts with a clean, empty card.
Back Up Important Data First
Before formatting your SD card, it’s crucial to back up any important files stored on it, such as photos, videos, documents, etc. When you format a card, all data will be erased.
To avoid permanent data loss, first copy your files to another storage device, such as your computer’s hard drive, an external hard drive, or cloud storage like Google Drive or Dropbox. This will ensure you have a separate copy of your data before formatting the card.
Focus on backing up irreplaceable files like family photos and home videos. Personal documents and work files should also be saved, as they can be difficult to recover or recreate. The more important the data is, the more essential it is to have a backup.
Once you’ve verified the files have been backed up properly elsewhere, you can safely proceed with formatting the SD card knowing your data is protected. Taking this preventative step guards against inadvertent data loss.
Using Diskpart to Format
Diskpart is a command line disk partitioning utility included with Windows. It allows you to completely erase and reformat partitions on a drive from the command line interface (CLI).
It’s important to note that using diskpart will completely erase all data on the drive. So before formatting with diskpart, be sure to back up any important files you want to keep.
To launch diskpart, first open the Windows Start menu and search for “Command Prompt”. Right click on the Command Prompt app and select “Run as administrator”. This will open an administrator command prompt window.
In the command prompt, type “diskpart” and press enter. This will launch the diskpart utility.
You can now start entering diskpart commands to view, select, and format drives and volumes. We’ll cover the key formatting steps in the sections below.
Identify the SD Card
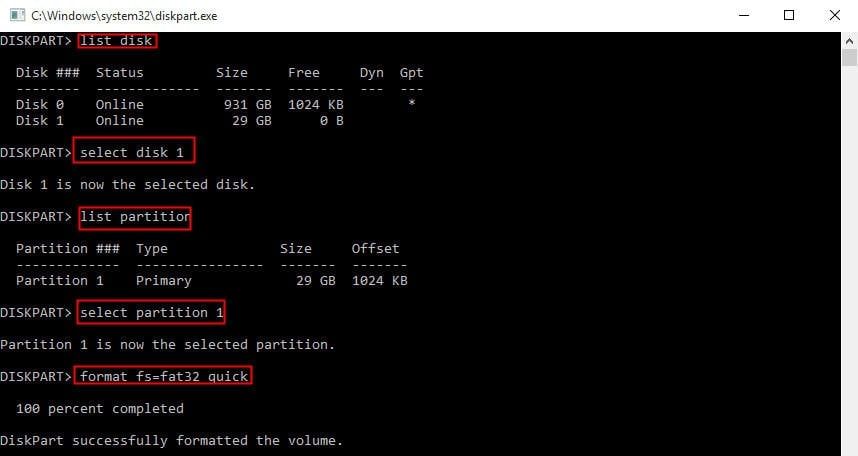
The first step in formatting an SD card with Diskpart is to identify which disk letter is assigned to the SD card. This can be done using the ‘list disk’ command in Diskpart. According to Microsoft, “The list disk command displays all the disks on the computer.”
To use it, first open the Command Prompt and type ‘diskpart’ and press enter to launch the Diskpart utility. Then type ‘list disk’ and it will display all the drives connected to the computer along with their size in MB/GB/TB. Look for the size of the drive to identify which one is the SD card, as SD cards are typically smaller capacity drives like 32GB, 64GB, 128GB etc. Match the size to determine the disk number for the SD card drive. For example if disk 3 shows a size of 32GB it is likely the SD card.
According to Seagate’s guide on diskpart, “Make a note of which disk number corresponds to the drive you want to erase.” Once you’ve identified the SD card disk number, you can then select it in the next step to prepare for formatting.
Select the SD Card
Before formatting the SD card, it is crucial to properly identify and select the correct disk drive to avoid accidentally formatting other drives. Use the ‘select disk #’ command in Diskpart to select the SD card drive.
For example, if your SD card shows up as Disk 2 when you enter ‘list disk’, you would enter ‘select disk 2’ to select the SD card drive specifically. Take care to match the disk number with the SD card details from the ‘list disk’ output. Selecting the wrong disk could result in data loss if you accidentally format drives like your primary system disk.
Verifying you are selecting the proper disk for the SD card is important to avoid any unintended consequences of formatting the wrong drive. The ‘select disk #’ command allows you to shift focus in Diskpart to the exact disk you intend to format.
Clean the SD Card
Before formatting the SD card, it’s important to completely wipe any existing partitions and data using the ‘clean’ command in diskpart. This will delete everything on the card and prepare it for a fresh format.
According to the Seagate knowledge base article, “From the diskpart prompt, type clean and press Enter. The drive’s partition, data, and signature is now removed. You will return to the diskpart prompt.” https://www.seagate.com/support/kb/how-to-diskpart-eraseclean-a-drive-through-the-command-prompt-005929en/
As noted on the Buffalo Tech website, “At the diskpart prompt, type “clean” and hit Enter. You will not be given a chance to opt out. Once you hit Enter, the disk will be erased.” https://www.buffalotech.com/knowledge-base/cleaning-a-disk-in-windows-7-using-diskpart
Be sure to back up any important data on the SD card before using the clean command, as it will permanently delete all existing partitions and data to prepare the card for a fresh format.
Create New Partition
Now that the SD card is cleaned, you need to create a new primary partition on it. This is done using the ‘create partition primary’ command in Diskpart. You can also specify the size of the partition, for example 100GB, using the ‘size’ parameter. Here is the syntax:
create partition primary size=100GB
This will create a new 100GB primary partition on the SD card. As explained on the Intel website, the ‘primary’ parameter creates a primary partition, while ‘size’ allows specifying the partition size. Once executed, a new primary partition of the specified size will be created on the SD card.
Format the Partition
Once the new partition has been created in Diskpart, the next step is to format it. The format command is used to specify the file system for the partition. The most common options are FAT32 or NTFS.
To format the partition to FAT32, type:
format fs=fat32
To format to NTFS instead, type:
format fs=ntfs
You can also specify a quick or full format. A quick format simply erases the file table on the partition, taking less time but not fully scanning the drive for bad sectors. A full format scans for bad sectors, taking longer but helping to ensure drive integrity.
To do a quick format, add the /Q parameter:
format fs=ntfs /Q
In most cases, a quick format will suffice. But if you want the most thorough format, or suspect there may be disk errors, use a full format without the /Q option.
Once the format is complete, the partition will be empty and ready for use as a formatted drive in Windows.
Assign a Drive Letter
The next step is to assign the SD card a drive letter so that it will show up in File Explorer. This is done using the ‘assign’ command in diskpart.
According to Use Diskpart Assign Drive Letter in Windows 11, 10, 8, 7, to assign a drive letter you would:
- Type “assign letter=X” where X is the drive letter you want to assign.
- This will assign the selected volume the drive letter specified.
- Now the disk should show up in File Explorer with the assigned drive letter.
Assigning a drive letter is an essential step to allow the SD card to be accessible in Windows. The ‘assign’ command in diskpart provides a simple way to do this from the command line.
