Formatting a solid state drive (SSD) is an important step when installing a new SSD in a Mac. Properly formatting optimizes the SSD for performance and ensures compatibility with the Mac operating system. This guide will provide an overview of the process for formatting an SSD on a Mac.
There are two main reasons why formatting is critical when installing an SSD on Mac. First, it enables the proper file system for SSD optimization. Apple’s native file system, APFS (Apple File System), is optimized specifically for flash storage like SSDs. APFS offers faster performance compared to the older HFS+ file system on traditional hard drives. Second, formatting correctly configures the drive to work seamlessly with MacOS. The Mac operating system requires specific formatters to recognize and interface with storage drives.
The formatting process will include checking SSD compatibility, using Disk Utility to format, physically installing the SSD, transferring data, and configuring the SSD as the startup disk. This guide will walk through these steps to ensure the SSD is correctly formatted and set up to work at peak performance on a Mac.
Back Up Your Data
Before formatting your SSD, it’s crucial to back up your data first. Doing so ensures you have a copy of all your files in case anything goes wrong during the formatting process. According to Apple Support, backing up with Time Machine on Mac allows you to save files that weren’t part of the macOS installation, like apps, music, photos, and documents.
There are a few different backup options to consider before formatting your SSD:
- Time Machine – Apple’s built-in backup software that allows you to restore your entire system from a Time Machine backup. Connect an external hard drive and Time Machine will automatically back up your data.
- Cloud storage – Services like iCloud, Dropbox, Google Drive, etc. allow you to backup your files to the cloud. Useful for backing up important documents.
- External drive – Copy important files to an external hard drive or USB flash drive for a physical backup.
Make sure your backups are complete before erasing and formatting the new SSD. It provides peace of mind knowing your data is safe.
Check SSD Compatibility
Before upgrading the SSD in your Mac, it’s crucial to check that the SSD you plan to use is fully compatible. The main factors to check are the SSD’s interface, physical size, and speed.
For interface, most modern Macs use either SATA or PCIe/NVMe SSDs. Refer to EveryMac’s Mac SSD upgrade guide to find the interface for your specific Mac model. For physical size, measure inside your Mac or check the manufacturer specs to find the drive bay size. For speed, choose an SSD with seq. read/write speeds that meet or exceed your Mac’s interface speed.
You’ll also want to verify the SSD has the proper form factor and connector type. For instance, M.2 or mSATA for MacBooks, and SATA for iMacs. Check the SSD vendor’s site like Crucial to confirm compatibility based on your exact Mac model.
Additionally, check if your Mac requires a proprietary Apple SSD for full functionality. For example, the latest Mac Pro uses special modules only configurable in Apple Configurator (source). An incompatible third party drive may work, but lack certain macOS optimization features.
Taking the time to thoroughly verify SSD compatibility will ensure your upgrade goes smoothly and delivers maximum performance gains.
Format SSD with Disk Utility
To format the SSD drive on your Mac, you’ll need to use the built-in Disk Utility app. Here are the steps:
First, open Disk Utility on your Mac. You can find it by using Spotlight or going to Applications > Utilities.
Once Disk Utility is open, click the View menu and select Show All Devices. This will display all available drives connected to your Mac.
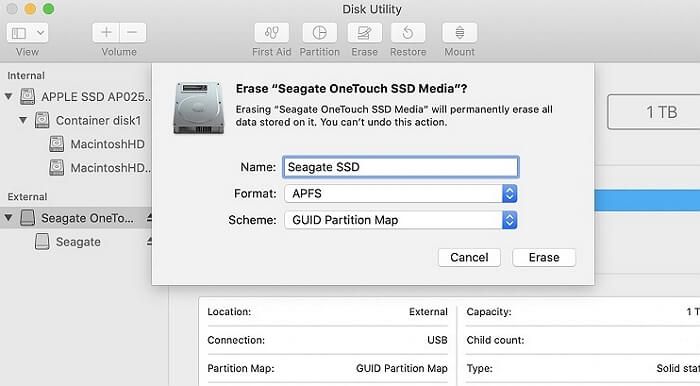
Select the SSD drive you want to format. Make sure to select the drive itself, not the volume name below it. The drive name will typically include the word “Media” (for example, “APPLE SSD AP0512M Media”).
With the SSD drive selected, click Erase in the top toolbar.
In the popup window, rename the SSD drive if desired.
Then, select APFS as the format. Make sure Scheme is set to GUID Partition Map.
Finally, click Erase to begin formatting the SSD to APFS. This may take several minutes depending on the drive size.
Once complete, the SSD will be formatted and ready to use as a startup disk or for storage.
Install the SSD
To install the SSD, you’ll need to open up your Mac computer or external enclosure to physically insert the drive. If installing internally in a Mac, refer to device disassembly instructions or videos to access the internal drive bays. For external enclosures, open the case following provided steps to expose the SATA drive connector inside.
When installing the SSD, be very careful handling the drive to avoid any static discharge damage. Ground yourself by touching a metal part of the computer case before manipulation. Align the SATA data and power connectors on the SSD with the mating connectors in the drive bay or enclosure. Insert the drive, pressing gently but firmly to fully seat the connection. Secure the SSD in place with any screws or mounting hardware. Replace any components and reassemble the computer or enclosure.
For maximum performance, install the SSD internally if your Mac supports it. SSDs in Thunderbolt or USB enclosures are limited by the external bus speeds. But external installation allows use of SSDs between machines more easily. Choose internal or external connectivity based on your specific needs and use case.
Transfer Data to the SSD
After formatting your SSD and installing it in your Mac, it’s time to transfer your data, files, and apps over to the new drive. There are a couple methods you can use to migrate your data:
Use Migration Assistant
The easiest way to transfer everything over is to use the Migration Assistant utility that comes built-in to macOS. Migration Assistant allows you to migrate user accounts, applications, settings, and files from your old drive to your new SSD [1].
To use Migration Assistant, restart your Mac and hold down the Option key during boot. Select the SSD as the startup disk, then launch Migration Assistant. Follow the on-screen instructions to transfer data from your old drive.
Manually Copy Data
You can also manually copy files, folders, and data from your old drive to your new SSD. Connect both drives to your Mac, then drag and drop to copy files over. This gives you more control over what gets transferred.
To copy your apps, you’ll need to copy over the Applications folder from your old drive to your new SSD. Be sure to deauthorize any media apps before copying.
Re-download Apps
Rather than copying your Applications folder over, you can also freshly download and install apps on your SSD. Sign in to the App Store and re-download any purchased apps you want on your new drive.
This ensures you have clean installs of apps without any cruft from your old drive. However, it does mean reconfiguring app settings.
Configure SSD as Startup Disk
Once the SSD is formatted and setup, you’ll need to configure it as your Mac’s startup disk. This ensures your Mac will boot from the SSD rather than your older hard drive. Here’s how to set the SSD as the startup disk:
Go to System Preferences and click “Startup Disk.”1 This will show you a list of available startup disks. Select your newly formatted SSD from the list and click “Restart.” Your Mac will restart and boot up from the SSD.
The startup disk contains the operating system and related software that loads when you turn on your Mac. By default, your Mac will use its internal drive as the startup disk. Setting an external SSD allows you to boot your Mac from that drive instead. This enables you to run macOS and apps from a fast external SSD rather than relying on an older, slower internal hard drive.
Restart and Verify
After installing the SSD and transferring data, it’s time to restart your Mac and verify that the SSD boots up the system properly. Here are the steps:
1. Shut down your Mac if it is currently on.
2. Press and hold the power button until you hear the startup chime. This will turn your Mac back on.
3. Immediately press and hold the Option key after you hear the startup chime. This will bring up the Startup Manager.
4. Select the SSD from the available startup disks. Your Mac will now boot up from the SSD.
5. Once logged in, open Finder and verify your files and folders were properly transferred to the new SSD. Also launch any applications to verify they open correctly.
If the SSD encounters any errors during boot, you may need to recheck the physical installation or connections. Refer to Apple’s guide on Startup Security Utility for troubleshooting boot issues.
Once you’ve verified full functionality, the SSD is ready to be used as your Mac’s startup drive. You can now configure the SSD as the default startup disk using System Preferences.
Maximize SSD Performance
Once your SSD is installed and setup as the startup disk, there are some additional steps you can take to ensure optimal performance over time. One key task is to enable TRIM support on your SSD. TRIM allows the SSD to more efficiently handle garbage collection, the process of reclaiming unused memory blocks. Without TRIM enabled, SSD performance can degrade over time as unused memory blocks build up. Enabling TRIM helps maintain consistent read/write speeds.
To enable TRIM on your Mac SSD, open the Terminal app and enter the command sudo trimforce enable (you will need to enter your admin password). This command tells macOS to optimize garbage collection for your SSD [1]. You can also use a third party utility like Chameleon SSD Optimizer to enable TRIM [2].
It’s also important to monitor free space on your SSD. Having at least 10-20% free space allows the drive to manage memory blocks efficiently and maintain top performance. Be diligent about moving infrequently accessed files to external storage to avoid filling up the SSD.
In general, follow best practices like avoiding excessive reading and writing, limiting boot ups/shutdowns, monitoring drive health, and keeping macOS and applications updated. With some basic maintenance, your SSD can deliver fast and reliable performance for years.
Conclusion
In summary, formatting and installing an SSD on a Mac involves several key steps. First, you’ll want to back up your data to ensure nothing is lost in the process. Check that the SSD is compatible with your Mac model. Use Disk Utility to format the drive, choosing APFS as the format. Physically install the SSD, either replacing your existing drive or adding it as a secondary drive. Transfer your files and data over to the new SSD. In System Preferences, set the SSD as your Mac’s startup disk. Finally, restart your computer and verify the SSD is detected and working properly.
To maintain your SSD’s performance and extend its lifespan, there are a few best practices to follow. Avoid completely filling up the drive, as this slows it down. Enable Power Nap in Energy Saver settings to allow automatic maintenance. Regularly clear out your downloads folder, browser caches, and other temporary files. Make use of Optimized Storage in Sierra and later to store rarely used files in iCloud. Consider using an SSD utility app to enable TRIM if your Mac doesn’t do it automatically. Overall, be careful not to overwork your SSD by monitoring its health and following manufacturer’s recommendations.
