What is RAID 0?
RAID 0, also known as disk striping, is a type of RAID (Redundant Array of Independent Disks) configuration that spreads data across multiple drives to improve performance (PCMag). It involves splitting data evenly across two or more disks with no parity or duplication (PartitionWizard). The main advantage of RAID 0 is increased speed and performance, as data can be read and written simultaneously across multiple disks. However, RAID 0 provides no data redundancy or fault tolerance. If one drive fails, all data will be lost (PCMag).
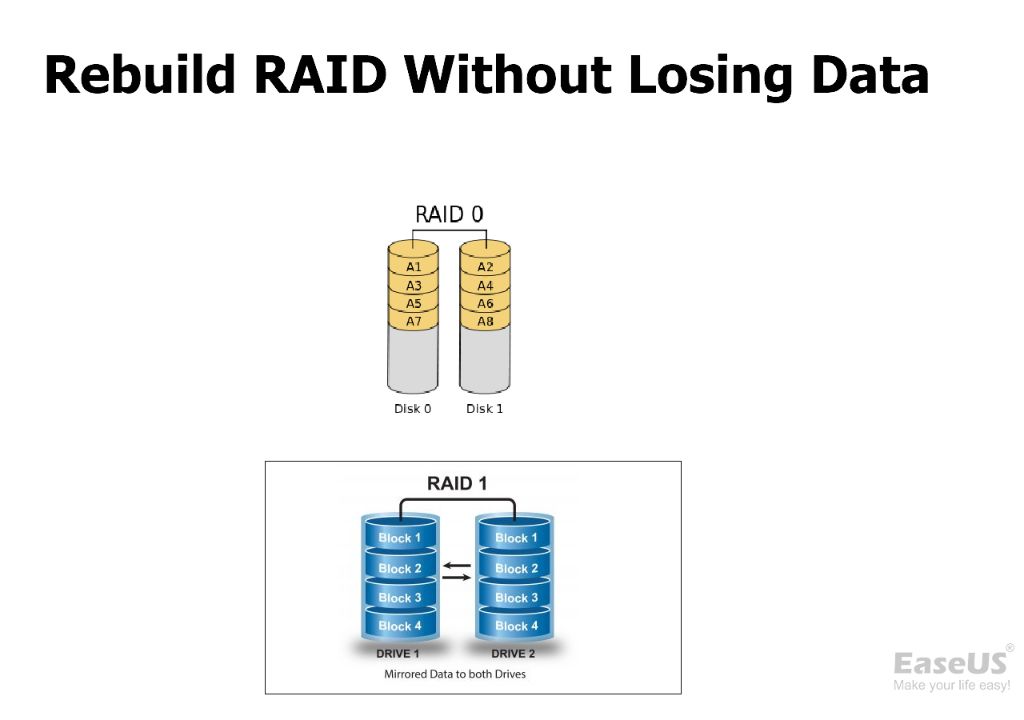
In summary, RAID 0 stripes data across multiple disks with no parity or mirroring. It improves performance but lacks redundancy. A single disk failure results in total data loss, making backups critical (Quora).
Why Use RAID 0?
The main benefit of RAID 0 is faster performance compared to a single drive. By striping data across multiple disks, RAID 0 allows for simultaneous read and write operations, enabling parallelization. This means multiple drives can be accessed at the same time, maximizing throughput.
RAID 0 combines the capacity of multiple drives into one large volume. For example, two 1TB drives makes a 2TB array. This allows you to expand storage space as needed by adding more drives to the array. The combined storage capacity can be used for applications and data that benefit from large amounts of storage and fast access, like video editing, gaming, or databases.
In benchmarks, RAID 0 can achieve data transfer speeds up to double or greater than a single drive depending on the number of disks and type of drives used. The performance also scales well as more drives are added. For these reasons, RAID 0 is a popular choice for those seeking faster data access and maximum usable storage space.[1]
Risks of RAID 0
The biggest risk of using RAID 0 is that it provides no redundancy. Since the data is striped across multiple drives with no parity or mirroring, if one drive fails, all data across the RAID 0 array will be lost. This makes RAID 0 much more prone to catastrophic data loss compared to other RAID levels like RAID 1 or RAID 5.
With RAID 0, the likelihood of data loss scales linearly with the number of drives in the array. For example, if you have a 2 drive RAID 0 array, there is a 50% chance one of the drives will fail within the typical lifetime of a hard drive. With a 4 drive array, there’s a ~75% chance one drive will fail in that period. Since one drive failure results in total data loss, those failure probabilities equate to the risk of losing all data on the RAID 0 array.
According to a Reddit user, RAID 0 failures using ZFS are no different than traditional RAID 0. The user lost all data after a single drive failure. This highlights that while ZFS provides additional features like bit rot protection, it does not reduce the core risk of catastrophic failure without redundancy.
In summary, RAID 0 comes with an inherent and significant risk of irrecoverable data loss. Anyone implementing RAID 0 should regularly back up their data and be prepared for the high probability of total data loss during the lifetime of the array.
Backing Up Your Data
It is extremely important to back up your data before setting up a RAID 0 array. As mentioned previously, RAID 0 provides no redundancy, meaning if one drive fails, all data will be lost. According to one source, “RAID is not a Backup. RAID in its entirety cannot completely replace backup. RAID 0, for instance, does not even replicate the data within its disks, meaning if one fails, all data will be lost” (https://www.msp360.com/resources/blog/is-raid-a-backup/).
There are several options for backing up your data before RAID 0:
- External hard drive – Copy important files to an external HDD.
- Cloud backup – Back up files to a cloud service like Dropbox, Google Drive, etc.
- Network Attached Storage (NAS) – Store files on a dedicated NAS device.
- Offline backup – Burn files to Blu-Ray discs or external SSDs that are kept offline.
Performing a full backup ensures you have copies of your data in case of RAID 0 failure. As noted by one expert, “RAID cannot provide a suitable backup. To properly protect your data, you need an air-gapped backup solution” (https://www.techtarget.com/searchdatabackup/tip/RAID-vs-backup-Learn-the-differences-and-benefits-of-both).
Choosing Drives for RAID 0
When selecting drives for a RAID 0 array, it is important to choose drives that are compatible with each other and have the same storage capacity. According to Microsemi, RAID 0 works by “striping data evenly across multiple disk drives.” If the drives have different capacities, the array will function based on the size of the smallest drive.
For optimal performance, all of the drives in the array should have the same rotational speed (RPM), cache size, and interface. Mixing drive types can lead to uneven performance. Many experts recommend choosing drives from the same manufacturer and model when building a RAID 0 array. The drives should also have the same firmware version to avoid compatibility issues.
Finally, the number of drives you choose will depend on your required capacity and performance needs. RAID 0 offers faster speeds with more drives, but also a higher risk of failure. Most configurations consist of two to four matching drives.
Creating the RAID 0 Array
The process of creating a RAID 0 array will vary slightly depending on whether you are using a hardware or software RAID controller. In general, the steps involve:
1. Entering the RAID configuration settings in the BIOS or RAID management software. This is where you will select the type of array (RAID 0), the drives to include, and any other options.
2. Initializing and formatting the array. Once created, the RAID 0 array will need to be initialized and formatted just like a regular drive before it can be used.
Some important points when selecting drives for RAID 0:
- Use identical drives in terms of capacity and performance. Mixing drive types can lead to slower performance.
- Select two or more drives to include in the array. More drives can increase performance but also the risk of failure.
- Consider using smaller capacity drives (e.g. 120GB). This can minimize data loss in the event of failure.
Refer to your motherboard or RAID controller manual for specific steps to create the array in the BIOS or management software. Some controllers provide automatic RAID configuration wizards to walk you through setup.
Migrating Data to the Array
When setting up a RAID 0 array, you’ll want to migrate your existing data over to the new array without losing any files in the process. One of the best ways to do this is by cloning your existing drive.[1] Cloning creates an exact copy of your drive that you can then add to the RAID 0 array.
Using cloning software like Macrium Reflect or AOMEI Backupper can make cloning your drive and migrating data to RAID 0 quick and seamless. These programs allow you to create a clone of your drive and seamlessly transfer all the data to the new RAID 0 array.
The key when migrating data to RAID 0 is making an exact clone of your original drive first before building the array. This ensures no data is lost. Once the clone is created, you can build the RAID 0 array using the clone and the new empty drive(s). The cloning software will automatically migrate all the data from the clone to the high-performance RAID 0 array without any chance of data loss.
Migrating data to RAID 0 doesn’t have to be complicated. Using drive cloning software streamlines the process so you can efficiently transfer all your data to a fast RAID 0 array.
[1] https://driveshero.com/how-to-raid-0-nvme-ssd/
Checking and Formatting
After creating the RAID 0 array, it’s crucial to check that it is functioning properly before transferring data over. First, go into Disk Management and verify that the RAID 0 volume shows up. You should see one large volume that combines the full capacity of the drives.
Next, you’ll want to format the RAID 0 array. This writes a file system to the RAID so that Windows can access it like a regular drive. The most common file system is NTFS. To format, right-click the array in Disk Management and choose “New Simple Volume”. Go through the wizard, selecting NTFS as the file system. Make sure to do a quick format, not full, since you have no data on it yet. A quick format will take seconds, while a full one can take hours on a large RAID [1].
After formatting, the RAID 0 should show up in Windows File Explorer like any other drive with the file system you selected. You can begin transferring files to it. It’s a good idea to start by copying non-critical files over first and verifying they copy correctly before migrating important data. Enjoy the speed benefits of your new RAID 0 array!
Rebuilding After Failure
If a drive in your RAID 0 array fails, the data on the entire array will be inaccessible. However, you may be able to rebuild the array and restore your data from a backup.
To rebuild the array, you will need to replace the failed drive with a new, identical drive. Make sure the new drive is the same size or larger than the failed drive. Then, reconnect the array to your RAID controller and let the controller detect the new drive. The controller should give you the option to rebuild the array.
The rebuild process recreates the RAID 0 stripe set using the data still available on the functioning drive(s). Any data that was on the failed drive will be lost and must be restored from backup. After the rebuild completes, you can restore data to the array from your most recent backup.
Having a complete and current backup is critical when using RAID 0, as there is no parity or duplication of data across drives. Without a backup, rebuilding the array provides the structure but none of the actual data. Restoring data from backup after failure allows you to get your RAID 0 back up and running.
Some RAID recovery software like GetDataBack can assist with rebuilding failed arrays, but you still need a backup to restore data.
Alternatives to RAID 0
There are other RAID levels that can provide storage speed without the complete lack of redundancy found in RAID 0. One option is RAID 10, which combines mirrored drives (RAID 1) with striping (RAID 0). This provides fast performance while still protecting your data if a drive fails. However, RAID 10 requires at least 4 drives.
Another alternative is RAID 5, which stripes data across drives like RAID 0, but also stores parity information so that you can recover data if a drive fails. RAID 5 requires at least 3 drives.
External drives connected via Thunderbolt, USB 3, or eSATA can also potentially provide fast storage while keeping your data separate from your computer’s internal drives. Portable SSD drives in particular can offer transfer speeds rivaling some RAID setups. Just make sure to have a good backup strategy for external drives as well.
The right RAID alternative depends on your specific storage needs and budget. But for many home users, an external SSD or HDD may provide the best blend of affordability, capacity, and speed without resorting to the risks of RAID 0.
