Moving your iTunes library from one user account to another on the same computer is a common task for many iTunes users. Whether you are setting up a new user profile, switching between family member accounts, or simply want to consolidate your iTunes content in one place, transferring your iTunes library between users on the same computer is possible. Here is a step-by-step guide on how to seamlessly move your iTunes content from one user to another on the same computer.
Why Move Your iTunes Library Between Users?
There are a few key reasons you may want to transfer your iTunes library between user accounts on the same computer:
- Setting up a new user profile – If you are creating a new user account on your shared family computer, you may want to move your existing iTunes content over to the new profile.
- Switching between family member accounts – Families that share a computer but have different iTunes libraries can transfer content between user profiles.
- Consolidating content in one place – If you have iTunes content scattered across multiple user accounts on the same computer, you can consolidate it all into one user profile.
The main advantage of moving your iTunes library between users on the same computer is convenience – you get to keep all your iTunes content in one place no matter which user profile you are logged into. This makes managing your music, movies, apps and other iTunes media much easier compared to having to switch between separate libraries.
How iTunes Manages Libraries for Different Users
Before we get into the steps for transferring your iTunes library, it’s helpful to understand how iTunes handles libraries for different users on the same computer.
By default, each user account on a Mac or Windows PC will have its own iTunes library. This allows multiple users to access iTunes on the same computer while keeping their content separate.
The iTunes library for each user includes the iTunes Media folder that contains any imported or purchased music, movies, apps, etc. It also includes iTunes preferences, playlists, and other metadata that’s specific to that user’s library.
Users can switch between iTunes libraries by choosing the appropriate library in the Advanced Preferences in iTunes. This allows you to access different libraries on the same computer without having to log in and out between different user accounts.
However, this can make managing your iTunes media cumbersome if you have content scattered across multiple user libraries. That’s where transferring your iTunes library from one user to another can help consolidate your iTunes content in one place.
Prerequisites for Transferring iTunes Library
Before transferring your iTunes library between users, make sure:
- You have admin rights to both user accounts you want to transfer the library between.
- You know the password for both accounts.
- All media you want to transfer is authorized to play on the destination user account. Or you disable iTunes Match on both accounts temporarily during transfer.
- You have enough free disk space on the destination user account to transfer the iTunes Media folder.
- You exit any open iTunes applications running on either user account.
With those prerequisites met, you’re ready to move your iTunes library!
Step 1: Consolidate Your iTunes Library
The first step is to consolidate your iTunes library content and playlists to prepare for transfer. Here’s how:
- Open iTunes on the source user account (the account you want to transfer FROM).
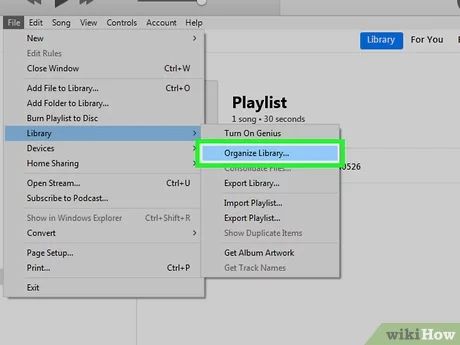
- In the iTunes menu bar, choose File > Library > Organize Library.
- Check the box for “Consolidate files.”
- Click OK. This will create copies of all media files for this iTunes library in one location – the iTunes Media folder.
Consolidating collapses your library’s sprawling media files into one place, rather than scattered across your computer. This makes transferring the entire iTunes Media folder easier.
Any music, movies, apps or other content purchased from the iTunes Store will still be authorized on your account, so no worries about losing access. Consolidating simply gathers copies locally to transfer the library in one step.
Step 2: Find and Transfer the iTunes Media Folder
With your iTunes library consolidated, you next need to locate the iTunes folder and transfer it to the new user account. Here’s how:
- Still in the source iTunes library, go to iTunes > Preferences > Advanced.
- Look for the current iTunes Media folder location under “iTunes Media folder location.” This is typically in your Music or Users folder.
- Go to this folder location on your computer and copy the entire iTunes Media folder.
- Go to the Music or Users folder under the destination user account.
- Paste the copied iTunes Media folder here. This may take some time if you have a large library.
Transferring the iTunes Media folder copies all your music files, videos, books, iOS backups and more to the new user location.
Step 3: Transfer Playlists & iTunes Library XML File
Moving the iTunes Media folder gets all your content to the new user. Next, transfer your playlists and iTunes library database file:
- Return to the source user’s iTunes app.
- Go to File > Library > Export Library. This saves an XML file of your iTunes library database.
- Locate the exported XML file, typically in your Music folder.
- Copy this file and the iTunes > Playlists folder and paste them into the Music folder under the destination user.
This exports your playlists and iTunes library details like play counts, ratings, metadata etc. and prepares them for import.
Step 4: Import iTunes Library to New User Account
With all your files and data transferred to the new user, you can now import it into the destination iTunes library:
- Log in to the destination user account.
- Open iTunes.
- Go to File > Library > Import Library and select the XML file you copied over.
- Select to import or overwrite existing playlists when prompted.
iTunes will import the library XML database file first, recreating your playlists and metadata from the source account. It will then match up the transferred iTunes Media files, pointing the library to their new location.
When done, your iTunes library should now be successfully transferred to the destination user account!
Step 5: Authorize Computers and Media
As a final step, deauthorize the source computer and authorize the destination computer for any iTunes Store content:
- On the source computer, go to Account > Authorizations > Deauthorize This Computer.
- On the destination computer, go to Account > Authorizations > Authorize This Computer.
You may also need to authorize computers or media files if prompted when trying to play imported iTunes content.
With that, you can delete the leftover iTunes files from the source user if desired and enjoy your media!
Troubleshooting iTunes Library Transfers
If you run into any issues migrating your iTunes library between user accounts, here are some troubleshooting tips:
- Missing media files – If some tracks, movies or other content went missing, go back and check that the entire iTunes Media folder transferred properly in step 2.
- Playback issues – Media files may need to be authorized on the new computer or user account. Go to Account > Authorizations.
- Wrong metadata – Check that the correct iTunes Library XML file imported in step 4. Try re-importing if needed.
- Can’t find playlists – Be sure the Playlists folder transferred and imported correctly into the new user account.
If issues persist, you may need to transfer the library again from the original source user account. Follow each step carefully and your iTunes library should transfer successfully between user accounts.
FAQs About Transferring iTunes Libraries Between Users
Here are some common questions about moving your iTunes library to a new user profile:
Will transferred iTunes media still work if I have iTunes Match enabled?
Yes, as long as the media is matched or uploaded to iCloud. Disable iTunes Match temporarily if you have issues playing matched songs that won’t authorize.
Do I have to transfer everything in my iTunes library?
No, you can choose to only transfer certain playlists or media if you don’t need your entire library in the new location.
What about audiobooks, do they transfer over?
Yes, audiobook content and your current listening position will transfer over the same as other media files.
Can I transfer libraries between Mac and Windows?
While the process is similar, library transfers works best between same operating systems. Transferring between Mac and Windows can cause metadata issues.
Will app data like save files also transfer over?
No, you will need to redownload any mobile apps and start new save files. The transfer is focused on iTunes media content.
Conclusion
Transferring your iTunes library from one user to another on the same computer takes just a few steps. By consolidating your library, copying over media files and playlist data, and re-importing to the new user, you can seamlessly move your iTunes content between accounts on the same Mac or PC.
Just be sure to authorize computers and media as needed, and troubleshoot any issues with missing files or wrong metadata. Follow this guide and you’ll have your iTunes library working in no time under your new user profile.
