Partitioning a hard drive allows you to divide the available storage space into separate drives. This can help organize your data and programs more efficiently. However, reshaping your hard drive’s partitions requires modifying the existing partition layout, which can potentially cause data loss if not done carefully.
The good news is that you can safely partition your hard drive in Windows 7 without losing any data, as long as you follow the proper procedure. In this guide, we will walk you through the step-by-step process for partitioning a hard drive in Windows 7 without losing any of your precious files or programs.
Should You Partition Your Hard Drive?
Before jumping into the how-to steps, let’s first discuss some of the potential benefits of partitioning your drive so you can decide if it’s right for your needs:
- Segregate programs and files: Partitioning allows you to separate your operating system and programs from your data. This can improve performance and make your backups easier.
- Organize data: Multiple partitions enable you to logically group your data. For example, you could dedicate partitions just for media, documents, downloads, etc.
- Multi-boot environments: Splitting your hard drive into partitions allows you to install different operating systems on different partitions. This enables multi-booting between OSes on the same computer.
- Isolate backups: You can use a separate partition specifically for backups to protect that data from other activities on your main drive.
- Security: If one partition gets corrupted, the others should remain intact and accessible.
So in summary, partitioning provides more granular organization, facilitates multi-OS systems, keeps backups isolated, and adds an extra security safety net in case of drive issues or corruption. The tradeoff is that you have less flexibility with the available space on each partition.
Requirements for Partitioning Without Losing Data
To successfully partition your hard drive without data loss, your system needs to meet these requirements:
– Running Windows 7 Home Premium, Professional, or Ultimate editions. (Partitioning is not available in the Starter and Basic editions.)
– Existing data and partitions you want to retain must have enough free space left to accommodate the new partition layout.
– Back up any data you want to keep. Partitioning comes with an inherent risk of data loss if something goes wrong. Having backups prevents disaster.
– Use the Windows 7 built-in Disk Management utility. Third-party partition managers tend to have poorer reliability and compatibility.
– Administrator access is required to use Disk Management and alter the partitions.
As long as your system meets those requirements, you can safely partition your drive using the methods outlined next.
Back Up Your Data as a Precaution
Before starting any partition operations, it’s absolutely vital that you back up your important data as a precaution. Partitioning is normally safe if done properly, but there’s always a slight chance something could go wrong that results in data loss. Here are some ways to back up your data before partitioning:
– Copy important files to an external hard drive or cloud storage. This creates a secondary copy you can restore from if needed.
– Use Windows Backup and Restore to do a system image backup. This creates a snapshot of your partitions that you can reinstate.
– Use a third-party backup utility like Acronis True Image to do a full system backup.
– Manually back up key data partitions using imaging software.
The specific backup method doesn’t matter too much. The key is to have one or multiple backups containing your personal files and any installed programs and operating systems you want to preserve. With your data protected, you can partition freely knowing you can restore if anything gets corrupted.
Using Windows Disk Management Utility
Windows 7 has a built-in Disk Management utility for viewing and manipulating hard drive partitions. We’ll use this tool to reshape our disk’s layout. Here’s an overview of the Disk Management interface:
- Graphical map of existing partitions on all disks.
- Summary info on each disk and partition’s properties.
- Toolbar with options for common operations like creating, deleting, and formatting partitions.
- Right-click menu for additional actions on selected partitions.
The visual interface makes it easy to resize, move, create, and delete partitions. Just be careful not to make changes too hastily – small mistakes can have big consequences!
To open the Disk Management utility:
- Open the Start Menu and type “disk management.”
- Click “Create and format hard disk partitions” to launch the utility.
Now that we know how to access Disk Management, let’s look at the step-by-step process for safely partitioning a disk.
How to Use Disk Management to Partition a Disk
Follow these steps to partition your hard drive in Windows 7 using the built-in Disk Management utility:
Step 1. Analyze your current partition layout
Once Disk Management is open, examine the graphical map of your existing partition structure. Pay attention to:
- Size and contents of each partition.
- Free space available on each one.
- Whether the partitions are primary or logical.
This will determine your options for creating new partitions. Also note down the drive letters assigned to each partition.
Step 2. Decide on a new partition layout
Determine how you want to slice up the free space on your disk. Some considerations:
- How many new partitions do you need and how big should they be?
- What types of data or OS will go on each one?
- Do you want to change any existing partitions?
- Will you extend, shrink or move any current partitions?
Plan your new layout wisely, as you can cause issues if you over-partition the disk or make partitions too small. Allow room for growth.
Step 3. Create new partitions in the free space
Assuming you have enough free space for your planned new partitions, go ahead and create them:
- Right-click inside the unallocated space.
- Select “New Simple Volume.”
- Walk through the new partition wizard that opens up.
- Assign size, drive letter, and format the partition.
Repeat those steps to create as many new partitions as needed in the free space.
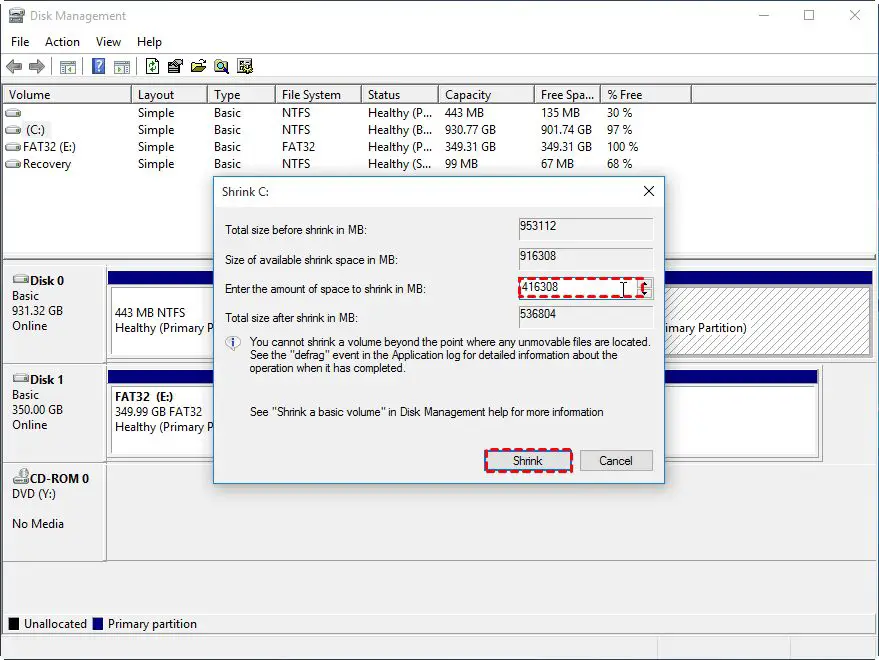
Step 4. Extend or shrink existing partitions
If your plan requires resizing existing partitions:
- Right-click the partition you want to change.
- Choose either “Extend Volume” or “Shrink Volume”
- Enter the new desired size.
- Click “Shrink” or “Extend.”
Use caution when shrinking. Don’t shrink partitions so much that you risk data loss.
Step 5. Move or delete unwanted partitions
If your new layout involves moving or consolidating partitions:
- To move, drag a partition to the desired location in the map. This will reorder the layout.
- To delete, right-click the partition and select “Delete Volume.” Then confirm.
Again use extreme care, as deleted partitions will lose all data.
Step 6. Check for errors and restart
With your new partitions in place, run a check for errors:
- Open Computer Management.
- Under Storage, select Disk Management.
- Right-click the partition and choose “Properties.”
- Click “Check Now” under Error-checking.
- Restart your computer for the changes to take full effect.
The error check makes sure no corruption occurred during the partitioning process.
Tips for Safe, Successful Partitioning
Keep these tips in mind to help ensure a smooth partitioning process without any data loss:
– Close all other programs before running Disk Management to reduce errors.
– Don’t interrupt the resizing or moving of partitions, as this can corrupt data.
– Only shrink volumes in small increments to reduce risk.
– Transfer data off partitions you want to delete or shrink to prevent file loss.
– Allow ample free space for partitions to be moved or resized.
– Adjust dynamic disk sizes through the Computer Management snap-in, not Disk Management.
– Reboot after major changes before using your system normally again.
With some care and planning, Disk Management makes it relatively straightforward to partition your Windows 7 hard drive safely without losing data. Just remember to back up important files, stick to non-destructive changes whenever possible, and avoid interrupting any lengthy partition operations.
Frequently Asked Questions
Here are answers to some common questions about partitioning hard drives in Windows 7:
How many partitions can I have on one hard drive?
Windows supports up to four primary partitions or three primary partitions plus an extended partition containing unlimited logical drives. The exact limit depends on your hard drive’s partition style (MBR vs GPT).
What are the partition size limits in Windows 7?
For MBR disks, the maximum size for a basic partition is 2 TB. Dynamic volumes on GPT or MBR disks can be up to 256 TB. Total partition space is limited by the physical capacity of your hard drive.
Can I undo partition changes if something goes wrong?
Unfortunately, there is no simple undo option. Your best protections are having a backup and only making non-destructive changes like creating partitions in unused space rather than deleting existing partitions.
How can I regain space from an oversized partition?
Use Disk Management to shrink oversized partitions. Free up data on the partition first if needed to shrink small enough. You can also extend adjacent partitions into the newly freed up space.
Should I use a third-party partition manager instead of Disk Management?
Microsoft recommends against using third-party tools, since they can cause instability or compatibility issues. Stick with the built-in Windows Disk Management for best results.
Conclusion
Partitioning your hard drive in Windows 7 is a straightforward process using the built-in Disk Management utility, as long as you carefully plan the new layout and back up your data first. Follow the step-by-step guide outlined above to split your disk into multiple partitions without losing any existing files or programs in the process. Partitioning can provide valuable benefits like better organization, easier multi-booting, and keeping backups isolated from the OS. Just be sure to leave ample free space for your partitions to avoid complications resizing or moving them after the fact. With some planning and care, partitioning your drive on Windows 7 can be a safe, effective way to optimize your system.
