What is RAID 5?
RAID 5 is a type of redundant array of independent disks (RAID) that combines disk striping with distributed parity to provide fault tolerance and increased storage capacity compared to a single disk. In RAID 5, data is striped across multiple disks in block-level stripes, while parity information is distributed across all disks in the array. This allows the array to continue functioning normally even if one disk fails. The benefits of RAID 5 primarily come from its combined use of disk striping and parity (Source).
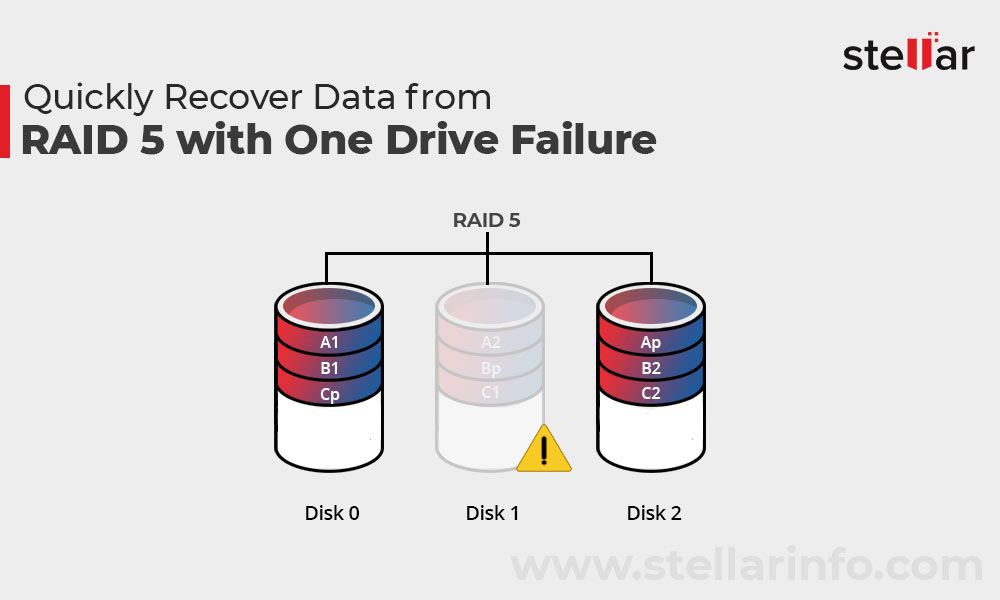
Specifically, in a RAID 5 array with N disks, N-1 disks’ worth of space is used for data storage, while the equivalent of 1 disk’s space is used for parity storage. Data and parity blocks are interlaced across all the disks, so if any single disk fails, the missing data blocks can be recalculated from the remaining data and parity blocks (Source). This provides fault tolerance and allows the array to continue operating with no data loss even if a single drive fails.
Key benefits of RAID 5 include increased storage capacity over mirroring, fast read performance due to striping, and low cost fault tolerance (Source). Overall, RAID 5 provides an efficient and economically viable solution for storing large amounts of data with protection against single disk failures.
How does a RAID 5 array get degraded?
A RAID 5 array can become degraded when one of the disks in the array fails or becomes unusable (IBM). This disk failure leads to unavailability of the data that was stored on the failed disk. However, the remaining disks in the array still contain all of the data. This is made possible by RAID 5’s distributed parity, in which parity information is spread across all the disks.
When a disk fails in a RAID 5 array, the array is able to continue operating in a degraded state by using the parity information spread across the remaining disks to reconstruct the data that was on the failed disk. This allows a RAID 5 array to continue providing access to data and avoid outage even with a failed disk. However, with only a single disk failure tolerance, a second disk failure would lead to complete data loss.
Disk failures in RAID 5 can occur for a variety of reasons, including mechanical failure, corruption, or removal of a disk. Detecting and replacing the failed disk is crucial to rebuild the array and restore redundancy and fault tolerance.
Impacts of degraded RAID 5
When a disk fails in a RAID 5 array, it can have several negative impacts, including increased risk of data loss and reduced performance.
With one failed disk, RAID 5 is operating in a degraded state. This means there is no longer full redundancy across the array. If another disk were to fail before the failed disk is replaced, complete data loss could occur (MacPerformanceGuide). The degraded array is vulnerable until the failed disk is replaced and rebuilt.
In addition to increased risk, degraded RAID 5 also suffers reduced read and write performance. With one disk missing, the array must work harder to access data and calculate parity information across the remaining disks. This extra work leads to slower operation compared to a healthy RAID 5 (Spiceworks). The more disks that fail, the greater the performance impact.
To minimize these risks, it’s important to replace and rebuild failed disks in a degraded RAID 5 array as soon as possible. The degraded state leaves data vulnerable and hampers performance.
When to rebuild RAID 5
There are two common approaches to rebuilding a degraded RAID 5 array:
As soon as disk failure is detected
Many experts recommend rebuilding the array as soon as possible after a disk failure occurs. The advantage of rebuilding quickly is that it minimizes the window of vulnerability where another disk failure would result in data loss. According to Server Fault users, rebuilding a 10 TB RAID 6 array could take up to a week[1]. The longer the degraded state persists, the higher the risk of irrecoverable data loss if another disk fails.
During a maintenance window
Some administrators prefer to schedule the rebuild during a maintenance window or period of low activity. The rebuild process can impact performance, so rebuilding during off-peak hours minimizes disruption. However, the tradeoff is extended exposure in the degraded state. According to Ars Technica users, there are pros and cons to both approaches[2].
Overall, rebuilding as soon as possible is generally recommended to minimize risk. Scheduling the rebuild should be based on the specific needs and priorities of the organization.
Preparing for RAID 5 rebuild
Before beginning the process of rebuilding a degraded RAID 5 array, it is important to take some preparatory steps to ensure the rebuild goes smoothly and critical data is protected.
First, check the documentation for your specific RAID controller. The controller manufacturer will provide instructions on how to safely rebuild the array using their hardware. Following these directions can prevent issues during the rebuild process.
Next, ensure you have an appropriate spare disk available that is at least the same size or larger than the failed disk. The spare will be used by the controller to rebuild the array. Without an available spare, the rebuild cannot proceed.
Finally, and most importantly, back up any critical data on the degraded array before beginning the rebuild. While unlikely, issues can still occur during rebuild that cause complete array failure. Having a reliable backup ensures no data loss in a worst-case scenario.
Taking these preparatory steps will provide the best chance for a smooth and successful RAID 5 rebuild.
Adding a spare disk
One way to rebuild a degraded RAID 5 array is to hot swap the failed disk with a spare disk. Most RAID controllers allow you to designate one or more spare disks that can automatically replace failed disks in the array. When a disk fails, the controller will begin rebuilding the array using the spare disk (1).
To add a spare disk to a degraded RAID 5 array:
- With the server powered off, physically insert the new spare disk into the empty slot where the failed disk was located.
- Boot the server and allow the controller to detect the new disk.
- Using the RAID management utility, designate the new disk as a hot spare.
- The controller will automatically add the spare disk to the array and begin the rebuild process.
The advantage of using a hot spare is that rebuilding starts immediately without any manual intervention. The controller seamlessly integrates the spare into the degraded array. Modern RAID controllers can complete rebuilds quickly, restoring full redundancy within hours (2).
Manually Rebuilding RAID 5
The most direct method of rebuilding a degraded RAID 5 array is to manually initiate the rebuild process on the RAID controller. This involves identifying a spare disk to add to the array and starting the rebuild operation on the controller interface.
To manually rebuild RAID 5:
- Replace the failed disk with a new spare disk of equal or greater capacity. Install this disk in the same physical location as the failed disk.
- Access the configuration utility for the RAID controller. This may require rebooting the server and entering the RAID configuration screen during startup.
- In the configuration, identify the new spare disk you installed and add it to the degraded array to replace the failed disk. Initiate the rebuild operation.
- Monitor the rebuild progress through the controller interface. Depending on the size of the disks and the controller, this may take several hours.
- Once rebuilding is 100% complete, perform a data scrub on the array. This reads all disk blocks and verifies parity consistency.
According to Data Recovery Specialists, the controller will start rebuilding the data onto the new disk based on parity information from the remaining disks.
After scrubbing, the RAID 5 array should be fully rebuilt and restored to a healthy state. The new disk is now an integral part of the array. Be sure to perform regular backups going forward to avoid potential data loss from disk failures.
Verifying rebuilt RAID 5
After rebuilding a degraded RAID 5 array, it is critical to verify that the array is fully restored before using it. Here are the main steps to verify a rebuilt RAID 5:
First, check the filesystems on the array for any errors using utilities like fsck or chkdsk. Run a thorough check of the full filesystem to identify and fix any inconsistencies or corruption.[1]
Next, confirm through the RAID management interface that the array is no longer in a degraded state and is showing as fully operational. All previously degraded disks should now display as normal.[2]
Finally, perform read/write tests across the full array to verify all sectors can be accessed reliably. This will help identify any lingering issues not caught in earlier steps.
Only once full verification is complete should the RAID 5 array be considered restored and placed back into production use. Rushing ahead without verification risks undetected errors leading to future data loss or array failure.
Restoring from backup
If the rebuild process is unsuccessful and the RAID 5 array remains degraded or inaccessible, the next step should be to restore critical data from backups. This emphasizes the importance of maintaining regular and complete backups of RAID arrays. Backups provide a safety net in case issues arise during a rebuild.
To restore from backup:
- Attach the backup storage device or access the backup files.
- Identify the most recent full backup of the RAID 5 array.
- Restore the backup to a separate location, not the degraded RAID array itself.
- Verify that files and folders have been successfully restored from the backup.
- Once data has been restored, files can be copied back to the array once it has been rebuilt or replaced.
If no viable backup exists, last resort options would be to attempt recovery using RAID recovery software. However, this will often result in partial data recovery. Having reliable backups is the best way to protect against permanent data loss when issues arise with RAID arrays.
Preventing degradation
There are a few best practices you can follow to help prevent RAID 5 degradation in the first place:
Monitor disks for early failure signs – Closely monitor your RAID disks with tools like SMART to look for signs of potential failure like bad sectors or high error rates. Replacing disks that show warning signs can prevent failures down the line. See this guide for monitoring disk health.
Use hot spare drives – Configuring hot spare drives allows the RAID to automatically rebuild using the spare if a disk fails. This prevents the degraded state entirely. Just make sure to replace the failed disk after rebuilding to get back to full redundancy.
Schedule proactive disk replacements – Disks have a typical lifespan of 3-5 years. You can avoid unexpected failures by scheduling replacements of disks after 3-4 years of use. Replace one disk at a time and allow rebuilding to prevent degradation.