Deleting files accidentally and then realizing you need them is an experience most Mac users have likely faced. The Recycle Bin provides a convenient safety net to recover deleted files easily. However, once you empty the Recycle Bin, those files are permanently deleted. Or are they?
Fortunately, it is possible to recover deleted files from the Recycle Bin even after emptying it on your Mac, without relying on third party software. The key lies in understanding where macOS stores deleted files and how to access them.
Where are deleted files stored on a Mac?
When you delete a file on your Mac, it is not immediately removed from your hard drive. Instead, macOS moves it to the Trash folder, which acts as the Recycle Bin. This allows quick and easy recovery of deleted files.
The Trash folder is located at /.Trashes on your Mac’s drive. Within this folder, there is a sub-folder for each volume on your Mac. For example, if your main drive is called Macintosh HD, the path would be /.Trashes/Macintosh HD.
When you empty the Recycle Bin, macOS deletes the references to the files in the metadata. But the actual file contents remain in the hidden Trash folder until that space is overwritten by new data.
So if you act quickly after emptying the Recycle Bin, you still have a chance to recover deleted files before they are truly lost.
How to recover deleted files from an emptied Recycle Bin on Mac
Here are the step-by-step instructions to recover deleted files after emptying the Recycle Bin on your Mac:
1. Stop writing new data to the drive
As soon as you realize important files are missing from the Recycle Bin, it’s crucial to stop any activity that may overwrite the deleted data. Avoid creating/modifying/downloading files, installing apps, etc.
2. Locate the Trash folder
In Finder, hit Shift + Command + G to open the ‘Go to Folder’ dialog. Paste the path /.Trashes and hit Go. This will open the hidden Trash folder.
3. Navigate to relevant subfolder
Within .Trashes, look for a subfolder with the name of the volume where the files originally resided. Often, this will be “Macintosh HD”. Open this folder.
4. Search for and copy deleted files
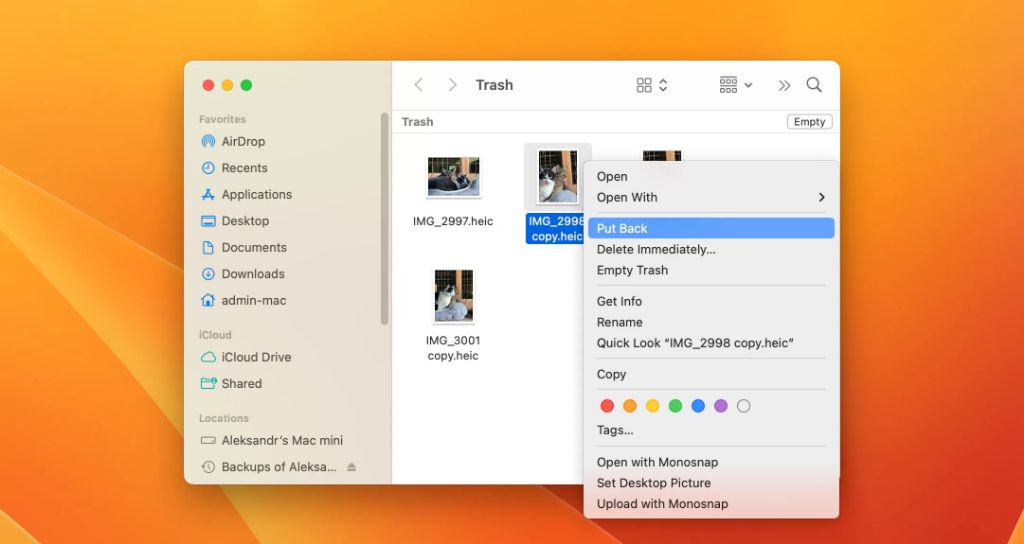
Here you will find all files deleted from that volume, retaining their original folder structure. Browse and search for the files you need to recover. Select them and hit Command + C to copy them.
5. Paste files to a safe location
Go back to Finder and paste the recovered files to another suitable location e.g. Desktop, Documents folder etc. This completes the recovery process.
6. Restart your Mac (optional)
To clear the Trash folder completely, restart your Mac. All contents will now be permanently deleted.
Tips for successful Recycle Bin file recovery
Follow these tips to improve your chances of recovering deleted files from an emptied Recycle Bin on Mac:
- Act quickly – The sooner you attempt file recovery, the better.
- Avoid writing new data to the drive – This minimizes overwrite risk.
- Remember original file locations – Helps find files faster in Trash folder.
- Copy files before recovery – Working on copies is safer.
- Use Time Machine – Provides an additional safety net for easy restore.
- Close sensitive apps – Certain apps may access and modify Trash contents.
- Restart your Mac after recovery – Clears Trash folder and frees up space.
Recovering deleted files via Time Machine
If you have Time Machine backups enabled, that provides an alternate way to recover deleted files from an emptied Recycle Bin. Here’s a quick rundown of the steps:
- Open Time Machine from the menu bar or System Preferences.
- Navigate to the Time Machine backup version created before you deleted the files.
- Enter Time Machine to view the backed-up file system.
- Browse and locate the files you want to restore.
- Select the files and click Restore to copy them back to their original or a new location.
The advantage with Time Machine is that file recovery is risk-free. Since you are accessing a backup, there is no danger of overwritten data. Time Machine also retains older versions of files, allowing you to “go back in time” to undo changes or deletions.
When is deleted file recovery impossible?
While recovering deleted files from an emptied Recycle Bin is often possible, keep in mind that permanent data loss can still occur in certain circumstances:
- Overwritten data – If the storage space used by deleted files gets overwritten by new data, those original files can no longer be recovered.
- Full disk encryption – On drives using Apple’s FileVault encryption, emptied Trash data is unrecoverable.
- SSD drives – Deleted files on solid state drives get overwritten almost instantly due to TRIM command.
- Mac with T2 chip – The T2 security chip also instantly erases emptied Trash contents.
Therefore, it is still important to exercise caution when permanently deleting files on your Mac. Avoid deleting data in haste that you may regret or need later on.
Third party Mac data recovery software
When native Recycle Bin recovery methods fail, your last resort is to use third party Mac data recovery software. Here are some popular options:
1. Disk Drill
Disk Drill can recover 500 MB of data free on Mac OS. Supports deleted file recovery even after emptying Recycle Bin. Has user-friendly interface and quick scan options.
2. Data Rescue
Data Rescue is a recovery app dedicated for Mac. It boasts high recovery success rate. Provides a deep scan to dig out hard-to-find file fragments.
3. EaseUS Data Recovery Wizard
EaseUS offers an intuitive solution to recover lost files on Mac, including documents, photos, videos, music etc. from various data loss scenarios.
While paid recovery apps can be very effective, try free native recovery methods first before investing in commercial software.
How to avoid permanent data loss on Mac
Prevention is better than cure when it comes to data loss. Follow these tips to improve data security and minimize the risk of accidental file deletion on your Mac:
- Enable Time Machine automatic backups
- Periodically create full system backups manually
- Store important data on multiple locations – internal drive, external drive, cloud storage
- Beware of force-empty shortcuts like Command + Shift + Delete
- Add important files/folders to Dock for quick access
- Don’t save everything on your desktop – use appropriate folders
- Check Trash before emptying to avoid mishaps
- Review permissions and ownership on critical files/folders
Staying organized, paying attention to file deletion/modifications, and having solid backups are the best defenses against accidental data loss on your Mac.
Conclusion
While the Recycle Bin provides a great first line of defense, permanently deleted files don’t have to be gone forever on your Mac. By understanding where deleted files are temporarily stored and how to access them, you stand a good chance of recovering erased data from an emptied Trash with a high success rate.
Act quickly after deletion, avoid overwriting data, restart your Mac after recovering files, and leverage Apple’s built-in Time Machine backups for foolproof data recovery. With some knowledge of how macOS handles file deletion, you can rescue important deleted data without relying on third party software in most cases.
Remember, prevention is the key to avoiding unfortunate data loss. Cultivate good file management habits, rely on backups, and avoid reckless deletions. Follow the tips outlined in this guide, and you can minimize the stress of accidental file deletion while increasing your chances of successful data recovery on Mac.