Damaged SD cards are a common issue that Android users face. The memory cards can become corrupted or unreadable for various reasons, rendering the data inaccessible. When this happens, some users may be quick to format the card to try and fix it. However, formatting will erase all the data, which is not ideal if the card contains photos, videos, or other files you want to recover.
The goal of this guide is to walk through steps to potentially repair a damaged SD card in an Android device without formatting it. This allows you to salvage your data. Brief troubleshooting can often get the card working again without losing anything stored on it.
Back Up Data
The first step when dealing with a damaged SD card on Android is to back up your data. This ensures you have a copy of your files in case the card cannot be repaired. There are a couple options for backing up an Android SD card:
Copy the files to your computer. Use a USB cable to connect your Android device to your computer. You can then access and copy the files from the SD card to save them on your computer. For detailed steps, refer to this guide: [How to Backup Android to SD Card[3 Methods]](https://toolbox.iskysoft.com/backup-android/how-to-backup-android-to-sd-card.html).
Back up to cloud storage. Services like Google Drive, Dropbox, or OneDrive make it easy to back up files from your Android. Connect to WiFi, open the cloud storage app, and upload your files. See this guide for full instructions on how to backup an Android SD card: [A Full Guide to Backup SD Card on Android](https://drfone.wondershare.com/backup/backup-sd-card-android.html).
Backing up your SD card files before attempting to repair should be your first priority. This gives you a redundant copy in case the repair is unsuccessful.
Check for Physical Damage
Look closely at the SD card for any signs of physical damage. This includes bent or broken pins, cracks, scratches, dents, or chips in the card itself. Even minor physical issues can prevent proper contact between the card and phone, leading to corruption or failure to read.
First, remove the SD card from your Android device. Inspect both sides and edges, watching for any external damage. Look at the metal contacts to ensure none are bent or broken. Scrutinize the plastic casing for cracks or scratches. A magnifying glass may help spot tiny imperfections.
A card with any physical defects is unlikely to function properly again. However, even if no external damage is visible, internal components could still be affected. Proceed with software troubleshooting, but be prepared to replace the card if errors persist.
While a physically damaged SD card often cannot be repaired, data may still be recoverable using specialized software and hardware. But extensive physical damage increases the difficulty and cost of data recovery significantly (Source 1).
Try the Card in Another Device
One of the easiest ways to determine if the issue is with your SD card or your Android device is to try using the card in another phone, computer, camera, or device that accepts SD cards. This allows you to isolate the issue. If the SD card works fine when inserted into a different device, then the problem is likely with your Android phone or tablet. However, if the card fails to show up or work properly in multiple devices, then the SD card itself is likely damaged or corrupted.
When testing the SD card in other devices, be sure to try different card readers and ports as well if possible. For example, try inserting the card into a built-in SD card slot on a laptop, as well as using an external USB card reader. Move the card between multiple devices to rule out any incompatibilities.
If the card does not show up in File Explorer on Windows or the Finder on Mac when inserted into a computer’s card reader, the issue is almost certainly with the card. Similarly, if the card fails to work when inserted into other phones or cameras, it points to a problem with the card rather than just an isolated issue with your Android device.
Trying the card in multiple devices helps narrow down where the true issue lies. Once you’ve determined whether the problem is with the Android device or the SD card itself, you can move forward with more specific troubleshooting steps.
Sources:
https://www.quora.com/Why-is-my-SD-card-not-detected-in-any-device-How-should-I-solve-the-problem
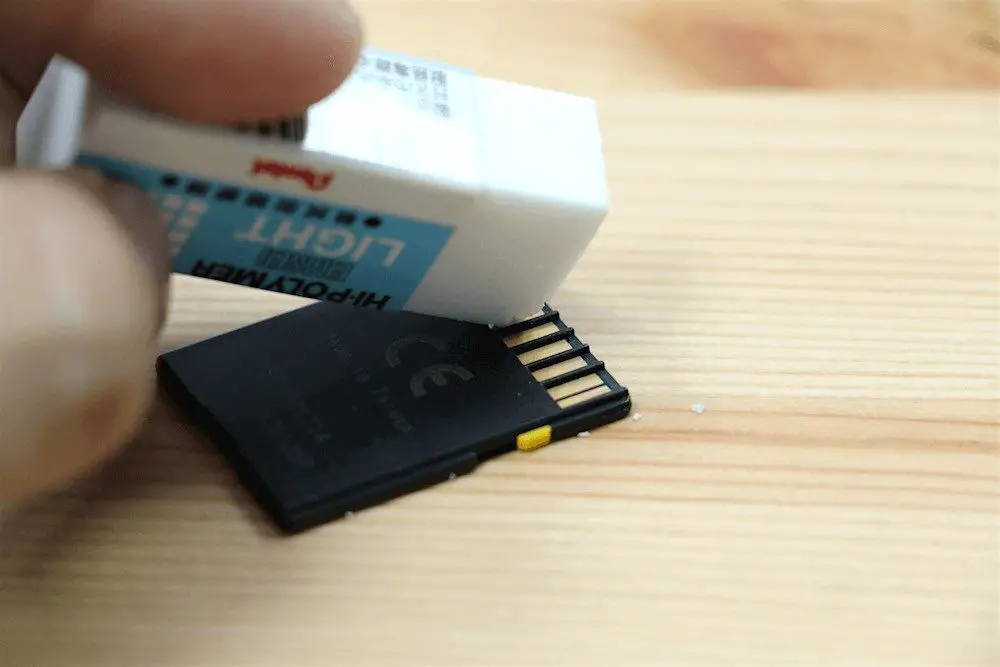
Reseat and Clean the SD Card
Before concluding that the SD card is damaged, try removing it and reinserting it into the device. Sometimes this simple step can fix connection issues caused by dust, dirt, or slight dislodgment of the card.
To reseat the card, turn off the Android device and remove the SD card by gently pushing it in to eject it. Then, inspect the gold contacts on the SD card for any dirt, dust, or corrosion. Using a soft, dry cloth, gently wipe the contacts. Avoid using anything abrasive or wet, as that could further damage the contacts.
If there are signs of dirt or oxidation on the contacts, use isopropyl alcohol and a soft toothbrush to gently clean the contacts. Let the SD card air dry fully before reinserting it into the device. Be very gentle when scrubbing the contacts, as scrubbing too hard can cause damage.
Once fully dry, orient the SD card properly and gently reinsert it into the card slot. Sometimes the simple act of reseating the connection is enough to get a damaged SD card working again in Android.
Check for Errors
Before formatting the SD card, it’s a good idea to check for file system errors and attempt to repair them. This can potentially fix corruption issues and recover data without having to completely wipe the card.
On Windows, you can run the chkdsk command. According to Wondershare, type the following in Command Prompt:
chkdsk X: /f
Replace X with the drive letter of your SD card. Chkdsk will scan the card and attempt to repair any errors it finds.
On Linux, use the fsck command instead. As recommended on the Linux Mint forums, run:
sudo fsck -fvy /dev/sdb5|tee ~/sdb5_results
To check and repair the SD card mounted at /dev/sdb5 and save the results to a file. This may fix corruption issues without fully formatting the card.
Running chkdsk or fsck before formatting can potentially recover your SD card and avoid data loss. It’s a quick process and worth trying.
Format the Card
As a last resort, try formatting the SD card to fix any errors in the file system. Formatting the card essentially reformats the file system and erases all data on it (Source).
To format your SD card on Android, go to Settings > Storage and tap on your SD card. Then tap “Format” or “Format as internal” if you want to set it as internal storage. This will completely wipe the card.
Formatting is a good option if other troubleshooting steps like reseating the card have not worked. However, keep in mind that formatting will erase all data, so be sure to back up anything important first (Source).
While formatting is sometimes necessary, try other options like cleaning the contacts first, as repeated formatting can shorten the lifespan of an SD card over time. But if errors persist, a format should resolve any file system issues.
Try Data Recovery Software
If formatting the SD card is unsuccessful in repairing it, the next step is to try using data recovery software. Specialized software like Tenorshare 4DDiG can analyze the raw data on the SD card and recover lost or corrupted files.
Data recovery software works by scanning the SD card sector-by-sector and reconstructing files based on file signatures. Even if a file system is corrupted or partitions are erased, the data itself still resides on the SD card until it gets overwritten by new data.
The key advantage of data recovery software is that it does not rely on the file system, so it can recover data even from severely corrupted cards. This gives you the best chance of recovering photos, videos, documents and other files from the damaged SD card.
To use data recovery software, download it to your computer, connect the SD card using a card reader, then scan the card. Any recoverable files will be listed and can be previewed and restored to your computer or another storage device. Just be sure not to save the recovered files back to the damaged SD card.
Replace the Card
If all of the above steps have failed to repair or recover data from the damaged SD card, then it may be time to replace it with a new one. SD cards are not designed to last forever, and typical lifespan is around 3-5 years depending on usage and storage conditions, though top brands like Samsung state their cards may retain data for up to 10 years (source).
When purchasing a replacement, it’s best to get it from a reputable brand known for making quality memory cards, such as SanDisk, Samsung, Sony, or Kingston. Avoid generic or no-name brands which often have much shorter lifespans. Also make sure to purchase a card with ample storage capacity for your needs.
Once you have the new SD card, format it properly in your device before transferring any data. With any luck, this fresh card will give you many more years of reliable performance.
Summary
Overall, it is usually possible to repair a damaged SD card without resorting to formatting. Here is a quick summary of the key steps that can often restore a card’s functionality:
– First, always back up your data if possible. Copy files off the card to another storage device before troubleshooting.
– Check for any obvious physical damage to the card. If the card is cracked, warped, or corroded, it may need to be replaced.
– Try the card in another device like a computer, phone, or camera. This can determine if the issue is with the card or your Android device.
– Reseat and clean the SD card’s contacts with a soft dry cloth. Ensure the card is making good contact in the device.
– Run disk check utilities to scan for and repair errors on the card.
– As a last resort, quick format the card on your Android device to wipe it. Then attempt data recovery software.
– If all else fails, the SD card itself is likely damaged and needs replacement. But formatting should not be the first option when issues arise.
