Restoring an SSD (solid state drive) in BIOS refers to updating the firmware on the SSD through the computer’s BIOS interface. Firmware is the programming code that runs on the SSD and controls how it operates. Over time, bugs or inefficiencies in the firmware can develop, which is why SSD manufacturers release firmware updates. Updating to the latest firmware can help fix performance issues, improve compatibility, and add new features to the SSD.
There are a few reasons why you may need to restore or update your SSD firmware:
- To resolve data corruption or instability issues
- To enable new functionality like improved encryption
- To fix bugs in the existing firmware
- To improve performance, speed, or endurance
Updating the firmware is generally a safe process, but there is a small risk of data loss if the power fails during the update. That’s why it’s crucial to have a current backup before updating. Overall, keeping your SSD firmware up-to-date can help you get the most out of your solid state drive.
Prerequisites
Before updating the firmware on an SSD, it is crucial to back up any important data stored on the drive. This ensures the data is protected in case anything goes wrong during the firmware update process. There are a few options for backing up the data:
- Copy important files to an external hard drive or cloud storage. This creates a separate copy of the files that can be restored after the firmware update.
- Use backup software like Acronis True Image to create a full system image backup of the SSD. This replicates the entire drive contents which can be restored if needed (according to Microsoft Answers).
- On Windows 10, use the built-in backup tools to create a system image or file history backup of the SSD. This provides recovery options after updating the firmware.
It’s recommended to store the backup externally such as on another drive, USB flash drive, or cloud storage. This protects the data if the SSD fails during firmware flashing. With the backup complete, you can safely proceed with updating the SSD firmware.
Enter BIOS
To access BIOS settings, you need to enter the BIOS menu on your computer’s startup. Here’s how to enter BIOS on startup for most computers:
- Restart your computer.
- As soon as the computer starts booting up, look for a key command to enter BIOS, such as F2, F10, Del, or Esc.
- The key command can vary depending on your computer manufacturer, so refer to your computer’s documentation if unsure.
- Once you press the key, you should see the BIOS menu appear on your screen.
Entering BIOS will interrupt the boot process and take you to the system setup screen. From here, you can access firmware settings to update or restore your SSD. Be sure to enter BIOS at the right time during startup, otherwise it will not work.
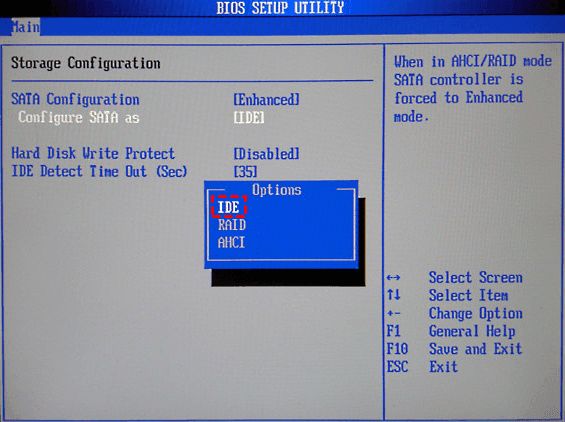
Locate Firmware Settings
To find the firmware or SSD settings in the BIOS, you will first need to access the BIOS menu on startup. The steps to enter BIOS vary between computer manufacturers, but often involve pressing a function key like F2, F10 or Delete during bootup before Windows loads (refer to your computer documentation).
Once in the BIOS, navigate to the “Advanced” tab, then look for options like “Storage Configuration”, “SATA Settings”, or “Drives”. There should be a menu that lists detected drives, including your SSD. Select the SSD drive and look for a tab or option to view the firmware version or update firmware.
For example, on Dell computers you may need to go to Advanced > SATA Settings to find the firmware menu for your SSD drive. Refer to your computer or motherboard manuals for the exact steps.
If you cannot locate the firmware menu in BIOS, you can also find the SSD firmware version in Windows. Open the start menu and type “cmd” to open the command prompt. Then type “wmic diskdrive get model,firmwareversion” and it should display the firmware for connected disk drives including your SSD.
Sources:
https://www.dell.com/support/kbdoc/en-us/000175541/how-to-find-ssd-hdd-firmware-revision-easily
https://www.crucial.com/support/articles-faq-ssd/find-firmware-revision-windows
Backup Current Firmware
Before updating your SSD firmware, it’s important to make a backup of your current firmware version. This allows you to revert back if the update causes any issues. Here are the steps to backup your SSD’s firmware in BIOS:
1. Enter your computer’s BIOS menu on startup. The key to press varies between manufacturers, but common options are F2, F10, Delete, or Esc.
2. Navigate to the Firmware settings section in the BIOS. Look for options related to firmware backup or updating.
3. Select the option to create or save a firmware backup. The BIOS may prompt you to insert a USB drive to save the backup file to.
4. After the backup file is created, safely eject and remove the USB drive. The backup firmware file can now be used to restore your SSD if needed after updating.
Some SSD manufacturers like Crucial provide tools to backup and flash firmware updates from within Windows instead of BIOS. However, the BIOS method is most universal. Refer to your SSD product page or manual for specific instructions.
Sources:
https://forums.tomshardware.com/threads/how-to-backup-firmware-ssd.2688674/
https://www.overclock.net/threads/how-do-you-make-a-backup-of-ssd-firmware.1316947/
Download Latest Firmware
The latest SSD firmware can typically be downloaded directly from the manufacturer’s website. Most major SSD brands like Samsung, Crucial, Western Digital, and Kingston provide firmware download pages where you can get the most up-to-date firmware version for your specific SSD model.
For example, to update a Samsung SSD, you would visit Samsung’s SSD Downloads page. Micron (Crucial) SSD firmware can be found at Micron’s firmware download site. Always make sure to select the exact SSD model you have to ensure compatibility.
The manufacturer website will have instructions on how to identify your SSD if you are unsure of the model. You can also use third-party SSD utility software like Samsung Magician to detect drive information and available firmware revisions.
In summary, head to the SSD manufacturer’s website and find the page for firmware downloads to get the latest update for your specific drive model. This ensures compatibility and that you are installing the correct firmware version.
Update Firmware
To update the SSD firmware:
- Locate the firmware update file you downloaded earlier and copy it to a USB flash drive.
- With the bootable USB drive inserted, restart your computer and enter the BIOS.
- Navigate to the firmware update section in BIOS.
- Select the option to update firmware from a USB drive.
- Follow the on-screen instructions to locate and select the firmware update file on your USB drive.
- Allow the update process to complete. This may take several minutes.
- When the firmware update is complete, reboot your system.
The SSD firmware should now be updated to the latest version. You can confirm this by entering BIOS again and checking the firmware version listed for the SSD.
Confirm Update
After the firmware update process is complete, it’s important to confirm that the SSD firmware was successfully updated to avoid potential issues. There are a few methods to verify the firmware version on an SSD in Windows:
In Windows File Explorer, right-click on the SSD drive and select “Properties.” Go to the “Hardware” tab and look at the firmware version listed under Device Information. Compare this to the previous firmware version to confirm it matches the new version you updated to.[1]
Alternatively, you can open the Command Prompt as Administrator and enter the command “wmic diskdrive get firmwareversion.” This will list all connected disk drives and their current firmware versions. Locate the SSD and verify the firmware version matches the updated version.[2]
Some SSD manufacturers also provide firmware update tools that can confirm the update was successful. Consult your SSD manufacturer’s instructions to see if any utility can validate the new firmware version.
If the firmware version does not reflect the updated version, the SSD firmware update may have failed or only partially completed. It’s recommended to attempt the firmware update process again to ensure it is successful.
Exit BIOS
After updating the SSD firmware in the BIOS, the next step is to exit the BIOS menu and reboot the system so the changes can take effect. Here are the steps to properly exit the BIOS:
1. Save Changes: Before exiting, be sure to save any changes made in the BIOS. This can usually be done by selecting the “Save Changes and Exit” option from the main BIOS menu. The BIOS may prompt you to confirm saving changes.
2. Reboot System: After saving BIOS changes, the system will begin rebooting. Let the system fully reboot and load into the operating system before using the computer again.
3. Confirm Firmware Update: Once rebooted, verify that the SSD firmware has been successfully updated by going back into the BIOS and checking the firmware version shown for the SSD. It should now display the newer version.
4. Resume Use: With the SSD firmware update complete and verified, the system can now be used as normal. Be sure to keep the BIOS and SSD firmware up-to-date periodically for optimal performance and compatibility.
Properly exiting the BIOS after a firmware update ensures settings are saved and the update is applied. After confirming the new firmware version, the computer can be used normally again. (1)
Restore Data
If you had the foresight to back up your data before updating the SSD firmware, you can easily restore it after the update is complete. Connect the drive or external media where your backup is stored to the computer. Then use your preferred backup software to restore the data files to the SSD. For example, if you use Windows Backup, go to Settings > Update & Security > Backup and select “Restore files from a current backup” to walk through the restoration process. You can restore specific files/folders or the entire backup.
Some key things to keep in mind when restoring data after an SSD firmware update:
- Make sure to restore the data to the same SSD that was originally backed up. The folder structure and drive letter may be different post-update.
- Don’t restore the backup to the OS drive if you updated the system drive firmware. Instead, restore user files only.
- If desired, you can choose to do a selective restore of only important user files versus everything.
- Refer to your backup software’s documentation for the exact steps to restore on your system.
By restoring from a backup, you can quickly regain access to your files after the SSD firmware process. Just be sure your backup is complete and current before starting the firmware update.
Source: https://www.cleverfiles.com/howto/recover-data-from-failed-ssd.html