The boot order in BIOS determines the sequence in which a computer checks its connected devices for a bootable operating system when powered on or restarted. The BIOS (Basic Input/Output System) is firmware that initializes hardware components at startup and allows the OS to communicate with devices. Changing the boot order may be necessary to designate a preferred boot drive or device, recover from boot issues, or boot from external drives.
For example, you might need to set a new hard drive or SSD as the first boot option after upgrading your system. Or if you have bootable media like a USB drive or DVD for installing an OS or running diagnostics, setting that first in the order allows booting from it. Troubleshooting boot problems may require modifying the boot sequence to try different drives. The ability to control boot order in BIOS provides flexibility in selecting boot devices.
Preparation
Before making any changes to your BIOS settings, it is highly recommended to back up your important files and data as a precaution. This ensures you have copies of your critical information in case anything goes wrong during the BIOS update process. There are a few key steps you should take:
- Back up personal files – Make copies of documents, photos, videos and other data files you don’t want to lose. Save them to an external hard drive, USB flash drive or cloud storage.
- Back up system files – Use Windows built-in backup utilities or third party software to create a system image, which saves a snapshot of your operating system, installed programs and settings.
- Back up browser data – Export your browser bookmarks, passwords and other important information.
Taking these preparatory steps guarantees you have restore points to go back to if the BIOS update causes any problems. As recommended in articles like this LinkedIn guide, backing up beforehand avoids potential data loss issues.
Enter the BIOS
To enter the BIOS setup utility, you need to press a special key as the computer boots up. The most common BIOS access keys are F2, F10, Delete, and Esc. However, the exact key can vary depending on your computer manufacturer and model.
Here are some of the most common BIOS access keys by computer manufacturer:1, 2
- ASUS: F2 or Delete
- MSI: Delete
- Gigabyte: Delete or F2
- ASRock: F2 or Delete
- Dell: F2 or F12
- HP: F10 or Esc
- Lenovo: F1, F2, or Fn + F2
To find the proper BIOS key for your computer, check your manufacturer’s website or user manual. You can also try common BIOS keys to see which one works.
As soon as you turn on the computer, look for a text prompt to “Press ____ to enter Setup”. Press the specified key continuously until you enter the BIOS screen.
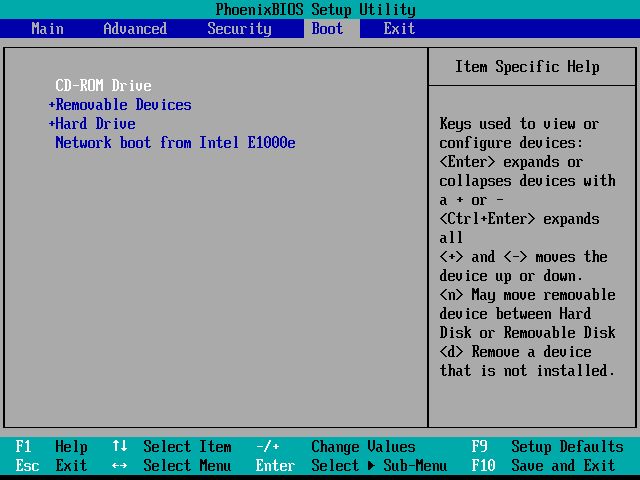
Navigate to Boot Options
The boot options menu is usually accessed by pressing a specific function key during the initial boot process. The exact key depends on your computer’s BIOS, but some common keys are F2, F10, F12, Delete, or Esc. You may see a brief prompt to “Press ____ for Boot Menu” during startup.
Once you press the appropriate key, you should see a boot menu that lists the available boot devices. These may include the hard drive, optical disc drives, USB devices, and network boot options. The hard drive will usually be listed with a label like “Windows Boot Manager” or the hard drive brand name and model.
For example, on many Dell computers pressing F12 brings up the one time boot menu. According to How do you customize BIOS boot options and order?, Lenovo computers often use F12 as well.
Change Boot Order
Once you navigate to the Boot Options menu in the BIOS, you will need to change the boot order so that the hard drive is listed first. Here are the steps:
1. Use the arrow keys on your keyboard to highlight the hard drive device you want to boot from first. This is usually labeled as “Hard Drive” or something similar.
2. Press + or – on your keyboard to move that hard drive boot device to the top of the boot order list.
3. Make sure the hard drive is now listed first under the “Boot Option Priorities” or similar menu option.
4. You may also want to disable or remove any other boot devices like optical drives or USB devices so they do not override the hard drive boot. This can help avoid issues booting to the wrong device.
5. Once the hard drive is set first in the boot order list, press F10 to save changes and exit the BIOS.
This will ensure your computer boots from the internal hard drive first when restarting. Setting the hard drive first in the boot order is important to make sure your operating system loads properly.
Save and Exit
Once you have finished making all your BIOS configuration changes, the next step is to save the changes and exit the BIOS. This will ensure that your new BIOS settings are saved and take effect.
To save changes and reboot in most BIOS:
- Navigate to the “Save & Exit” tab in the BIOS menu.
- Select the “Save Changes and Exit” option. This will save all the changes you have made to the BIOS settings.
- The system will prompt you to confirm saving changes. Select “Yes” to confirm.
- The system will then reboot, and the new BIOS settings will take effect after restarting.
It’s crucial to save BIOS changes before exiting, otherwise the changes will be lost. According to the BIOS Protection Guidelines from NIST (National Institute of Standards and Technology), it’s a recommended practice to document all BIOS configuration changes as a backup.
Verify Boot Order
After saving and exiting the BIOS, you’ll want to verify the boot order changes were saved properly. As your computer starts up, watch closely for a message indicating which key to press to enter the boot menu (usually Esc, F8, F10 or F12). Press the key to access the boot menu.
In the boot menu, you should now see your hard drive listed first in the boot order. Select it and press Enter to boot from the hard drive. If the hard drive is listed first and you are able to successfully boot into Windows from it, then you have successfully changed the boot order in the BIOS.
If the hard drive is not listed first in the boot order, you will need to go back into the BIOS and double check the boot order configuration. Refer to the previous steps to change it again if needed. The changes should persist after saving and exiting.
As a final verification, you can restart your computer again later on and confirm it automatically boots from the hard drive without needing to select it manually in the boot menu. This indicates your BIOS boot order change was successful.
Troubleshooting
If your PC is not booting from the hard drive even after changing the boot order, there are some common issues that could be causing the problem. Here are some troubleshooting fixes to try:
- Reset the CMOS by removing the CMOS battery on the motherboard for a few minutes. This will reset the BIOS settings to default. After replacing the battery, enter the BIOS again and set the boot order. According to the EaseUS article, this can resolve boot issues caused by corrupted BIOS settings.
- Check for loose cables – Make sure the power cable, SATA cable, and any other connections are properly seated. Loose cables can prevent the hard drive from being detected at boot.
- Inspect the hard drive – Open the PC case and check that the hard drive is properly connected and spinning up. Listen for mechanical sounds from the drive on bootup. If not spinning, the drive could be faulty and need replacing.
- Try booting into Safe Mode – Restart your PC and boot into Safe Mode, then restart again normally and check if the issue is fixed. Safe Mode loads default settings.
- Reseat the RAM sticks and clean the contacts. Faulty RAM can cause boot issues. Refer to the Intel guide for steps.
If the above steps do not resolve the issue, the problem may require professional repair or replacement of faulty hardware components.
BIOS Security
BIOS security is crucial to protect your computer from unauthorized access and tampering. There are a few key settings to enable in your BIOS to improve security:
Enable BIOS passwords – Set a strong power-on password to prevent unauthorized users from booting your computer. You can also set an admin password to restrict access to your BIOS settings. Refer to your computer or motherboard manual on how to set BIOS passwords.
Lock BIOS settings – Many BIOS versions allow you to lock or restrict access to certain settings like boot order, storage configuration, etc. This prevents malicious changes if someone gains physical access to your computer.
For example, on Dell business computers you can enable ‘Setup Lock’ in the BIOS to lock all settings until the admin password is entered [1]. On Lenovo Thinkpads, you can set a supervisor password to control changes to BIOS settings [2].
Enable Secure Boot – This verifies the bootloader and OS are signed by a trusted source before allowing the boot process to continue. Secure Boot prevents tampering with the boot sequence.
These BIOS security measures, along with full disk encryption, provide multiple layers of protection for your computer.
Conclusion
In summary, changing the boot order in your computer’s BIOS allows you to select which device you want the system to boot from first. The key steps are:
1. Enter the BIOS setup utility, usually by pressing a key like Delete or F2 during boot.
2. Navigate to the boot options section, commonly called Boot Order or Boot Priority.
3. Use the arrow keys to move your desired boot device, such as the hard drive, to the top of the boot order list.
4. Save changes and exit the BIOS, typically by pressing F10.
5. Verify the new boot order took effect by restarting your computer and ensuring it boots from the correct drive.
Following these steps allows you to configure your PC to prioritize booting from the internal hard drive over other devices. This ensures a smooth and optimized boot process.