What is a Short DST Check
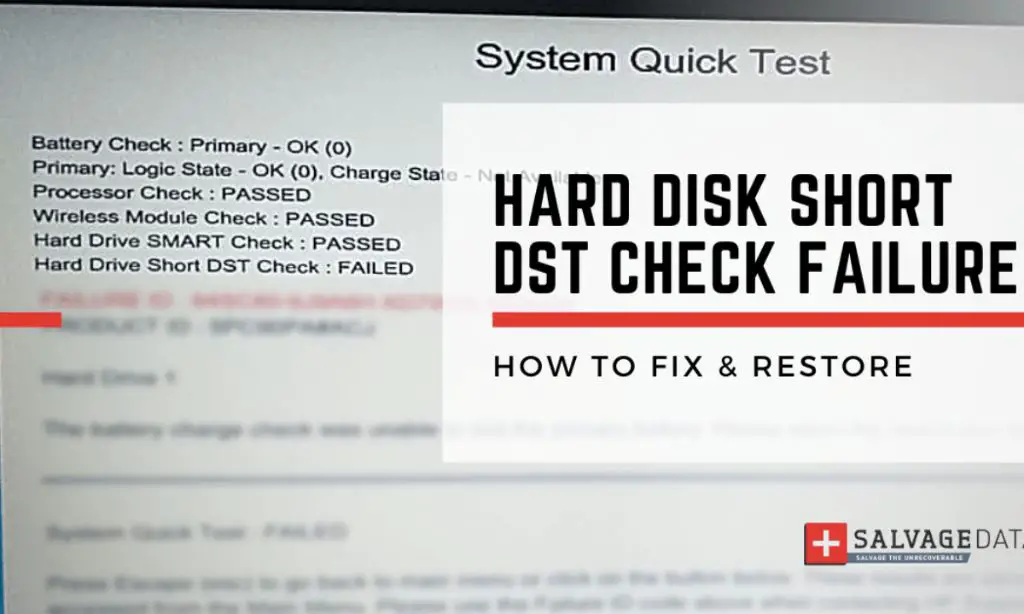
A short DST check is a diagnostic test that is run on hard drives by many computer manufacturers like HP, Dell, and Lenovo. DST stands for Drive Self Test and it checks the mechanical and electrical functions of a hard drive by writing test patterns across the disk platters and reading them back.
The purpose of a short DST check is to quickly identify any potential issues or failures with the hard drive hardware. It is shorter and faster than a full DST test but still checks major functions. Short DST checks are often run during computer startup or as part of scheduled system diagnostics.
Hard drives typically perform a short DST every time the computer boots up. The results can indicate if the drive is functioning normally or if read/write errors are occurring that could be a sign of impending drive failure.
Causes of Short DST Check Failure
There are a few common causes of a hard drive failing the short DST check:
Worn out hard drive components – Over time, the mechanical and electronic components in a hard drive can degrade and fail. The read/write heads, spindle motor, and integrated circuits have a finite lifespan.
Damaged hard drive media – The platters that store data can become damaged from physical impacts, manufacturing defects, or gradual deterioration over time. This can cause data errors and access issues.
Corrupted hard drive firmware – The firmware controls the functionality of the drive. If it becomes corrupted from a power surge or firmware update failure, it can render the drive inoperable.
Issues like bad sectors, mechanical failure of moving parts, connection problems, and overheating can also lead to DST check failures. Frequent short DST failures indicate an unreliable drive that is likely to completely fail soon. (Source)
Consequences of Failure
A hard drive short DST failure can have serious consequences if not addressed promptly. The most severe impact is potential data loss or corruption. Since DST checks test components involved in reading and writing data on the drive, a failure indicates the drive is having issues properly accessing stored data. This can lead to irrecoverable data loss if the drive fails entirely before the data can be recovered.
In addition to data loss, a failing drive is at high risk for complete crashes. Hard disk crashes can happen suddenly without warning if the issues triggering DST errors are mechanical in nature. The drive may fail to boot entirely, leaving you unable to access the operating system or files.
Even if complete failure does not occur immediately, hard disk errors will generally cause system instabilities. You may experience frequent crashes, blue screens of death, freezing, application errors, and file corruption. The operating system depends on reliable storage to function smoothly, so DST drive errors can severely impact system stability.
Addressing DST errors right away is crucial to avoid the potential catastrophic scenarios of data loss, complete disk failure, and system instabilities. Diagnosing and resolving DST errors can restore proper drive functionality and access to your important files and operating system. Consult professional data recovery services if issues persist and data loss occurs.
How to Diagnose
When you receive a hard drive short DST check failed error, the first step is to diagnose the issue to determine the cause. There are a few ways to do this:
Review SMART data – SMART (Self-Monitoring, Analysis and Reporting Technology) is a monitoring system built into hard drives that can detect and report on various indicators of drive reliability and health. Using a SMART monitoring tool like CrystalDiskInfo, you can check SMART attributes like read error rate, spin retry count, etc. Abnormal SMART values may indicate a problem with the hard drive hardware https://www.stellarinfo.com/blog/fix-hard-drive-dst-short-test-failed/.
Check Event Viewer – The Windows Event Viewer logs various system events and errors. Checking the system and application logs around the time of the DST failure may reveal hardware errors, I/O problems or other issues that could be causing the problem.
Monitor HDD health – Use a hardware monitoring tool like Speccy or HDTune to check the hard drive’s health (e.g. bad sectors) and performance (e.g. slow transfer speeds). Declining performance or an increasing error rate over time can indicate a failing drive.
How to Fix
There are a few things you can try to fix a hard drive that failed the short DST check:
Update the HDD firmware – Hard drive manufacturers release firmware updates periodically that include bug fixes and improvements. Updating to the latest firmware may resolve issues causing the DST failure. Refer to your hard drive manufacturer’s support site for instructions on finding and installing firmware updates.
Replace worn out components – Over time, components inside a hard drive like the read/write heads can degrade and cause errors. Replacing worn heads or motors can sometimes get the drive operational again. This requires specialized skills and tools – you may need to contact a data recovery service.
Repair corrupted sectors – If the DST failure is caused by corrupted sectors rather than a mechanical issue, it may be repairable by low-level formatting to map out bad sectors. This will erase your data, so only attempt after backups. Use your operating system or HDD manufacturer’s tools to securely erase and reformat the drive.
If the drive is still under warranty or you have it backed up, replacing it is often the simplest fix. For older drives, try the steps above but be prepared to remove and replace the drive if issues persist.
Data Recovery Options
If important files and data are still on the failed hard drive, data recovery should be attempted before replacing the drive. There are two main options for data recovery when a hard drive fails its short DST check:
Data recovery software like Stellar can scan the drive and recover lost or inaccessible files. This DIY software option is affordable, convenient, and may successfully recover your files if the drive failure is logical and has not caused physical damage. However, if there is physical damage to the platters or read/write heads, DIY software is less likely to work.
Professional data recovery services like SalvageData can attempt more advanced recovery methods in a cleanroom environment. They use specialized tools and techniques to extract data from physically damaged drives. This option has the best chance for recovery but is also the most expensive. Costs may range from $300 to over $3000 depending on the extent of drive damage.
Prevention
There are a few key ways to help prevent hard drive short DST check failures from occurring:
Monitor HDD Health – Use disk utility software like CrystalDiskInfo to regularly check the SMART status of your hard drive. Tracking metrics like reallocated sectors and temperature can alert you to issues before failure occurs.
Update Firmware – Keep your hard drive firmware up-to-date through your computer or drive manufacturer. Firmware updates often address stability issues and improve drive performance.
Handle with Care – Avoid physical shocks and impacts to your hard drive. Do not move your computer while the drive is actively reading or writing. Proper handling helps prevent mechanical failure over time.
With vigilant health monitoring, timely firmware updates, and careful physical handling, you can help avoid or delay drive failures flagged by short DST check failures.
When to Replace a Hard Drive
There are two main instances when you should consider replacing your hard drive after getting the short DST check failed error:
After repeated failures: If you keep experiencing the short DST check failure despite trying various troubleshooting methods, it likely indicates an issue with the hard drive hardware itself that is not easily fixable. Repeated DST check failures usually mean the hard drive is deteriorating and reaching the end of its lifespan. At this point, it’s best to replace it before you experience full failure and potential data loss.
Preventively based on age/usage: Most hard drives last between 3-5 years on average with regular use before needing replacement. If your hard drive is older or has seen very heavy usage, you may want to be proactive about replacing it even if you haven’t had DST check errors yet. Hard drives degrade over time, so replacing an older high-mileage drive can help prevent future errors and failure. Check the Power On Hours and power cycle count in the S.M.A.R.T. data for usage metrics.
Choosing a Replacement Drive
When your hard drive fails the Short DST check, it’s usually a sign that you need to replace it. There are a few key factors to consider when choosing a replacement drive:
Compatibility – Make sure the new drive is compatible with your computer’s motherboard and operating system. The connection type (SATA, IDE, etc.), size, and RPM speed should match the old drive.
Performance needs – Consider the performance level you need in areas like drive capacity, data transfer speeds, and overall responsiveness. For example, gamers and media editors often opt for fast solid state drives (SSDs).
Reliability – Hard drive reliability varies between models and manufacturers. Check professional reviews and ratings when possible. Enterprise-class and server-grade drives usually offer the best reliability. Consumer-level drives can be more prone to failure.
Additional factors like noise level, power consumption, warranty length, and price should be considered as well. Consulting with a computer technician can help ensure you select an optimal replacement drive that meets both your compatibility needs and performance demands.
Some good compatible replacements for a failed hard drive include:
– Seagate BarraCuda https://www.seagate.com/products/hard-drives/barracuda-hard-drive/
– Western Digital Blue https://shop.westerndigital.com/products/internal-drives/wd-blue-sata-hdd#WD10EZEX
– Toshiba X300 https://toshiba.semicon-storage.com/us/product/storage-products/client-hdd/x300.html
Migrating Data to New Drive
When your hard drive is failing, you’ll need to transfer your data to a new replacement drive. There are a few options for migrating data:
Cloning vs Clean Install
Cloning involves making an exact copy of your original hard drive and transferring it to the new drive. This will copy over your operating system, programs, settings, and files. Cloning saves you the hassle of reinstalling everything and reconfiguring settings.1
Doing a clean install involves reinstalling your operating system and programs from scratch on the new drive, and then manually transferring your personal files over. This takes more effort but gives you a fresh start.
Using Disk Imaging Software
Specialized disk imaging programs like Acronis True Image or Macrium Reflect can clone your entire drive or just copy select files. They can even recover data from drives with bad sectors. This is the easiest way for an exact clone.2
Manual File Transfer
You can manually copy files over via drag and drop. This works if you only need to transfer documents and don’t want to clone the entire drive. Be selective about which folders to copy if your old drive is unstable or corrupted.
