What is an SSD?
An SSD, or Solid State Drive, is a type of data storage device that uses integrated circuit assemblies to store data persistently, typically using flash memory (Wikipedia, 2021). It differs from a traditional hard disk drive (HDD) which has spinning platters and a mechanical arm to read/write data. Instead, SSDs store data on microchips and have no moving parts.
Some key benefits of SSDs over HDDs include:
- Faster read/write speeds – SSDs can access data almost instantly while HDDs require time for the mechanical arm to move into position (TechTarget, 2022). This makes SSDs better for quick access of large files.
- Quick boot times – With no moving parts, SSDs can start up almost immediately. HDD boot times are slower due to the physical spin up time (Kinsta, 2021).
- More durable – With no moving parts, SSDs are more resistant to physical damage from drops or shocks.
- Lower power usage – The lack of a motor makes SSDs more energy efficient.
Overall, SSDs provide substantial performance and reliability improvements over traditional HDDs. Their fast speeds, quick boot times, durability and efficiency make them ideal for laptops and other mobile devices where responsiveness and battery life are important.
Why Remove the SSD?
There are several reasons you may need to remove the SSD from your laptop:
- To troubleshoot performance issues or errors – If your SSD is failing or malfunctioning, removing it for inspection or replacement may be necessary.
- To upgrade to a larger SSD – As your storage needs grow, you may need to upgrade to a larger capacity SSD. This requires physically swapping out the old SSD.
- For data recovery – If your SSD has failed completely, removing it to attempt data recovery using specialized tools may be your only option.
- To reinstall the operating system – Sometimes a clean OS install is needed to resolve software issues. This may require removing the SSD temporarily.
- To salvage working parts – If your laptop has physical damage, the SSD may still be good. Removing it allows you to repurpose it.
- To fix physical damage – If the SSD itself is physically damaged, removing it for replacement is required.
Overall, the main reasons for removing an SSD involve troubleshooting hardware issues, upgrading components, data recovery, reinstalling software, or salvaging working parts from a damaged device.
Precautions Before Removing
Before removing the SSD from your laptop, it’s important to take some precautions to avoid data loss or damage to the drive.
First, be sure to back up any important data on the SSD. Copy files to an external hard drive or cloud storage to ensure you don’t lose anything when the drive is removed (Source 1).
Next, discharge any static electricity from your body before handling the SSD. Ground yourself by touching a metal part of the laptop case first. Static shock can damage computer components (Source 3).
Have the proper tools on hand for removing the SSD, such as a Phillips screwdriver and plastic pry tool. Refer to your laptop manual for the exact tools needed. Avoid using excessive force while removing the drive.
Following these precautions will help ensure safe SSD removal and prevent any data loss or hardware damage.
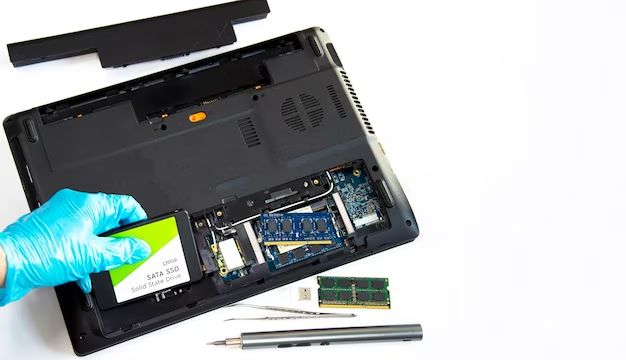
How to Remove the SSD
Removing the SSD from a laptop is a straightforward process, but you need to take care not to damage any components. Here are the steps to safely remove an SSD:
- Turn off the laptop and disconnect any cables or accessories like the charger.
- Locate the SSD compartment door, usually on the bottom of the laptop. It may be held in place with screws.
- Carefully loosen any screws and open the compartment door. Be gentle as the door may be brittle.
- Locate the SSD inside the compartment, likely held in place by a screw or latch mechanism. This video shows how to access the SSD on a typical laptop.
- Gently loosen the screw or latch holding the SSD in place. Use a plastic pry tool if needed to pop it out of the slot.
- Slide the SSD out of the slot. Never pull on the cables as that can damage the connections.
- Sometimes an adapter sleeve needs to be removed from the SSD before it can slide out. Check for any screws or clips holding the sleeve in place.
- Once removed, carefully place the SSD in an anti-static bag for safekeeping.
- Close the compartment door and replace any screws to secure it.
Taking pictures as you go can help if you need to reinstall the SSD later. Also be aware that the procedure varies across laptop brands and models. Consult a service manual for your specific laptop if any of the steps seem unclear.
What Happens After Removal
When you remove the SSD from a laptop, several things can happen:
First, the laptop may not be able to boot up properly without the SSD installed. The SSD often contains the operating system and applications needed for the laptop to function. Without it, the laptop will likely display an error message on boot up since it can’t find the OS (Source 1).
Second, you will no longer have access to any of the data and files that were stored on the SSD. The data remains on the physical SSD drive, but with the drive removed, the laptop can’t read it anymore (Source 2). This cuts off access to the programs, apps, photos, documents, and any other files on the SSD.
Finally, performance will likely be reduced without the SSD. HDDs are much slower than SSDs when it comes to data transfer speeds. So operating system functions, loading apps, and file access will be slower overall without the speed boost of the SSD.
Replacing the SSD
Replacing the SSD in a laptop is a straightforward process, though care needs to be taken to avoid damaging components. Here is a step-by-step guide for replacing a laptop SSD:
- Backup any important data from the old SSD. Copy files to an external drive or cloud storage to ensure no data is lost in the replacement process.
- Purchase a compatible SSD. Consult your laptop manual or specifications to determine the correct physical size and interface (SATA, NVMe, etc).
- Open the laptop case and locate the SSD. This usually involves unscrewing a panel on the bottom of the laptop.
- Carefully disconnect the old SSD from the motherboard. Be gentle when handling connectors.
- Insert the new SSD into the slot and secure it. Make sure it clicks into place properly.
- Replace the laptop cover and screws.
- Boot into the BIOS menu and make sure the new SSD is detected properly.
- Install your preferred operating system and drivers onto the new SSD.
- Migrate data from backups or the old SSD to complete the replacement.
When replacing a laptop SSD, the most important steps are securing compatibility, safely handling components, and migrating data to avoid loss. With care and proper backups, the process can upgrade storage with minimal disruption.
Alternatives to Removal
Before removing the SSD completely, there are some alternatives worth considering that allow you to continue using the drive without taking it out of your laptop:
External SSD Enclosures
Rather than removing the SSD, you can get an external USB enclosure for it. This allows you to keep using the SSD externally while also installing a new drive in your laptop. Enclosures are inexpensive and easy to use (source).
Cloning the SSD
Cloning copies everything on your current SSD to a new one that you can install in your laptop. This lets you migrate to a new drive without losing your data or starting from scratch. Many cloning softwares make this process simple (source).
Fixing Issues Without Removal
Before removing your SSD, try troubleshooting any issues. Problems like a full drive, corrupted files, or OS issues can often be fixed with simple solutions like deleting files or reinstalling your operating system (source). Removing the SSD should be a last resort.
Data Recovery
If you removed the SSD without first backing up your important files, recovering the data can be challenging but is often possible. There are a few options for attempting DIY data recovery before turning to professional services:
Use data recovery software like Disk Drill or EaseUS Data Recovery Wizard to scan the SSD drive and recover deleted files. These tools can recover data even from corrupted or damaged SSDs.
Connect the SSD to another computer externally using a SATA-USB adapter. This gives you access to the drive to attempt data recovery. Make sure not to overwrite the drive when connected.
If DIY software recovery fails, turning to professional data recovery services may be necessary. Experts have specialized tools and clean room facilities to repair drives and recover data at the component level. Prices range from $300 to $3000+ depending on the drive’s condition.
Recovering data from a removed laptop SSD can be difficult and time consuming without backups. While possible in many cases, preventing data loss by regularly backing up the drive is highly recommended.
Disposing of the Old SSD
Once the SSD has been removed and replaced, you’ll need to securely dispose of or recycle the old SSD. It’s important to securely erase all data on the SSD before disposal to protect your personal information.
There are a few recommended methods to securely erase an SSD according to Backblaze:
- Use disk utility software to overwrite the drive with zeros or random data multiple times
- Use the SSD manufacturer’s secure erase tool to reset the drive to factory settings
- Perform a full disk encryption on the drive then delete the encryption key to make data inaccessible
Physically destroying the SSD by shredding it into small particles is another foolproof method according to IoLo System. Some recycling centers like Eco-Tech Environmental provide SSD shredding services to completely destroy drives.
Once the data is securely erased, the SSD can be recycled or disposed of properly. Many computer stores and electronics recyclers will accept old SSDs for recycling. Recycling helps recover valuable materials from the SSD and minimizes environmental impact.
When to Consult a Professional
Although SSD removal and replacement in a laptop is usually a straightforward process, there are some situations when it’s best to have a professional handle it for you:
If the data on the SSD is mission-critical or irreplaceable, and you are not comfortable attempting the removal yourself, it may be worth paying an expert to handle it. Professionals have specialized tools and techniques to safely remove and replace SSDs without data loss. This is especially important for enterprise devices with proprietary hardware or encryption.
If you need to service a laptop that is still under warranty, it is generally recommended to go through the manufacturer or an authorized repair shop. They can ensure proper protocols are followed so the warranty remains intact.
For business laptops with enterprise-level encryption or device management software, a professional IT service may be required to properly transfer or decrypt data when swapping SSDs. They will have the necessary tools and permissions.
If the laptop requires substantial disassembly to access the SSD bay, such as removing the entire bottom cover, it is better left to experienced technicians to avoid damage. Attempting complex teardowns when you are not comfortable doing so risks breaking delicate components.
In summary, for average consumer laptops, most users can replace an SSD themselves if they take care and follow guides. But if you have a mission-critical device, lack the proper technical skillset, or need to preserve a warranty, seeking professional assistance may be your best option.
