What is Disk Utility?
Disk Utility is a built-in app included with macOS for managing storage devices and volumes. It can be found in the Utilities folder within the Applications directory. Some of its core capabilities include:
Erase, format, and partition disks (Source)
Repair disk errors and problems (Source)
Create and manage volumes including RAID arrays (Source)
Back up drives or make disk images (Source)
Overall, Disk Utility gives users control over their storage devices, allowing advanced disk management directly within macOS.
Reasons to Erase a Disk
There are several common reasons why Mac users may want to erase a disk using Disk Utility:
Repurpose or reuse a disk – Erasing a disk completely wipes it clean, allowing you to repurpose the disk for a new use. For example, you may want to erase an old external hard drive to use for backups or storage.
Remove sensitive data before selling/giving away a Mac – Erasing the disk ensures no personal or sensitive files are left behind when selling or giving away your Mac. This is an essential security step.
Troubleshoot disk errors or problems – Sometimes disk problems like corruption or read/write errors can be fixed by completely erasing the disk. This gives you a clean slate to reinstall macOS and start over.
Start fresh before a macOS reinstall – Many choose to erase their Mac’s disk before doing a fresh install of macOS. This cleans up any accumulated junk, caches, or problems in the OS.
Overall, erasing a disk with Disk Utility is commonly done to repurpose a disk, securely wipe sensitive data, resolve disk errors, or prepare for a fresh macOS install. It completely resets the disk to a clean state. [1]
How to erase a disk with Disk Utility
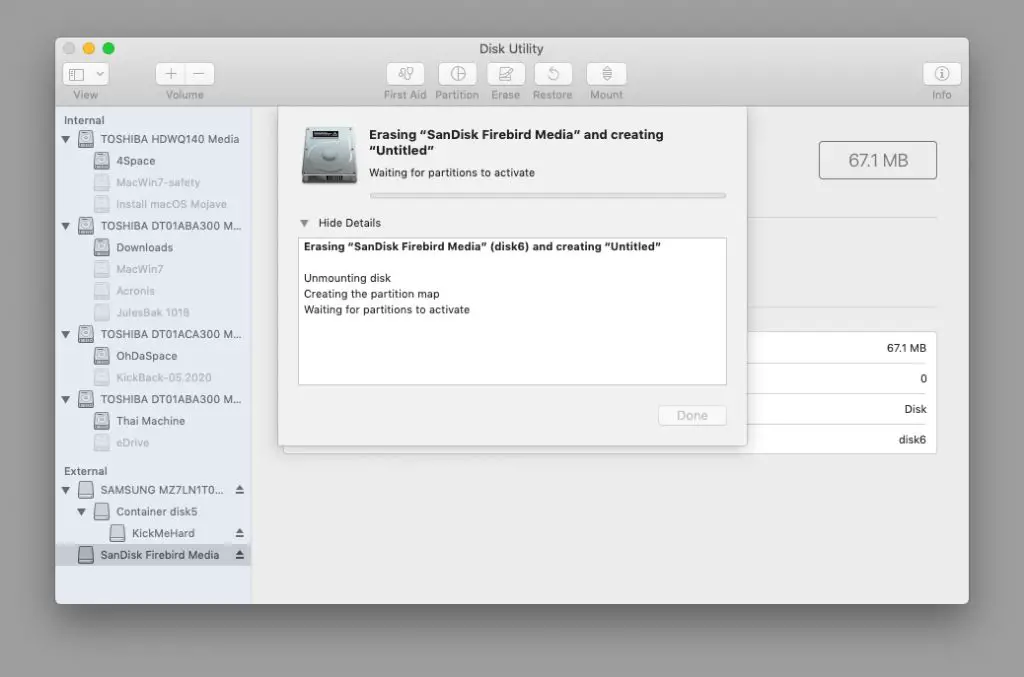
Erasing a disk using Disk Utility on a Mac is straightforward. First, connect the disk you want to erase and launch Disk Utility, which is located in the Utilities folder on your Mac. In the Disk Utility sidebar, you’ll see all available disks listed.
Select the disk you want to erase from the sidebar. This will highlight the disk information and show the Erase button in the toolbar at the top. Click the Erase button to bring up the format options. Here you can choose a format like APFS or exFAT and select a scheme like GUID Partition Map. Choose the options you want for the disk – the most common are APFS and GUID Partition Map.
Once you’ve selected the format and scheme, simply click the Erase button at the bottom to confirm the disk erase. Disk Utility will then quickly erase and reformat the disk. Be aware this deletes all data on the disk, so be sure to backup anything important first.
For more details, see Apple’s guide on erasing disks with Disk Utility: https://support.apple.com/en-us/HT208496
Disk erasing options
When erasing a disk in Disk Utility on Mac, you have two main format options:
- APFS (Apple File System): This is the default format for solid state drives and flash storage in modern versions of MacOS. It is optimized for solid state drives.
- Mac OS Extended: This is the older format optimized for hard disk drives. It is compatible with older versions of Mac OS X.
For the partition scheme, the default option in Disk Utility is GUID Partition Map. This is the most widely compatible partition scheme and works for disks over 2TB in size. The older Apple Partition Map only supports disks up to 2TB.
When erasing, you can also choose between a faster erase which overwrites the disk directory, or a more secure erase which overwrites all data. The most secure option is to select a 7-pass or 35-pass erase which overwrites all data multiple times. This ensures all previous data is non-recoverable.
Secure erase options
Disk Utility provides several options for securely erasing data on a disk or volume. The level of security depends on how thoroughly you want to wipe the data.
The fastest and least secure option is to simply delete the volume. This removes the references to the files on disk but does not overwrite the actual data. The data remains on disk until it gets overwritten by new files over time.
For more secure options, Disk Utility can overwrite the disk space with zeros or random data patterns. The “most secure” options perform this overwrite process two or more times to prevent any chance of recovery. According to Apple, their standard 35-pass secure erase process should take about 7 hours to wipe a 1TB hard drive.
In most cases, the standard 1-pass zero-out option provides reasonable security against typical recovery attempts. But for very sensitive data, the 3-pass or 7-pass overwrite is worth the extra time to virtually guarantee the data cannot be recovered by any means.
What gets erased
When you erase a disk in Disk Utility on a Mac, it deletes all volumes and partitions that exist on that disk (Apple Support). This removes all files, folders, applications, and data stored on those volumes. Erasing effectively formats the disk and resets it to a clean, blank state as if it were brand new.
Some key points on what gets erased when disk erasure occurs in Disk Utility:
- All volumes and partitions on the disk are deleted.
- All files and folders on those volumes are permanently removed.
- The disk is reformatted, wiping out any previous file system structures.
- All data residing on the disk is destroyed and no longer recoverable.
- The disk is restored to a fresh, blank slate as if it was a new disk.
In summary, disk erasure results in a complete removal of all stored data, resetting the disk to an unused, empty state ready for new volumes and data to be written. No files or information can be recovered after a proper erase.
Data recovery after erasing
Once a disk has been securely erased, the options for recovering data are very limited. Secure erase methods like degaussing or overwriting completely remove any trace of the original data. However, some data recovery software may be able to restore data from a disk that has been erased through normal formatting. Software like Disk Drill for Mac or Recuva for Windows searches for remnants of deleted files and reconstructs them.
The most reliable way to recover erased data is from a backup. Before erasing or reformatting a disk, it is crucial to make sure you have a full backup of any files you may need later. Backup systems like Time Machine on Mac or File History on Windows preserve previous versions of files, providing a safety net if you ever erase your disk by accident.
What if erasing fails?
Sometimes the erasing process can fail due to underlying issues with the disk itself. Disk errors like bad sectors can prevent erasing from completing successfully. If you get an error like “Erase process has failed” in Disk Utility, it usually means there is a problem with the disk.
Before attempting to erase the disk again, first try repairing it using First Aid in Disk Utility. This may resolve any directory errors and allow erasing to work. If First Aid fails, the drive itself may be failing and need replacement (Source).
If the disk is corrupted or has physical errors, erasing can fail repeatedly. At that point it’s best to replace the failing drive if possible. Failing hard drives, SSDs, or external drives will need to be replaced before you can reliably erase and reuse them.
Erasing errors can also occur if the drive is not mounting properly. Try unplugging the external drive and plugging it back in, or rebooting the Mac. The macOS installation drive may also fail to erase, requiring re-creating the installer USB.
While frustrating, erase failures due to disk problems can usually be resolved by troubleshooting the drive itself. Repairing errors, remounting the disk, or replacing the faulty hardware will typically get erasing working again.
When erasing is unnecessary
In some cases, erasing the entire disk with Disk Utility is unnecessary to accomplish your goals. For example, if you simply want to delete some files or folders from your disk, you can do that directly in the Finder without needing to erase the entire disk. The Finder delete option just removes the references to those files in the file system, but does not actually overwrite the data itself.
Additionally, you can reformat or partition a disk without needing to fully erase it first. For example, if you want to change the partition format of your disk from APFS to HFS+, or change the partition layout, you can do so directly in Disk Utility without erasing. This will restructure the file system, but not actually wipe all the data from the disk.
In summary, fully erasing a disk with Disk Utility is only necessary if you want to ensure all data is completely wiped from the disk. Otherwise, for more targeted operations like file deletion, reformatting, or partitioning, an erase is not required.
Summary
Erasing a disk with Disk Utility deletes all data from the disk and allows it to be reused for new data. The normal Erase option overwrites data making it difficult but not impossible to recover, while the Secure Erase options meet government standards for preventing data recovery. It’s important to back up any important data on a disk before erasing it, as the data will be permanently deleted.
Erasing should be done with caution and only when necessary, such as when selling, giving away or recycling a Mac. In most cases formatting or repartitioning a disk is sufficient for preparing it for reuse. Overall, Disk Utility provides a simple interface for securely and permanently erasing data from a disk.
