Secure erase is a feature on Mac computers that allows users to permanently delete data from their hard drives. When files are normally deleted on a Mac, the references to those files are removed from the file system but the actual data remains on the drive. Secure erase overwrites the data to prevent it from being recovered.
Why is secure erase important on Mac?
There are a few key reasons why securely erasing data is important on Macs:
- Prevent data recovery – Overwriting data with secure erase makes it extremely difficult for anyone to recover deleted files using data recovery software or hardware tools.
- Remove sensitive information – Before selling, recycling or disposing of a Mac, secure erase can help ensure personal and confidential data is completely wiped from the hard drive.
- Free up space – Securely erasing files frees up valuable hard drive space as the deleted data is overwritten.
- Reset to factory settings – Using secure erase can reset a Mac back to factory conditions by deleting all user data.
In summary, secure erase gives Mac users peace of mind that deleted files, documents, media and any other sensitive information is truly erased and unable to be accessed again.
How does secure erase work on Mac?
Secure erase works by overwriting the space occupied by files with randomized junk data at least 3 times. This makes it infeasible to recover the original contents of the deleted data.
Here is an overview of how secure erase overwrites data on a Mac:
- When a file is deleted on Mac, only the reference to that file is removed from the file system. The actual data still resides on the hard drive.
- With secure erase, the sectors where that file data is stored are overwritten with random strings of 1s and 0s multiple times.
- By default, this overwriting process is repeated at least 3 times by Mac’s secure erase function.
- The more times data is overwritten, the harder it becomes to recover anything residing there originally.
- With each pass, the chance of any residual data traces remaining diminishes significantly.
- Once complete, all deleted files and data have been replaced with meaningless random data, leaving no trace of the original contents.
This multi-pass random data overwriting is what makes secure erase so effective compared to simply deleting files or even formatting a drive.
When should you use secure erase on Mac?
Here are some common situations when it is recommended to use Mac’s secure erase feature:
- Selling or gifting your Mac – Securely wipe all personal and sensitive data before passing your Mac to a new owner.
- Disposing of an old Mac – Erase data before recycling or throwing out a Mac.
- Removing private or confidential data – Securely delete financial documents, legal records, client information etc.
- Freeing up disk space – Reclaim disk space taken up by unwanted files and caches.
- Eliminating malware – Wipe any potential viruses or other malware hiding in unseen files.
- Reset to factory settings – Erase all user data to return Mac to out-of-the-box state.
Essentially, any time you need to permanently destroy data on a Mac, you should use secure erase rather than standard file deletion.
How to securely erase data on Mac
Here are the steps to securely erase specific files, folders or entire drives on a Mac:
- Select the file, folder or drive you want to securely erase in the Finder.
- Right-click and choose Secure Empty Trash.
- This will prompt you to enter your admin user password to proceed.
- The Mac will then begin overwriting the selected data, which may take some time to complete.
- Once finished, the Mac will report that the contents have been securely erased and disk space freed up.
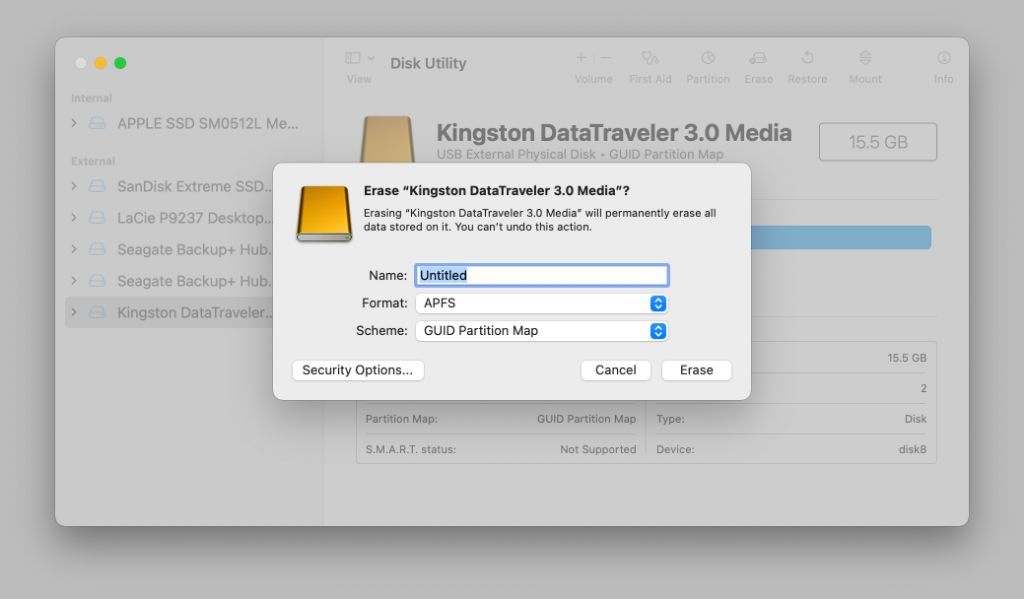
For erasing an entire disk or storage device, it is best to use Disk Utility instead:
- Open Disk Utility
- Select the disk or drive you want to erase.
- Click Erase at the top.
- Choose Mac OS Extended format.
- Select Erase Free Space to just securely erase free space, or Erase Volume Group to wipe the entire drive.
- Click Security Options and move the slider to Most Secure.
- Click OK, then click Erase to begin secure erase.
This will completely overwrite all data on the selected drive with secure erase.
Using Terminal to securely erase files
You can also use Terminal to securely erase specific files and folders with the srm command. For example:
srm /path/to/file
srm -r /path/to/folder
This will overwrite the data multiple times to prevent recovery. Using Terminal gives you more control over the number of overwrite passes.
How long does secure erase take on Mac?
The amount of time secure erase takes on a Mac depends on a few factors:
- Amount of data – More data means longer erase times.
- Disk speed – Faster SSDs finish secure erase faster than HDDs.
- Overwrite passes – More passes mean longer erase times.
- Mac performance – Secure erase goes quicker on newer, faster Macs.
As a general guideline for an average Mac:
- Erasing a few gigabytes of files may take a few minutes
- Erasing 50-100GB may take 30 minutes to an hour
- Doing a full disk secure erase of 500GB+ can take several hours
Be prepared for secure erase to take quite some time. You can still use your Mac as normal during the process.
Secure erase vs standard erase times
Securely erasing data takes much longer than a standard erase option. Here is a comparison of estimated erase times for a 500GB hard drive:
| Erase Type | Estimated Time |
|---|---|
| Standard Erase | 2 – 5 minutes |
| 1-pass Secure Erase | 1 – 2 hours |
| 3-pass Secure Erase | 4 – 8 hours |
| 7-pass Secure Erase | 12 – 24 hours |
The additional overwrite passes in secure erase significantly increase the total erase time. But they provide much better guarantees that data is unrecoverable.
Is secure erase enough when selling/donating a Mac?
Using the default 3-pass secure erase when selling or donating your Mac should be enough to permanently destroy personal and confidential data.
A 3-pass rewrite of all data makes it essentially impossible for basic data recovery attempts to harvest anything usable.
That said, for utmost due diligence when disposing of a Mac, you can use a 7-pass or even 35-pass secure erase that meets Department of Defense erasure standards. Although extremely time consuming, that maximizes assurance that every last bit is securely wiped.
You can also remove the Mac’s hard drive and have it shredded if you really want 100% certainty. But for most purposes, a 3-pass secure erase is sufficient.
Should you reinstall macOS before selling?
After using secure erase it is still a good idea to reinstall a fresh copy of macOS before selling or gifting your Mac. Here’s why:
- It removes any installed software licenses linked to your Apple ID.
- It clears out all system preferences and settings.
- It reverts macOS to a clean, factory condition.
- It removes any leftover caches, temp files or folders.
- It gives the new owner a fresh system to start from.
Reinstalling macOS combined with secure erase provides maximum assurance your data is removed and Mac is reset for transfer of ownership.
Is secure erase free for Mac users?
Yes, securely erasing data is free and included in macOS by default. There is no need to purchase any additional software or services.
The Secure Empty Trash and secure erase options are built into Finder, Disk Utility and Terminal at no cost.
Some key points about secure erase being free on Mac:
- All Macs come with data security tools included.
- You own the Mac hardware so can fully erase it.
- No ongoing license fees or subscriptions required.
- Works on any Mac regardless of age or specs.
- Apple provides it as an end-of-life option for Mac users.
Just be sure to backup any important data first, as secure erase will permanently destroy files and can’t be undone.
Paid software vs built-in secure erase
There are third-party macOS utilities that offer enhanced secure erase features above the built-in tools. However, for most users the free secure erase options are sufficient. Reasons to avoid paid Mac secure erase software include:
- Added cost with minimal benefit for casual users.
- Complex interfaces that can confuse novices.
- Extra features beyond what average user needs.
- Unknown reliability for many paid options.
- No guarantees better than built-in tools.
Unless you have highly advanced requirements, it’s best to stick with the proven and free macOS secure erase capabilities.
Is secure erase sufficient for SSDs?
Yes, Mac’s secure erase fully supports erasing SSDs (solid state drives) as well as traditional hard disk drives.
On SSDs, secure erase works by overwriting cells in the same way as on HDDs. The only difference is SSDs have higher performance, so the overwrite process generally finishes faster.
Key things to know about securely erasing SSDs:
- The same Secure Empty Trash and Disk Utility options apply.
- May need an adapter to connect an SSD externally.
- Erasing times are quicker than HDD but still substantial.
- Repeated overwrites are required to saturate SSD cells.
- Security standards are a minimum 3-pass erase.
- Proper SSD erasure is just as important as HDDs.
As SSDs become more prevalent, it’s critical to properly secure erase them before disposal or transfer of ownership.
Is secure erase needed for flash drives and SD cards?
Securely erasing flash drives, SD cards, and other removable storage devices is also essential. Though they use solid state memory, the same secure erase principles apply.
For flash drives:
- Use Finder’s Secure Empty Trash after copying data off.
- Use Disk Utility to fully erase drive.
- Be sure to eject drive after erase completes.
For SD cards and other external media:
- Use a USB card reader connected to Mac.
- Follow same steps as with a flash drive.
- May need an SD adapter for Disk Utility.
- Eject and securely store card after erase.
Following a proper secure erase process for these devices is just as crucial when disposing or recycling.
Can deleted files be recovered after secure erase?
No, the whole point of secure erase on Mac is to prevent deleted files from ever being recovered.
By overwriting all data remnants with randomized gibberish, secure erase makes it virtually impossible for deleted files to be rescued with standard software or hardware methods.
Some key points on secure erase and Mac data recovery:
- Only chance is advanced laboratory decryption.
- Would cost tens of thousands of dollars and weeks/months.
- No guarantee of reconstructing anything usable.
- Makes recovery financially and technically unfeasible.
- Safer than physical destruction without traces.
While no data destruction is 100% perfect, secure erase provides excellent practical safeguards against feasible recovery attempts.
How hackers try to recover erased data
With access to the original storage media, hackers may attempt recovery using methods like:
- Scanning magnetic traces on platters using microscopic or magnetic tools.
- Exploiting any weak areas of encode using complex algorithms.
- Reading faint voltage traces left in flash memory cells.
- Amplifying and decoding analog signal remnants.
- Using electron microscopes to inspect wafer surfaces.
The more overwrite passes completed, the lower the odds anything can be salvaged. Secure erase thwarts these tactics by repeatedly overwriting with random bit patterns.
Should you drill holes in old hard drives?
Drilling holes in a Mac hard drive after secure erase is unnecessary. The multiple data overwrites are sufficient to prevent any reasonable chance of recovery.
Some key points on physically destroying hard drives:
- Drilling holes makes data recovery impossible but so does secure erase alone.
- Physical destruction is permanent – no way to undo it if you change your mind.
- Drilling can be dangerous – slippery drill bits can cause injury.
- May still leave accessible data around the edges.
- Secure erase is cleaner and safer for average Mac user.
Securely wiping the drive first is a better option than just relying on physical destruction of the disks.
When is physical destruction recommended?
Here are some instances where physically destroying the hard drive makes sense as an extra precaution:
- Hard drive was used to store highly illegal or dangerous data.
- Dealing with extremely sensitive government or military data.
- Overkill peace of mind when disposing drives with confidential data.
- Organization has policy mandating physical destruction.
- Sending drive offsite for professional shredding/incineration.
For average Mac users, securely erasing a drive makes physical destruction unnecessary in most cases.
Conclusion
Securely erasing data is crucial when selling, donating or disposing of Macs. By overwritten all files, secure erase makes it realistically impossible for deleted data to ever be recovered.
Macs have excellent built-in tools for secure erase – including Secure Empty Trash and Disk Utility options. Using them provides cost-free, fast and efficient secure deletion of your confidential data.
Combined with reinstalling macOS, secure erase lets you permanently destroy your data and reset a Mac to factory condition when transferring ownership. It is an essential step that all Mac users should understand and utilize for privacy and security.