Bad sectors are areas on a hard disk drive that can no longer reliably store data due to permanent damage or errors. They can be caused by physical damage to the disk surface, manufacturing defects, or natural deterioration over time. Bad sectors can lead to data loss or corruption when trying to read or write data from those areas of the disk. Fortunately, modern operating systems include tools to detect, isolate and prevent the use of bad sectors.
The most common commands used to fix or repair bad sectors depend on the operating system. For Windows, the main command is “CHKDSK”. On Linux, the “fsck” command is used. And on Mac OS, the preferred tool is “Disk Utility”. Running these commands will initiate a scan of the drive and attempt to isolate bad sectors, preventing them from being accessed.
What are bad sectors?
Bad sectors, also known as hard disk errors, are small segments on a hard disk drive that can no longer be read from or written to reliably. This is usually caused by one of three things:
Physical damage
The surface of a hard disk platter can become physically damaged due to a head crash, tiny dust particles, wear and tear over time, or other physical trauma to the disk surface. This can make it impossible for the read/write head to access the data written on that area of the platter.
Manufacturing defects
During the manufacturing process, defects can occur that affect the magnetic properties of a specific area on the platter surface. This makes that area unusable for reliable data storage even though the rest of the platter is fine.
Natural deterioration
Over time, the magnetic properties of the platter surface can weaken and degrade. Areas affected eventually lose the ability to reliably store data as magnetic polarity becomes too weak. This natural deterioration occurs slowly over years of use.
The end result is always the same – a sector or cluster of sectors that cannot reliably perform read or write operations without error. These bad sectors must be mapped out so that the operating system knows not to use them.
Signs of bad sectors
Bad sectors often produce warning signs before total failure occurs:
File system errors
The most common sign is errors reported by the file system when trying to read or write data from the affected sectors. For example, you may get read/write errors when trying to access a file, or find files that seem mysteriously corrupted.
Long read/write times
It can take an unusually long time to load data from bad sectors. The hard drive keeps retrying the read operation, attempting to recover the data.
Unusual noises
In some cases, a clicking, grinding or buzzing sound might be audible when the heads attempt to move across damaged areas of the disk platters. The drive may struggle to perform seeks and load times increase.
SMART errors
Many drives today support SMART (Self-Monitoring Analysis and Reporting Technology). SMART monitors drive behavior and statistics like reallocated sector counts to predict drive failures before they happen.
If SMART reports growing numbers of reallocated sectors, that indicates the drive is remaping some bad sectors. This is an early warning of potential problems.
Why fix bad sectors?
It’s very important to fix bad sectors because data written to these areas of the disk cannot be reliably retrieved. If critical data resides in a bad sector, that data may be lost forever if the issue is not addressed.
Trying to read bad sectors can also severely slow down system performance. The drive may hang as it tries repeatedly to load the data.
Remapping bad areas prevents future read/write operations from using those damaged regions of the platter. By isolating bad sectors, you reduce the risk of losing valuable files due to unrecoverable read/write errors.
Fixing bad sectors also improves system performance. Eliminating bad sectors eliminates long hangs and delays caused by retrying failed disk I/O operations.
How are bad sectors repaired?
The ideal way to fix bad sectors is to completely replace the hard disk drive. However, this may not always be feasible. Replacing the drive eradicates bad sectors, restores peak performance and reduces the chance of future data loss.
If drive replacement is not an option, the next best solution is to isolate and remap the bad sectors. This involves two steps:
1. Detecting the bad sectors
Modern hard drives include built-in SMART monitoring tools to detect bad sectors during normal operation. Disk scanning utilities can also actively scan each sector on a drive to identify any areas prone to errors.
2. Remapping the bad sectors
Once identified, bad sectors can be marked as “damaged” in the drive’s internal defect management system. This prevents the operating system from attempting to read or write data from these bad areas in the future. Any data previously stored in the sectors may be lost.
This remapping process is sometimes referred to as “reallocating” sectors. The total number of sectors available to store data remains the same, but the remapped sectors are no longer usable.
This isolation protects against data loss and preserves system performance by avoiding future retry operations on bad regions of the platters.
Tools for fixing bad sectors
The exact steps required to fix or remap bad sectors depends on the operating system and disk utility tools available:
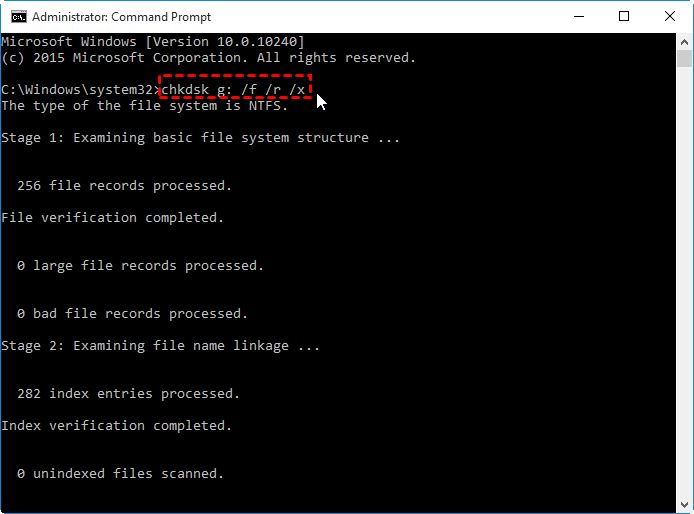
Windows – CHKDSK
On Windows, the primary command for identifying and remapping bad disk sectors is called CHKDSK. This is a command-line tool that scans the file system for errors, and can repair logical file system issues in addition to bad sectors.
To use CHKDSK in Windows:
1. Open the Command Prompt as an administrator
2. Type “chkdsk C: /f” (replace C: with the letter of the drive to scan)
3. Allow the scan to complete. CHKDSK will identify and remap any bad sectors it finds
Linux – fsck
The fsck command is used on Linux systems to check and repair file system errors. With the appropriate file system type specified, fsck can scan for bad sectors and remap them so they are no longer used.
For example, to scan and fix a Linux ext4 file system partition /dev/sda1, you would use:
“`
sudo fsck -t ext4 /dev/sda1
“`
This will actively scan the disk partition and make repairs. Other file system types like xfs or btrfs have their own fsck tools with similar capabilities.
Mac OS – Disk Utility
On Mac OS, the preferred method is to use the built-in Disk Utility application. Disk Utility includes a “Verify Disk” function that scans for bad sectors.
To use it:
1. Launch Disk Utility
2. Select the disk drive to scan
3. Click the “First Aid” tab
4. Click “Verify Disk”
This will initiate a scan of the drive and attempt repairs on any bad sectors found. For more advanced diagnostics, you can also try Drive Genius from Prosoft Engineering or TechTool Pro from Micromat. Both include sector-level diagnostic tools.
Manufacturer tools
Most hard drive manufacturers provide their own disk diagnostic and repair tools. These tools directly access the drive hardware and internal error logs to detect bad sectors and perform repairs:
– Seagate – SeaTools
– Western Digital – Data Lifeguard Diagnostics
– Hitachi – Drive Fitness Test
– Samsung – HDD Utility Tool
When available, manufacturer tools deliver more customized scan options than the generic operating system utilities. They may detect and repair bad sectors missed by other tools.
Advanced tools
More advanced third-party tools are also available to help identify, isolate and remap bad sectors:
– Spinrite – Powerful sector-by-sector diagnostic utility from grc.com
– HDD Regenerator – Repairs damaged hard disks by regenerating bad sector data
– HDD Scan – Checks HDD health status and gives recommendations
– Victoria – Freeware HDD diagnostics utility for Windows
These provide low-level sector diagnostics beyond the standard operating system commands. However, they may require an advanced understanding to utilize fully. Backing up data before use is also recommended.
Preventing bad sectors
While disk failures will inevitably occur over time, there are ways to reduce bad sectors and prolong the life of your storage:
Handle disks carefully
Physical shocks, drops, vibrations, and head crashes can damage disk platters and lead to bad sectors. Handle hard drives gently and carefully.
Ensure proper ventilation
Excessive drive temperatures can accelerate wear on platters. Ensure computers and external enclosures allow for adequate airflow to keep drives cool.
Use surge protectors
Power surges can damage sensitive electronic components in a hard drive. Always connect computers and external disks to surge-protected power sources.
Perform regular backups
Routinely backup your data to protect against loss should sectors fail. Backup media should be stored offline to isolate it from primary disk failures.
Scan drives periodically
Run periodic disk scans using CHKDSK, fsck, or disk utilities to detect bad sectors early, before they lead to data loss. Monitoring SMART attributes can also provide advance warning.
With proper care and maintenance, most bad sector issues can be avoided or managed before loss occurs. But inevitably, all drives will experience failure eventually. Regular backups combined with active monitoring provide the best protection.
Conclusion
Bad sectors are inevitable over the lifespan of a hard disk drive. But by understanding what causes them and how to fix bad sectors, data loss risks can be minimized. Critical tools like CHKDSK, fsck and manufacturer utilities can detect bad areas of the disk and isolate them before failures occur.
While replacing the entire drive is the only way to eliminate bad sectors completely, remapping techniques allow continued use of the drive with minimized risk. Monitoring SMART metrics and performing regular backups also helps guard against data loss due to deteriorating disk sectors.
With the proper precautions, bad sectors on a hard drive do not have to lead to lost files or system downtime. Careful drive management reduces the chances of encountering significant bad sector issues during normal operation. But if they do occur, the right tools and strategies can contain the problem before it brings down mission critical storage.
