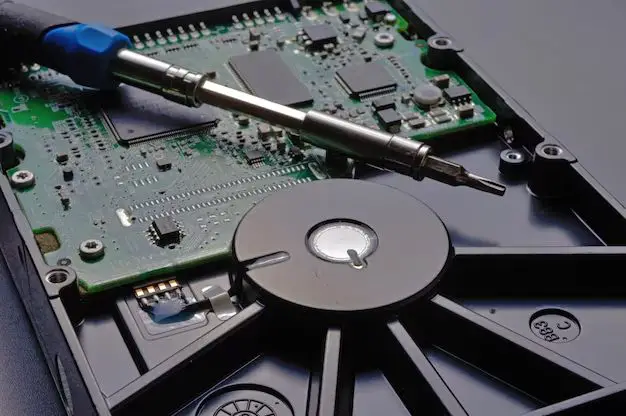
When it comes to dismantling a Western Digital (WD) hard drive, the right tools are essential. Choosing the correct type of screwdriver is key to safely and successfully taking apart a WD drive without damaging components. The most commonly used screwdrivers for dismantling WD hard drives are Torx and Phillips head screwdrivers.
Torx Screwdrivers
Torx screwdrivers, also known as star screwdrivers, are often used for dismantling WD hard drives. The torx design provides more contact between the driver tip and screw head compared to Phillips screwdrivers. This allows for better grip and torque when removing tightly screwed components.
Here are some tips for using torx screwdrivers on WD hard drives:
- Use the right torx size – WD hard drives typically use T6 to T10 torx screws. Using the incorrect size can strip the screws.
- Press down firmly – The torx tip needs solid contact with the screw head to properly grip it. Press the screwdriver down when turning to avoid camming out.
- Use a magnetic screwdriver – Magnetic tips help retrieve tiny screws and prevent losing components during disassembly.
- Take your time – Rushing can strip screws and damage components. Take it slow and steady.
High quality torx screwdriver sets suitable for handling WD hard drive screws are readily available from brands like iFixit, Wera, Wiha, and Craftsman.
Phillips Head Screwdrivers
While torx may be more common, some WD hard drive models use Phillips screws. A Phillips screwdriver with the right size tip can be used to dismantle drives with this type of screw.
Here are some tips for using Phillips screwdrivers on WD hard drives:
- Use a size #0 or #1 Phillips – Larger Phillips are too big for the small screws on most WD hard drives.
- Use a screwdriver with a precise tip – A worn tip can strip out Phillips screws easily.
- Magnetized Phillips are useful – A magnetic tip helps recovery tiny screws and avoids losing parts.
- Apply downward pressure – Prevent cam out by pushing down firmly when turning the screwdriver.
Carefully using a Phillips head screwdriver can allow safe removal of screws during WD hard drive disassembly. However, torx screwdrivers are generally preferred due to their grip and torque advantages.
Hex Screwdrivers
Some WD external hard drives and SSDs may use small hex screws. These can be removed using a precision hex screwdriver, sometimes referred to as an Allen key. Here are some tips for using hex screwdrivers on WD products:
- Identify the hex size – Measure across the screw head to determine the right hex key size.
- Use ball-end keys – Ball-end hex keys can angle into recessed screw heads more easily.
- Apply downward force – Press down firmly when turning the hex screwdriver to get a good grip.
- Go slow – Rushing can round off the hex screw heads making removal nearly impossible.
Quality hex screwdriver sets from brands like Bondhus provide the small metric sizes needed for handling hex screws on WD drives.
Pentalobe Screwdrivers
Some WD products, primarily SSDs and flash storage devices, make use of pentalobe screws. These have a five-point star shape requiring a specialized pentalobe screwdriver for removal. Here are some tips on working with pentalobe screws:
- Use a precision pentalobe tip – Cheap pentalobe drivers can strip screws due to poor tolerances.
- Apply steady downward pressure – This will prevent the screwdriver from camming out of the screw head.
- Take it slow – Rushing increases the chance of stripping the unique pentalobe screw heads.
- Consider magnetized tools – Magnetic pentalobe screwdrivers can help recover tiny screws.
Quality pentalobe screwdriver sets are available from companies like iFixit. Wiha also makes precision pentalobe drivers suitable for most WD products using these screws.
Spudgers
In addition to the right screwdrivers, plastic spudgers are also useful when dismantling WD hard drives. Spudgers can safely pry apart the plastic casing without scratching or damaging components inside. Here are some tips for using spudgers on WD products:
- Use thin, strong spudgers – Sturdy plastic is less likely to bend or snap during prying.
- Avoid metal spudgers – Metal can short circuit or scratch electrical components.
- Work carefully around edges – Slowly work around the perimeter to pop apart snap-fit casings.
- Apply even pressure – Prevent damage by avoiding localized pressure points.
High-quality spudger sets are produced by companies like iFixit and contain various spudger sizes and shapes suited for tech disassembly tasks.
Anti-Static Precautions
Proper anti-static precautions should be taken when dismantling WD hard drives. Electrostatic discharge can instantly damage sensitive components. Here are some anti-static tips:
- Use an anti-static wrist strap – Wearing a grounded wrist strap will drain static charge away from your body.
- Work on an anti-static mat – Anti-static work surfaces dissipate charges and protect components.
- Avoid carpeted areas – Build up of static electricity is more likely on carpeting.
- Don’t stack components – Individual components are less likely to rub and create static charges.
- Handle by edges – Avoid touching component contacts to reduce ESD risks.
Quality anti-static tools like wrist straps and mats are available from electronics suppliers such as DigiKey. Following anti-static best practices is critical for avoiding catastrophic static damage.
Preparation Steps
Proper preparation can make dismantling WD drives safer and easier. Here are some tips:
- Backup drive data – Retrieving data is impossible after disassembly. Backup first.
- Organize your workspace – Have all necessary tools ready to avoid mistakes or damage.
- Review drive specifics – Check guides to identify screw types and dismantling procedures.
- Go slowly – Rushing leads to stripped screws, damaged components and injury.
- Take pictures – Photograph steps to assist with correct reassembly.
Thorough preparation and having the right tools for the specific WD drive model will help ensure a smooth and damage-free disassembly process.
Dismantling Process
With the right tools gathered and preparations made, you’re ready to start dismantling the WD hard drive. The specific steps can vary slightly by drive model but usually follow a similar workflow:
- Remove outer casing screws – Use the identified screwdriver type to remove all perimeter screws.
- Separate casing halves – Insert spudgers around the edge to pop halves apart. Go slowly.
- Disconnect cables – Use care when removing ribbon cables from sockets on the PCB.
- Remove PCB – Remove screws securing circuit board and lift it out.
- Remove drive platter – Lift drive motor assembly out to access platter(s).
- Optional – Drive heads and motor can be further disassembled if desired.
Throughout the process, caution should be taken to avoid static discharge and physical damage to delicate components. Refer to manufacturer guides for model-specific procedure nuances.
Reassembly Tips
Reassembling the WD hard drive after dismantling will require the same care and precision. Here are some useful tips:
- Use new screws when possible – Reusing old screws risks stripping.
- Torque screws carefully – Overtightening can damage components or threads.
- Reconnect cables properly – Misaligned cables can prevent drive function.
- static precautions – Continue anti-static methods until reassembly is complete.
- Test after reassembly – Verify drive is detected before reinstalling in a computer.
Thoroughly cleaning components and using new thermal paste on CPUs can also help improve performance and lifespan. Photographs and notes from disassembly make reassembly smoother.
Conclusion
Dismantling WD hard drives requires proper tools and techniques to avoid irreparable damage. Torx and Phillips screwdrivers in the right sizes are essential, along with anti-static caution and plastic spudgers. Preparation with appropriate technical guides makes dismantling smoother. Reassembly also demands care and precision to restore drive functionality. With patience and the right approach, even inexperienced tinkerers can safely dismantle and reassemble Western Digital hard drives.
