RAID 6 is a standard RAID level that provides fault tolerance by using two parity drives (1). This allows the array to continue operating with up to two failed drives without losing data. RAID 6 is commonly used for mission-critical storage systems where maximum redundancy and data protection are essential.
The key benefit of RAID 6 is that it can sustain multiple drive failures. With single-parity RAID levels like RAID 5, the entire array is at risk if a second drive fails before the first failed drive is replaced. But RAID 6 can handle up to two failed drives concurrently through its use of double distributed parity (2).
RAID 6 is well-suited for large storage arrays because as the number of drives increases, so does the chance of multiple concurrent failures. The tradeoff is reduced storage efficiency and slower write speeds compared to single-parity RAID.
How RAID 6 Works
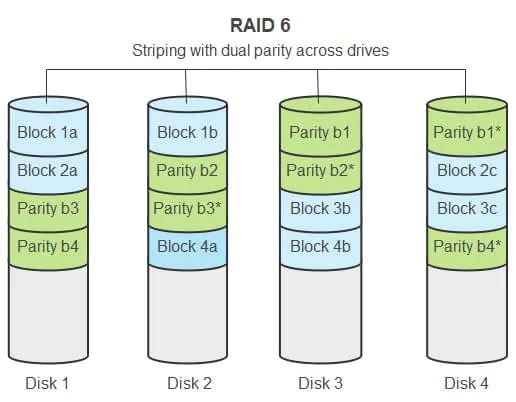
RAID 6 uses a combination of disk striping and distributed parity to provide fault tolerance. Disk striping spreads data across multiple disks in the array, while the distributed parity allows RAID 6 to withstand up to two disk failures without data loss.
With disk striping, data is divided into blocks that are written across multiple disks simultaneously. This allows for faster reads and writes since the workload is distributed across multiple disks. The block size can vary depending on the implementation.
RAID 6 uses two parity stripes distributed across the array. Parity information is calculated and written across different disks. The parity allows the array to recreate data in the event of one or two disk failures. If a disk fails, the parity stripes can be used along with the remaining data blocks to recalculate the missing information. This provides protection against two disk failures since there are two separate parity sets.
Because parity information is spread across multiple disks, RAID 6 can withstand up to two disk failures without losing data or access to information on the array. The dual parity provides an extra layer of redundancy compared to a single parity system like RAID 5. This makes RAID 6 well-suited for mission critical applications that require high availability and fault tolerance.
Operating Systems that Support RAID 6
RAID 6 is supported by most major operating systems including Linux, Windows, macOS, and FreeBSD. Here is a breakdown of RAID 6 support across some common operating system versions:
Linux – RAID 6 is supported in most modern Linux distributions without any additional configuration needed. Popular distros like Ubuntu, Debian, CentOS, Fedora all include RAID 6 support out of the box. Linux utilizes the mdadm utility to configure and manage RAID arrays.
Windows – Windows Vista and newer versions include native software RAID support including RAID 6. The Disk Management utility can be used to setup RAID 6 arrays on Windows machines. Third-party RAID controllers may also be used.
macOS – RAID 6 is supported on macOS using Apple’s Disk Utility program. External RAID enclosures connected via Thunderbolt are commonly used for RAID 6 on Macs.
FreeBSD – FreeBSD has supported RAID 6 since version 5.0 via the gvinum volume manager. The graid(8) utility can also be used to configure RAID 6 arrays.
Setting Up RAID 6 in Windows
Windows supports setting up RAID 6 using the built-in Disk Management utility. Here are the general steps to configure RAID 6 in Windows 10 and 11:
First, install at least 3 physical disks that you want to use in the RAID 6 array into your computer (source: https://www.diskinternals.com/raid-recovery/how-to-set-up-raid/). Then, open the Disk Management utility. Right-click on an empty space in the Disk Management window and select “Create Volume”.
In the Create Volume Wizard, select the disks you want to include in the RAID 6 array. Choose the RAID-5 volume with parity option. This will configure the disks in a RAID 6 array. Specify the RAID volume size and drive letter and create the volume.
The Disk Management utility will build the RAID 6 array. This may take some time depending on the size of the disks. Once complete, the RAID 6 volume will be accessible and ready to use as a regular drive in Windows.
The main advantages of using Disk Management to create a RAID 6 array are that it is built into Windows already and does not require any additional software. The main limitation is that you can only create the array at initial setup, and not convert existing drives into a RAID set.
Setting Up RAID 6 in Linux
Linux operating systems like Ubuntu and Red Hat Enterprise Linux support setting up RAID 6 using the mdadm utility. Mdadm allows creating and managing RAID devices in Linux using the command line.
Here are the key steps to configure RAID 6 in Linux using mdadm:
- Install mdadm if not already present:
sudo apt install mdadm(Ubuntu/Debian) orsudo yum install mdadm(RHEL/CentOS) - Identify the storage devices to use in the RAID array, such as
/dev/sdb,/dev/sdcetc. - Create the RAID 6 array:
sudo mdadm --create --verbose /dev/md0 --level=6 --raid-devices=4 /dev/sdb /dev/sdc /dev/sdd /dev/sde - Check the status of the RAID array:
sudo mdadm --detail /dev/md0 - Format the RAID array with a filesystem, like ext4:
sudo mkfs.ext4 /dev/md0 - Mount the RAID array on the desired mount point, like /data:
sudo mount /dev/md0 /data
This configures a 4-disk RAID 6 array on Linux, tolerating up to 2 disk failures. Refer to this tutorial for a step-by-step guide with examples.
Setting Up RAID 6 in macOS
The macOS operating system provides built-in support for setting up RAID 6 arrays using the Disk Utility application. Disk Utility allows you to easily create RAID arrays without any additional software.
To set up a RAID 6 array on macOS using Disk Utility:
- Open Disk Utility, located in Applications > Utilities.
- Click the File menu and select “RAID Assistant”.
- In the RAID Assistant window, select “RAID 6” as the type.
- Select the physical disks you want to include in the array.
- Click “Continue” and configure optional settings like name and format.
- Click “Create” to build the RAID 6 array.
Disk Utility will format the disks and build the RAID 6 array in the background. You can monitor the progress in Disk Utility until it finishes.
Third party software like softRAID also allows creating RAID 6 arrays on macOS with additional features like monitoring and notifications. SoftRAID can be used instead of Disk Utility if more advanced RAID management is needed.
With the built-in Disk Utility app or optional softRAID software, setting up RAID 6 on macOS is straightforward without needing any additional hardware.
Advantages of RAID 6
RAID 6 offers high fault tolerance and eliminates the single point of failure risk found in RAID 5 configurations. With RAID 6, data is striped across multiple drives and two parity drives are used, allowing for the failure of up to two drives without data loss [1]. If one drive fails, the array can continue operating normally. If a second drive fails, the parity information on the remaining drives can be used to reconstruct the lost data.
Specifically, RAID 6 provides the following key advantages:
- High fault tolerance – Can withstand the failure of up to two drives without data loss
- No single point of failure – Even if one drive fails, a second drive failure will not result in data loss
- Minimum of 4 drives required – Provides protection with the minimum number of drives
- Data is striped – Increased performance compared to a single drive
With the ability to withstand two drive failures, RAID 6 offers excellent protection for critical data and applications where downtime needs to be minimized [2]. The dual parity provided makes RAID 6 well-suited for environments that need high uptime and long retention periods.
Disadvantages of RAID 6
RAID 6 has some downsides compared to other RAID levels, mainly relating to performance and storage overhead.
The most notable disadvantage of RAID 6 is lower write performance compared to RAID 5. Because RAID 6 calculates and writes two parity stripes per stripe, the write process takes longer than RAID 5 which only uses one parity stripe (TechTarget). The extra parity calculation can significantly reduce write speeds in RAID 6.
RAID 6 also has higher storage capacity overhead versus other RAID levels. Since two drives are dedicated to parity, the usable storage capacity is reduced by up to 20% compared to a single disk array (IONOS). This overhead is higher than RAID 5 which only uses one parity drive. The tradeoff for the additional redundancy is lower usable storage space.
In summary, the main disadvantages of RAID 6 are slower write speeds due to dual parity calculation and higher storage overhead from the dual parity drives. These downsides may make RAID 6 less ideal for some use cases compared to RAID 5 or other RAID levels.
When to Use RAID 6
RAID 6 is most commonly used for critical data storage and large disk arrays where maximum protection against drive failures is essential. The redundant parity provided by RAID 6 makes it ideal for storing data that cannot be lost or easily recovered, such as financial records, medical data, scientific data sets, or any irreplaceable information.
The advantage of two parity drives allows RAID 6 to sustain multiple drive failures without data loss, making it preferable for large arrays where the likelihood of dual disk failures is higher. For disk arrays with 10 or more drives, the additional fault tolerance of RAID 6 provides peace of mind that a single or dual disk failure will not result in downtime or data loss. The added redundancy comes at the cost of storage efficiency and write performance compared to RAID 5 or RAID 10, but for critical data protection, RAID 6 is considered the gold standard.
According to Robert Coolidge, network architect at Stratus Digital, “RAID 6 is most appropriate for arrays storing critical data when utmost protection against data loss is required. The overhead of the second parity drive is well worth it for the high level of fault tolerance.” (https://kemaza.co.za/blog/2019/03/04/raid-6-vs-raid-10/)
Alternatives to RAID 6
While RAID 6 offers strong redundancy and protection against drive failures, there are some alternative RAID configurations that can also provide data protection:
- RAID 10 – RAID 10 combines mirroring and striping by creating mirrors of stripes. This provides faster performance but less overall storage capacity than RAID 6. RAID 10 can withstand multiple drive failures as long as no more than one drive fails per mirrored pair. It requires a minimum of 4 drives.
- RAID 50/60 – RAID 50 creates a RAID 5 array and then stripes data across multiple RAID 5 arrays. RAID 60 does the same with RAID 6 arrays. This provides additional performance and allows for more drive failures than a single RAID 5/6 array, but at the cost of more drives.
- Erasure coding – Erasure coding like Reed-Solomon coding breaks data into fragments and encodes redundant data fragments to protect against failures. It requires less disk overhead than RAID 6 but computations can impact performance.[1]
For critical data, RAID 10 provides excellent performance and fault tolerance but requires more disks. RAID 50/60 offers a balance of redundancy and storage efficiency. Erasure coding is emerging as an alternative with lower overhead than RAID 6 but potential performance impacts.
