A solid-state drive (SSD) is a type of computer storage device that uses flash memory instead of a spinning hard disk platter. SSDs have become increasingly popular in recent years due to their faster speeds, durability, and quiet operation compared to traditional hard disk drives (HDDs).
There are several reasons why a user may want to locate their SSD:
- To check the SSD’s capacity and available storage space
- To verify the SSD model and specifications
- To determine if the SSD needs to be upgraded or replaced
- To confirm the SSD is properly installed and connected
- To troubleshoot performance issues that may be related to the SSD
Knowing the physical location of the SSD in a PC helps users identify it, monitor its status, and perform upgrades or maintenance if needed.
Check Inside Your PC Case
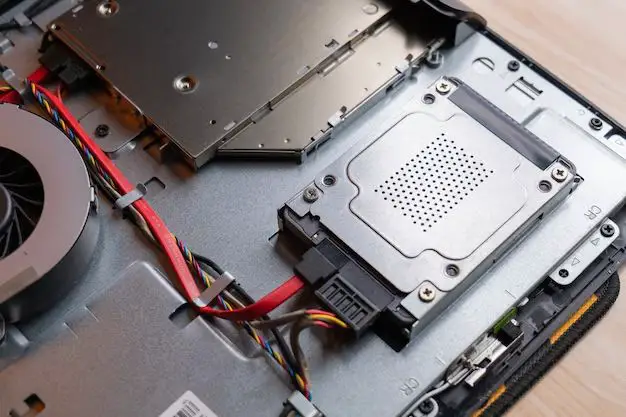
The first step is to open up your computer’s case and visually inspect where the SSD is located. In desktop PCs, SSDs are usually installed in either 2.5-inch or M.2 drive bays:
- 2.5-inch drive bays are designed for 2.5-inch SSD or hard drive form factors. These bays will have SATA power and data connectors to plug the SSD into the motherboard. 2.5-inch SSDs are the most common in desktops (Crucial IN, 2022).
- M.2 drive bays allow you to directly slot in an M.2 SSD stick onto the motherboard or a riser card. M.2 SSDs connect directly to the PCIe bus for faster speeds (Kingston, 2022).
For laptops, the SSD is usually installed internally, either as a replaceable module or soldered onto the motherboard. Open up the bottom case cover to look inside.
If you don’t see the SSD, it may be hidden behind drive cages or expansion cards. You may need to remove other components to gain access.
Look for Cables and Connectors
To identify whether your PC has an SSD installed, look inside your computer case for any cables and connectors going to a drive. SSDs typically use either the SATA or PCIe connector types to interface with the motherboard. SATA SSDs will have a SATA data cable, which has a small flat rectangular connector on each end, as well as a SATA power cable coming from the power supply. M.2 and PCIe SSDs plug directly into the motherboard without any cables.
If you spot a drive connected to the motherboard via SATA or directly inserted into an M.2 slot, that is likely your SSD. Having both SATA data and power cables or a direct motherboard connection are clear indicators that a drive is solid state rather than a traditional hard disk drive. The SATA interface is the most common for 2.5″ SSD form factors while M.2 and PCIe slots are used for smaller SSDs designed to save space.
Inspect the Motherboard
The motherboard is the main circuit board inside your PC and houses many of the crucial components, including RAM, the CPU, and expansion slots. One of the ways to locate your SSD is to visually inspect the motherboard itself.
Modern motherboards often have an M.2 slot where an SSD may be installed. The M.2 slot is a narrow connector on the motherboard that supports the M.2 form factor. M.2 drives are small, stick-like SSDs that plug directly into the motherboard via the M.2 slot.
To check if you have an M.2 SSD installed, open up your PC case and look on the motherboard for an M.2 slot. The M.2 slot is normally flat and has a small screw to hold the SSD in place. If you see a small circuit board in the M.2 slot, that is your M.2 SSD. M.2 SSDs come in different lengths, so you may see the whole circuit board or just part of it depending on the size.1
The M.2 slot may also be covered by a heat spreader or shield, so you may need to unscrew and remove that cover to view the M.2 SSD. If the M.2 slot is empty, then you likely have a 2.5” SATA SSD or hard disk drive installed instead.
Checking the motherboard physically for an M.2 SSD is a quick way to determine if you have one installed and locate where it sits within your system.
Check Disk Management
One easy way to find where your SSD is located in Windows is to open the Disk Management utility. Disk Management allows you to view all the drives connected to your PC, including internal and external hard drives and SSDs. To open Disk Management on Windows 10 and 11:
Right click on the Start menu and select “Disk Management”. Or, press Windows+R to open the Run dialog box, type “diskmgmt.msc” and hit Enter.
In Disk Management, all your drives will be listed on the lower panel. Hard disk drives typically show up as “Disk 0”, “Disk 1”, etc. SSDs may show up as “Disk 1” if they are your primary disk. Look for the disk marked as “System” with the Windows icon – this is usually your SSD where Windows is installed.
You can also view the drive details like capacity, used space, free space, etc. to identify your SSD drive. SSDs typically have lower capacity than HDDs, and will show a “Solid State Drive” label.
References:
[How to use Disk Management to set up a Hard Drive.](https://www.seagate.com/support/kb/how-to-use-disk-management-to-set-up-a-hard-drive-188931en/)
[Help in Disk Management.](https://support.microsoft.com/en-us/windows/help-in-disk-management-ad88ba19-f0d3-0809-7889-830f63e94405)
Device Manager
The Device Manager in Windows provides detailed information about all the hardware components and devices connected to your PC. To check if your SSD is listed in Device Manager, follow these steps:
First, press the Windows key + R to open the Run command box. Type “devmgmt.msc” and hit enter to launch Device Manager. Under the Disk drives category, look for an entry with the name of your SSD brand and model (for example, “Samsung SSD 970 EVO 500GB”). The disk drives section shows all storage drives connected to your PC, including both HDDs and SSDs. So if you see your SSD drive model listed there, your Windows has successfully detected it.
You can double click on the SSD entry to open its properties window and view details like driver version, device status, and the storage capacity. This confirms that Windows has the proper drivers installed for your SSD and it is being detected correctly. If you don’t see any SSD listed in the Disk drives section, it likely means your SSD is not being detected properly and you may need to check connections or update drivers.
Overall, Device Manager provides the simplest way to verify that your SSD is installed correctly and detectable by Windows. As long as you see it listed without any error codes or issues, your SSD should function as expected when installed properly in your PC.
BIOS and UEFI
One of the first places to check for your SSD is the BIOS or UEFI firmware on your computer’s motherboard. The BIOS (Basic Input/Output System) provides low-level instructions for communicating with hardware. UEFI (Unified Extensible Firmware Interface) is a more modern replacement for the traditional BIOS.
To access the BIOS or UEFI settings, restart your computer and press a specific key, often Delete, F2, F10 or F12, during the boot process. This will open the firmware interface before Windows starts loading. Look for options related to storage devices or hard drives. There should be a list of all the drives connected to the motherboard, including both HDDs and SSDs.
For example, on a Dell computer, go to System Configuration > SATA Operation > Drives to view detected disks [1]. Or on a Huawei PC, check Information > Storage Device Information to see if all disks are detected [2].
If the SSD is not showing up in the firmware settings, there may be a loose connection, or the drive itself may be damaged or disabled. If it is listed, the drive is being detected at a hardware level correctly.
Use Manufacturer Tools
Many SSD manufacturers provide their own free tools to get information about SSDs. One of the most popular is Samsung Magician, which works with Samsung SSDs. Samsung Magician provides drive details like model name, capacity, firmware version, and health status. It also lets you benchmark drive performance, optimize settings, securely erase data, and update firmware. Other SSD makers like Kingston, Crucial, and Intel offer similar tools for their drives.
These manufacturer-provided utilities are handy for getting more info directly from the source. They can provide deeper insights than generic disk tools since they are customized for those specific SSD models. However, the limitation is that they only work for SSDs from that particular brand. So Samsung Magician will only detect Samsung drives. To check SSDs from multiple manufacturers, you’ll need a generic disk utility that supports all brands.
Check Task Manager
An easy way to check if your storage drive is an SSD or HDD is to look in the Task Manager in Windows. Here’s how:
- Right click on the taskbar and select “Task Manager”.
- Go to the “Performance” tab.
- Under the CPU graph, you’ll see a list of your drives.
- SSDs will be labeled “SSD”, while HDDs will show “HDD”.
This provides a quick way to identify your system’s storage drives right from within Windows. Look for the drive labels on the Performance tab to see if you have an SSD, HDD, or both.1
Conclusion
In summary, there are several methods you can use to locate your SSD drive in a desktop PC:
First, open up your PC case and visually inspect the cables, connectors, and motherboard for any drives that resemble an SSD. SSDs come in form factors like 2.5″, M.2, and PCIe which can help identify them.
You can also check Disk Management in Windows to view all drives connected to your system. SSDs will be labeled with their capacity and type.
Using the Device Manager, you can expand the disk drives section to see labels for any SSDs.
Entering the BIOS or UEFI settings on your motherboard will also display connected drives, including SSDs.
Manufacturer tools like Samsung Magician can scan for compatible SSDs.
And the Task Manager performance tab will show all disk drives actively running on your PC.
By following these tips, you can locate your SSD within a desktop system to verify it is detected, check its health, monitor usage, and maintain its performance.
