Quick Answer
There are a few common reasons why you may not be able to delete a disk on your Mac:
- The disk is currently in use by the system or an application
- You don’t have permission to delete the disk
- The disk is locked or has permissions set that prevent deletion
- The disk contains system files that cannot be deleted
To delete a disk on your Mac, you first need to make sure the disk is not in use, unmount it, unlock or change permissions if needed, and use Disk Utility to erase the disk. If the disk contains system files like the boot disk, you will need to reinstall macOS to erase it.
What Does It Mean When A Disk “Can’t Be Deleted”?
When you get an error saying a disk can’t be deleted on your Mac, it typically means one of several things:
- The disk is currently mounted and in use by macOS or an application
- You do not have permissions to modify or delete the disk
- The disk is locked and cannot be modified or erased
- The disk contains system files or the boot partition that cannot be simply deleted
In order to delete a disk, the system needs to have full read/write access to the drive. If the disk is mounted and in use, it cannot be erased. Unmounting the disk will allow macOS to gain full control over it.
Permissions and ownership settings can also prevent you from deleting a disk. The root user generally has full access to erase disks, while a standard user may not.
Some disks also have a lock status enabled which prevents formatting or erasing the disk. This is commonly used for external hard drives that are meant to only store files and not have the contents deleted.
Finally, disks that contain boot partitions, system files, or the macOS Recovery partition cannot be simply deleted like a regular storage disk. The system needs these partitions to function, so additional steps are required to remove them.
How To Erase and Delete Disks on Mac
Here are the general steps to take to erase or delete a disk on your Mac:
- Check if the disk is mounted – Open Disk Utility and look for mounted drives. The disk needs to be unmounted.
- Unmount the disk – Select the disk and click Unmount in Disk Utility. This will prevent applications from accessing it.
- Change permissions if needed – Use Get Info to check permissions and change to Read & Write access if needed.
- Unlock the disk – Go to File > Disable Disk Protection to remove a lock status if shown.
- Erase the disk – Select the disk and click Erase in Disk Utility. Choose a format and name.
- Delete partition – Click the minus button in Disk Utility to remove a partition.
For disks that contain system files like the boot disk, you will need to erase the disk using macOS Recovery or by reinstalling macOS. This will clear all contents and allow the drive to be reused.
Let’s go through the steps to delete common disk types in more detail:
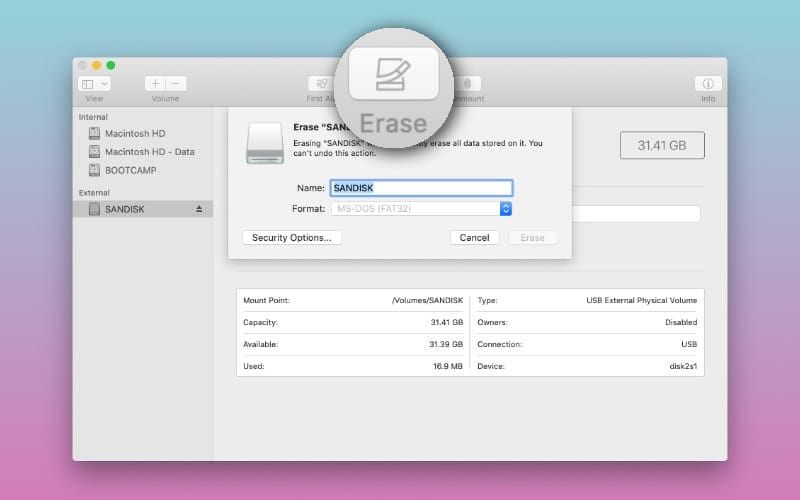
How to Delete an External USB Drive or Hard Disk
For standard external storage disks:
- Open Disk Utility
- Select the external hard drive or USB disk on the left
- Click Unmount if the drive is mounted
- Select Erase in the top menu
- Choose a name and format (APFS or Mac OS Extended)
- Click Erase to confirm
This will wipe the drive and allow it to be reused. Make sure you have backups of any important data first!
How to Delete a Partition
Deleting a partition will remove just that section of the disk, not the entire physical disk.
- Open Disk Utility
- Select the disk that contains the partition on the left
- Choose the partition you want to remove from the list
- Click the minus button below the partition list
- Confirm that you want to remove the partition
This is handy if you just want to remove a section of a disk vs the whole thing. But note it may not free up all space on the underlying physical disk.
How to Securely Erase Free Space on Your Mac’s Disk
To wipe any free space on the current startup disk:
- Open Disk Utility
- Select your Mac’s main disk on the left, often called “Macintosh HD”
- Choose Erase Free Space from the Erase menu
- Set a 3-pass erase to securely overwrite free space
This will only affect free space around files, not the files themselves. It’s useful to periodically wipe free space to erase any lingering sensitive temporary files.
How to Erase and Reinstall macOS from Recovery
If you need to erase your Mac’s startup disk completely, including macOS system files:
- Boot to macOS Recovery by holding Command-R at startup
- Select Disk Utility from the Utilities menu
- Choose your Mac startup disk and Erase it completely (named Macintosh HD typically)
- Quit Disk Utility when done erasing
- Go to Reinstall macOS and follow the prompts to install a fresh OS
This will completely wipe the startup disk and do a clean install of the operating system. Use this method for erasing system disks fully.
Why Can’t I Delete a Disk on Mac?
Now that we’ve covered how to delete disks, let’s go over some of the common reasons you may get errors trying to erase a disk:
The Disk is In Use
Disks that are currently mounted and in use cannot be erased. This includes the current startup disk, external drives in use by apps, and mounted volumes.
Always unmount the disk first using Disk Utility before trying to erase. If you get errors about the disk being in use, close all applications that may be accessing the drive and unmount it.
You Don’t Have Permissions
By default, a standard user account doesn’t have full permissions to modify all disks. The root user and admin accounts have full read/write access.
Use Get Info on the disk and check the permissions. Set to Read & Write access for your user if needed before erasing.
The Disk is Locked
Some disks have a lock status enabled that prevents erasing or formatting the disk. This is common on external hard drives.
Go to File > Disable Disk Protection in Disk Utility to remove the lock status. Then you can erase normally.
The Disk Contains System Files
The boot drive that contains macOS along with recovery and system partitions cannot be simply erased like a storage disk.
You need to boot to Recovery and fully erase/reinstall macOS to remove system disks. Or use macOS Recovery online to erase the startup drive remotely.
The Disk Format is Not Recognized
Disk Utility may not be able to erase disks that have an unfamiliar format not native to macOS. This can include Linux disk formats for example.
Try reformatting the unrecognized disk first before attempting to erase if possible.
There Was an Error Unmounting the Disk
Sometimes macOS will report it failed to unmount a disk properly. This is often tied to apps still using the disk in the background.
Restart your Mac and try unmounting again. Force quit any apps using the disk. Check for error messages during the unmount process.
The Disk Has Bad Sectors
Disks with hardware problems like bad sectors cannot be erased normally. Disk Utility will report a failure to erase the corrupt disk blocks.
You may need to physically replace the failing disk hardware in this case.
Tips for Deleting Disks on Mac
Follow these tips when trying to erase disks on your Mac:
- Always unmount disks first before erasing
- Disconnect external drives before formatting them
- Check disk permissions and change to Read & Write access
- Make sure you have backups before erasing
- Use the macOS Recovery HD partition to erase the startup disk
- Reformat unrecognized disk formats before erasing
- Repair any disk errors using First Aid before erasing
Taking the proper steps to unmount, check permissions, repair issues, and erase using Disk Utility will ensure the disk can be erased successfully.
Why Erase a Disk on Mac?
There are good reasons to want to completely erase a disk now and then:
- Remove sensitive information – Erase disks before selling or disposing to protect personal files.
- Fix disk errors – Wiping a disk can resolve errors like corrupted sectors.
- Erase free space – Periodically erase free space to delete temporary files.
- Reformat – Change the disk format to work better with macOS.
- Reinstall macOS – Fully erase the startup disk to do a clean OS install.
- Repartition – Delete and recreate disk partitions to change sizes.
Being able to securely erase disks is important for privacy, fixing issues, and reconfiguring your drives.
Conclusion
While disk erasure can be tricky on Macs, understanding what causes issues like being in use, permissions, locking, and disk formats allows you to troubleshoot and fix them.
Always eject and unmount disks before formatting. Check for errors with First Aid. Use macOS Recovery to fully erase system disks. And have proper backups before erasing any disk just in case.
Knowing the right Disk Utility steps can make erasing disks a smooth process. Just take care when deleting disk data, as that’s not always easily recoverable after a quick format.
