What is Disk Utility?
Disk Utility is an application included with macOS that allows users to manage the disks and volumes connected to their Mac. Some of its key functions include:
- Formatting, erasing, and partitioning drives
- Repairing disk errors and verifying disk health
- Creating encrypted disk images
- Restoring from Time Machine backups
- Managing RAID arrays
In essence, Disk Utility provides a graphical interface to manage storage devices and their file systems. It allows performing operations like securely erasing drives or troubleshooting disk issues without needing command line tools. Disk Utility is aimed at making storage management accessible for all Mac users.
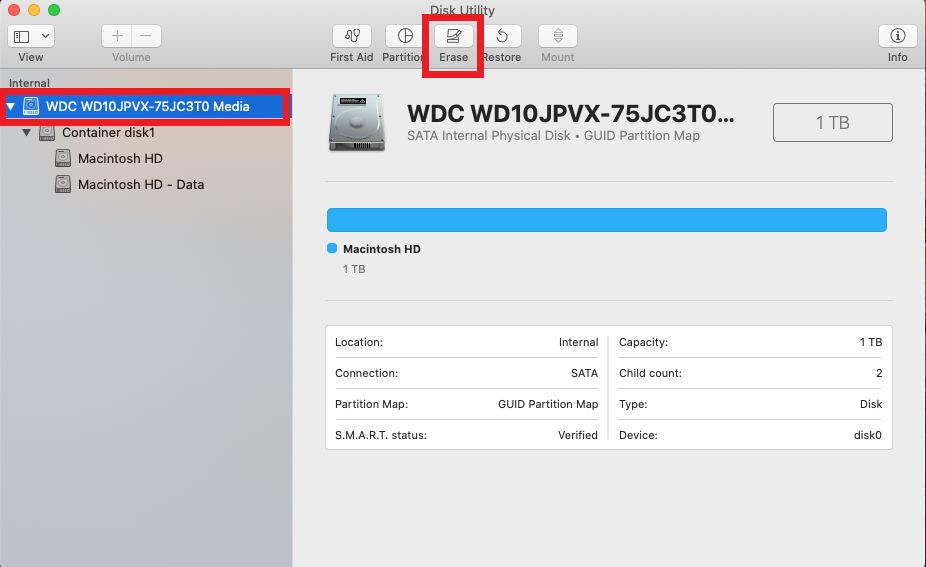
The Erase Function
The Erase function in Disk Utility allows users to securely wipe and reformat a drive on their Mac. It overwrites a drive’s directory and replaces it with an empty directory, effectively erasing all data on the drive and preparing it for use with a new file system.
There are several different Erase options available in Disk Utility:
- Erase – This does a simple overwrite, replacing the directory on the drive. It is the fastest option but less secure.
- Erase Free Space – This only erases unused space on the drive, leaving existing files intact.
- Secure Erase – This writes binary 1s and 0s over the entire drive up to 7 times, meeting U.S. security standards for drive erasure.
- Zero Out Data – This writes binary 0s to every sector on the drive up to 7 times. It takes the longest but is the most secure erase option.
The Erase function is very handy for wiping drives before selling, recycling or repurposing them. It can also be used to troubleshoot drives by completely reformatting them.
Why Erase Function Won’t Work on Startup Disk
The Erase function in Disk Utility is unable to erase the current startup disk because the disk cannot be unmounted while it is in use by the operating system.
According to Apple’s macOS documentation, “This startup disk can’t be erased or have its format changed because it contains the active system.”[1]
Disk Utility requires the ability to unmount any disk before it can erase or reformat it. However, unmounting the current startup disk is impossible because the operating system relies on that disk to run.
Therefore, if you attempt to erase your Mac’s main internal drive containing the bootable operating system, the Erase option will be greyed out and unusable in Disk Utility.
To summarize, the Erase function cannot work on the current startup disk as Disk Utility is unable to unmount the disk while the operating system is actively running from it.
[1] https://iboysoft.com/howto/disk-utility-wont-let-you-erase-hard-drive.html
How to Erase Mac Startup Disk
Erasing the startup disk on a Mac requires booting to an external environment like macOS Recovery or an external drive. This allows you to erase the startup disk that the Mac is currently running from.
Here are some methods to erase the Mac startup disk:
- Boot to Recovery Mode – Restart your Mac and hold Command + R to boot to Recovery Mode. Open Disk Utility and select the startup disk to erase.
- Boot to Internet Recovery – Restart and hold Option + Command + R to boot to Internet Recovery, if available for your Mac. Use Disk Utility to erase the startup disk.
- Boot from external drive – Make a bootable installer drive, connect it, restart and hold Option to select it. Open Disk Utility from the external drive to erase your startup disk.
- Use Terminal – Boot to Recovery Mode or external drive, open Terminal, type
diskutil eraseDisk JHFS+ "Name" diskX(replace Name and diskX). This will erase the startup disk.
These methods allow you to fully erase the Mac’s startup disk as Disk Utility’s Erase function is unavailable on the current boot disk. Be sure to backup your data first.
Reasons You May Want to Erase Your Mac
There are several common reasons why you may want or need to erase your Mac:
Upgrading to a new Mac operating system (OS) – Erasing your Mac allows you to do a clean install of the latest macOS, wiping out any files or settings that may cause conflicts. This ensures maximum compatibility and stability when upgrading to a major new OS version like macOS Ventura.
Selling or giving away your Mac – Erasing completely wipes your personal data from the hard drive before selling or gifting your Mac. This protects your privacy and personal information.
Fixing software issues – Sometimes system files, applications, or settings can become corrupted over time, causing performance issues or bugs. Erasing everything and starting fresh may resolve software problems.
Clean install – Even without specific software issues, erasing your Mac gives you a fresh start by wiping out unnecessary files, clearing out clutter, removing unused applications, and resetting custom settings. This can optimize available storage space and speed up your Mac.
How to Backup Mac Before Erasing
It’s crucial to backup your Mac before erasing the hard drive. This ensures you don’t lose any important files or data in the process. There are a few main ways to backup a Mac:
Use Time Machine to create a bootable backup. Time Machine is the built-in backup utility in macOS that automatically saves versions of your files and lets you restore your system from a bootable backup. To set up Time Machine, plug in an external hard drive and go to System Settings > Time Machine to select the drive as your backup disk. Time Machine will regularly back up your entire Mac so you can restore if needed (Source).
Back up to iCloud. You can backup your Mac to iCloud by enabling iCloud backup in System Preferences. This will sync your most important files like photos, emails, calendars, and documents to iCloud. However, iCloud has storage limits so it’s better for smaller backups rather than full system backups (Source).
Use a third-party backup tool. Apps like Carbon Copy Cloner allow you to create full bootable backups of your Mac to an external drive. This gives you maximum flexibility and control over your backups.
The key is to make sure your files are backed up to an external location before erasing your Mac’s startup disk. This ensures no data is lost in the process.
Erasing External Drives
Unlike the startup disk, you can easily erase external drives like USB flash drives, SD cards, and external hard drives using Disk Utility without any issues. This is because the external drive is not required for your Mac to start up and operate properly.
To erase an external drive in Disk Utility, first connect the drive to your Mac. Then open Disk Utility and select the external drive from the sidebar. Click the “Erase” button and select a format like APFS or ExFAT. You can also choose to securely erase the drive if you want to ensure the existing data is completely wiped. Finally, provide a name and click “Erase” to reformat the external drive.1
The main benefit of erasing external drives with Disk Utility is it allows you to quickly reformat them to work with your Mac or other devices. For example, you can erase an external drive that was previously used with Windows PCs so it is fully compatible with Macs. Overall, erasing external drives with Disk Utility is fast, easy, and avoids the limitations you may encounter when trying to erase the Mac’s internal startup disk.
Securely Erasing Data
When erasing a drive, it’s important to consider securely erasing your data to prevent it from being recovered. The standard Erase function in Disk Utility does a single pass erase, which overwrites the data with zeros. However, with advanced recovery methods, it’s possible for deleted files to be recovered even after a single pass erase.
For better security, Disk Utility provides a more secure erase option called Secure Erase. This meets U.S. Department of Defense standards by overwriting data multiple times to prevent recovery. According to Intego, Secure Erase does the following:
- 1st pass: Writes zeros to all data blocks
- 2nd pass: Writes random data to all data blocks
- 3rd pass: Checks the drive and corrects any errors in the random data
After a Secure Erase, it’s extremely difficult for even government-level organizations to recover the deleted data. This is recommended before selling, recycling or disposing of a Mac or external drive.
To use Secure Erase, select the drive in Disk Utility and choose Secure Erase from the Erase drop down. This will securely overwrite all data to Department of Defense standards.
Alternative Erase Options
In addition to the built-in Disk Utility app, there are some alternative ways to erase a Mac’s startup drive for users with more advanced needs or who want more flexibility and control:
Using Terminal – For advanced users, it’s possible to fully erase and repartition a startup drive using Terminal commands like diskutil and gpt. This gives more granular control but requires comfort with the command line.
Third-party tools – Apps like Drive Genius and Stellar Data Eraser for Mac provide enhanced disk erasing capabilities beyond Disk Utility. These tools support erasing unused disk space, secure overwriting, and other advanced options.
Internet Recovery – Booting into macOS Internet Recovery lets you completely erase and reinstall the Mac operating system, even if the startup disk is corrupted. This requires an internet connection during the process.
By using the command line or third-party utilities, advanced users can securely erase Mac drives with more flexibility than Disk Utility alone offers.
When to Get Help
In some cases, it’s best to seek professional help to erase your Mac properly before selling, donating or disposing of it. Here are some common scenarios where you may want assistance:
Before selling your Mac – You’ll want to securely erase all your personal data and settings so the new owner can start fresh. An expert can help overwrite your data securely.
Before donating your Mac – Charities often refurbish donated computers for reuse. Have a professional fully erase your Mac beforehand so no sensitive data remains.
Before disposing of your Mac – Getting help to completely wipe your Mac protects your data from being scavenged from the device later on.
Before sending your Mac for repair – Consult with the repair company first, but you may need to backup and erase your Mac before sending it in.
If you have an older Mac – Models prior to macOS High Sierra may need third party erase tools to fully erase the SSD. An expert can ensure it’s done correctly.
If erase fails repeatedly – Sometimes encryption or disk errors prevent erasing. A professional may be able to identify and resolve underlying issues.
In summary, it’s wise to get professional help erasing your Mac if you want the peace of mind of a complete, irrecoverable data wipe before selling, donating or disposing of it. Experts can also troubleshoot any issues that prevent you from erasing the Mac yourself.
