Quick Answers
There are a few common reasons why iTunes may not be able to find your music files:
- The files have been moved, renamed or deleted since you added them to your library
- The files are stored on an external drive that is currently disconnected
- Your library is corrupted and needs to be rebuilt
- The files are in a format iTunes can’t read, such as FLAC or WMA Lossless
Looking for Moved or Renamed Files
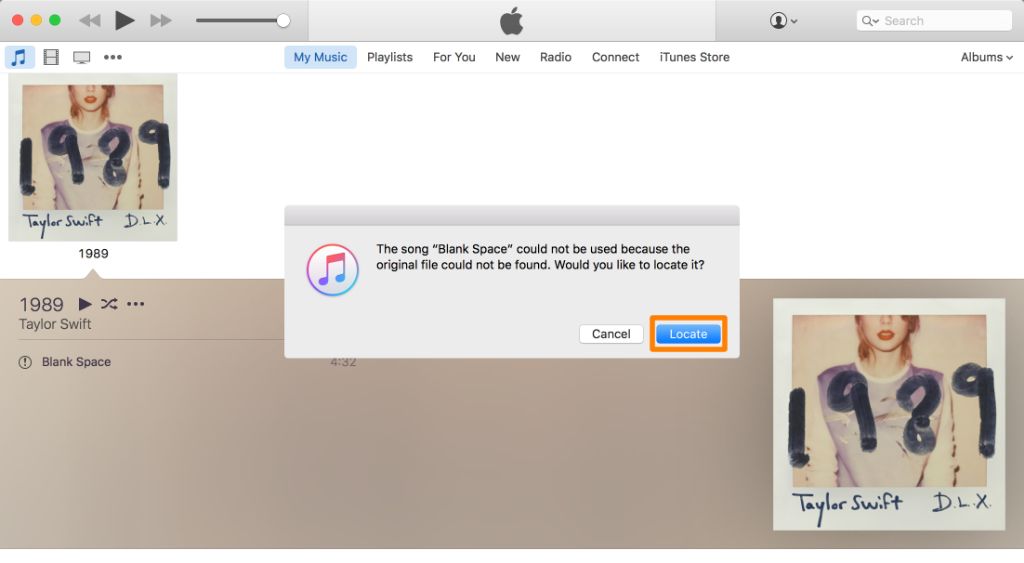
One of the most common reasons for iTunes not finding songs is because the actual files have been moved or renamed outside of the iTunes program. iTunes relies on the file path saved in its library to locate songs on your computer. If you move or rename a file outside of iTunes, it will no longer be able to find it using that saved path.
For example, if you originally added “mysong.mp3” from your desktop, then later went to the desktop and renamed it “favoritesong.mp3”, iTunes would still be looking for a file called “mysong.mp3” in that original location. The same thing would happen if you moved the file to another folder or drive entirely.
The best practice is to always edit your file and folder structure directly within iTunes, rather than elsewhere on your computer. iTunes will automatically update the file paths stored in its library whenever you move or rename files there.
Finding missing files
If iTunes can’t seem to locate files you know still exist, you’ll need to perform a search to track them down. The easiest option is use Finder or Search on Mac (or File Explorer or Search on Windows) and search your entire computer for the missing song names or portions of the track name. With any luck, this should help you locate the files.
If you have a large music library, you may need to use more advanced file search features to isolate the missing items. For example, you could search only certain file types like MP3 or AAC, or only certain folders where you may have moved the music. If you moved a lot of files recently, determining the date range for when file was modified can also help narrow things down.
Re-adding missing files
Once you’ve tracked down the missing files, you can add them back into your iTunes library a couple ways:
- Drag and drop the files directly into your iTunes library
- Right click on each file and select “Add to Library”
- Use the “Add File to Library” or “Add Folder to Library” options in iTunes
This will re-associate the music files to your iTunes library, and match them to the correct album and artist since iTunes still has the metadata for those missing songs. Re-added files should appear just as they did before.
Looking for Files on External Drives
If you keep your music library on an external hard drive or USB thumb drive, any disconnect from that drive can make parts of your collection temporarily unavailable. iTunes will display an exclamation point next to tracks it can’t find the file for.
To resolve this, make sure the external drive containing the media is connected to the computer and powered on. Then in iTunes, go to Preferences > Advanced and make sure the “Keep iTunes media folder organized” and “Copy files to iTunes Media folder when adding to library” options are both unchecked. This will prevent iTunes from copying music to your local hard drive and allow it to directly access the external location.
Finally, go to File > Library > Organize Library to have iTunes re-link the missing files. Any tracks on the external drive should again show up normally within your library. Just keep in mind that those songs will be inaccessible without that external drive mounted.
Consolidating your library
Having music stored across multiple locations can cause management challenges. Any time you add songs from a CD or download music, iTunes will save those files to your local computer drive by default.
To keep your entire library in one place, go to File > Library > Organize Library and click the Consolidate Files button. This will copy any files stored locally over to your external music drive. Now everything will be in one, easily accessible place.
You can set your iTunes Media folder location to the external drive in Preferences so all new additions get saved there automatically. Just make sure the drive is connected any time you want to access that media.
Rebuilding Your iTunes Library
In some cases, your iTunes library may get corrupted which can cause issues with accessing songs and other content. Errors like “The iTunes Library file cannot be saved” and other warnings are signs your library needs to be rebuilt.
Rebuilding your iTunes library means creating a brand new one and re-importing your music. This can resolve problems caused by corruption, errors, changes made outside iTunes, and other factors that render the current library unusable.
Backup your library first
Before rebuilding your library, it’s crucial to make a backup copy first. This will preserve your playlists, play counts, ratings, and other metadata that would otherwise be lost. Backups can be made to your computer hard drive, an external drive, or burning to disc.
To backup your iTunes library on Windows, hold down Shift and click File > Library > Export Library. On Mac hold down Option and click File > Library > Export Library. Choose where you want to save the backup iTunes folder.
Create a new library
With your backup complete, you can now rebuild your library. Start by holding down Shift (Mac) or Option (Windows) and choosing File > Library > Create Library. Pick a location to save this new iTunes library folder.
Now launch iTunes while holding down Shift/Option and select Choose Library when prompted. Navigate to your new library folder to complete the switch.
Import your music
Your new, empty iTunes library is ready to go. Click File > Library > Import Playlist and choose your backed up iTunes Library.xml file. This will import your music files and restore playlists.
You can also setup iTunes to use your old iTunes Media folder location so it has access to the actual media files. Any music or other media you had in your previous library will now be available again.
Unsupported File Formats
iTunes supports most major audio file formats like MP3, M4A/AAC, WAV, AIFF, Apple Lossless, and more. However, some formats will not work with iTunes, notably FLAC and WMA Lossless.
If you attempt to import one of these unsupported file types into your library, iTunes will skip adding the track and display a message explaining the file is an unsupported format. To get these files into iTunes, they need to be converted into a compatible format:
- FLAC to ALAC: Use a free tool like FLAC or Audacity to convert FLAC files into Apple Lossless (ALAC) format.
- WMA Lossless to AAC or ALAC: Use Freemake Audio Converter or Audacity to convert WMA Lossless to AAC/M4A or Apple Lossless.
Once converted to a compatible format, you will be able to add the files into your iTunes library and access them like normal.
Conclusion
If iTunes is having trouble finding or playing tracks in your music library, the most likely culprits are:
- Files were modified, moved, renamed, or deleted outside of iTunes
- Music is stored on an external drive that is disconnected
- Your iTunes library is damaged and needs to be rebuilt
- Unsupported formats like FLAC, WMA Lossless need conversion
Carefully managing your files within iTunes, consolidating your library to one location, and converting incompatible formats will help prevent “missing” songs in the future. But if iTunes can’t find your music, take the time to troubleshoot and reconnect missing files, or completely rebuild your library as a last resort.
Summary Table
| Problem | Cause | Solution |
|---|---|---|
| Files not found in library | Files moved, renamed, deleted outside iTunes | Search computer to find files, re-add them to iTunes |
| Tracks are missing | Music is stored on external drive that is disconnected | Reconnect external drive, have iTunes re-link files |
| Many tracks can’t be located | Corrupted iTunes library | Backup library, rebuild by creating new one and importing |
| iTunes won’t add tracks | Unsupported formats like FLAC, WMA Lossless | Convert to compatible format like ALAC, AAC |
