There can be several reasons why a hard disk drive (HDD) is not being detected in the BIOS. Some common causes include loose cabling, incorrect BIOS settings, drive failure, or an incompatible drive. Diagnosing the exact issue requires methodically troubleshooting and checking different components.
In this 5000 word guide, we will cover the full troubleshooting process for an HDD not showing up in BIOS in detail. We will explore all the potential reasons an HDD may not be detected and the steps to resolve them.
Quick Overview of Potential Issues
Here is a quick overview of some of the common reasons an HDD may not show up in BIOS:
– Loose SATA cable – If the SATA cable connecting the HDD is loose, the BIOS cannot detect the drive. Reseating the SATA cable firmly often resolves this.
– Incorrect BIOS settings – The BIOS needs to be configured correctly to detect drives. Settings like AHCI/RAID mode and hot-swapping may need to be enabled.
– Drive failure – If the HDD has mechanically failed or has bad sectors, the BIOS may not detect it. Trying the drive in another PC can confirm this.
– Incompatible drive – Very old HDDs with legacy connectivity may not work with newer systems. Trying the drive with a USB adapter can test compatibility.
– Damaged SATA port – If the motherboard’s SATA port is damaged, the HDD will not be detected. Trying another SATA port would confirm this.
– Insufficient power – HDDs require sufficient power from the PSU. An underpowered system may prevent disks from spinning up properly.
Now let’s dive into detailed troubleshooting steps for an HDD not showing in BIOS.
Step 1: Check Physical Connections
The first thing to check is whether the HDD is properly physically connected inside the PC. A loose connection can easily prevent the BIOS from detecting the drive.
Follow these steps to verify the physical connectivity:
– Shut down the PC and disconnect the power cable. Open the case to access the HDD.
– Check that both ends of the SATA data cable are firmly inserted into the SATA ports on the HDD and motherboard. Reseat both ends if necessary.
– Verify that the SATA power cable from the PSU is firmly connected to the HDD. Reseat if required.
– If it is a 3.5″ desktop HDD, ensure the power and data cables are not damaged. Check the HDD is securely seated in the drive bay.
– For 2.5″ notebook HDDs, inspect the physical connector for any bent pins. Test with another SATA cable if available.
– Reconnect the power cable and restart the PC to check if the HDD is now detected in BIOS.
Physically reseating the SATA connections often resolves detection issues. If the HDD is still not showing up after verifying the cables, move on to the next steps.
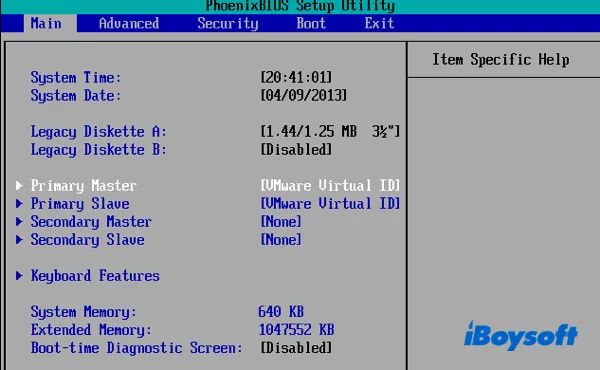
Step 2: Confirm SATA Mode Settings in BIOS
If the HDD cables are connected properly but the drive is still not detected, the issue may be incorrect SATA mode settings in the system BIOS. The BIOS needs to be configured in AHCI or RAID mode for the drives to be visible.
Here are the steps to check the BIOS SATA settings:
– Restart the PC and enter the system BIOS by pressing the appropriate key during bootup (F2, Delete, F8 etc depending on motherboard).
– Navigate to the “Advanced” tab and look for the “SATA Mode Selection” option.
– Verify it is set to AHCI or RAID. Switch to AHCI if it is in IDE mode. Some BIOS let you select AHCI/RAID individually per SATA port.
– Also ensure any legacy compatibility modes are disabled like “CSM”, “Legacy USB Support”, “Legacy Boot”.
– If there is an option to enable hot-swapping under AHCI settings, make sure that is selected.
– Save changes and exit BIOS. Reboot PC and check if HDD appears in BIOS or during POST.
– If the HDD model is very old, you may need to reconfigure BIOS to use IDE instead of AHCI to detect the drive.
The SATA Operation Mode absolutely needs to be set correctly for HDDs to be visible to the BIOS. This should resolve detection issues in most cases.
Step 3: Try a Different SATA Port
If reconfiguring the BIOS SATA mode does not help, the next step is to try connecting the undetected HDD to a different SATA port on the motherboard.
Follow these steps to rule out a bad SATA port:
– Shut down PC, disconnect power, open case and detach the data and power cables from the HDD.
– Connect the HDD to a different SATA port on the motherboard. Use the same SATA data cable if possible.
– Connect the power cable to the HDD. Close up, reconnect power cable and restart PC.
– Enter BIOS to see if the HDD is now visible. Also observe if it appears during the initial POST screen.
– If HDD is now detected, the previous SATA port on the board is likely faulty. Make a note to avoid using that port in the future.
– If the HDD still does not show up on the new SATA port either, the issue lies with the drive itself.
Trying a different SATA data port determines if the port is the root cause. A bad motherboard SATA interface can certainly prevent drives from being identified.
Step 4: Update SATA Drivers
Assuming the HDD is still not visible after checking connections and SATA ports, another aspect to examine is the SATA drivers. Outdated or corrupt chipset drivers may result in connected HDDs not being detected in BIOS.
Follow these steps to update the SATA drivers:
– Identify the specific SATA controller chipset used on your motherboard (e.g. Intel RST, AMD 570X, ASMedia etc)
– Note down the motherboard make/model and BIOS version.
– Go to the motherboard OEM website and lookup the downloads section. Search for the latest SATA drivers for your board.
– Download and install the SATA driver package. Reboot the system.
– If the drivers are up to date, try uninstalling the device in Device Manager, rebooting and letting Windows reinstall the SATA driver stack automatically.
– Open Device Manager and expand the “Storage controllers” section to verify the SATA driver is now listed without any errors or exclamation marks.
– Check if the HDD is now detectable in BIOS. Also observe if it appears during POST.
– As a last resort, reset the CMOS to force redetection of all drives.
Updated, certified SATA chipset drivers are essential for proper HDD functionality and visibility in BIOS.
Step 5: Test HDD using a SATA to USB Adapter
If all the standard SATA troubleshooting steps are unsuccessful, the next diagnosis step is to connect the HDD through a SATA-to-USB adapter. This provides additional insights on whether the drive is being detected at all.
Follow these steps:
– Obtain a SATA to USB adapter or dock. Ensure it supports your HDD’s connectivity (SATA I, II or III).
– Shut down PC, remove SATA cables, and insert the HDD into the adapter/dock.
– Connect power cable if required and connect the USB end to a laptop/desktop.
– Power up the HDD. If the adapter has an indicator LED, check that it lights up to signify a drive is connected.
– Open File Explorer on the PC to see if the HDD shows up as a connected USB drive.
– If it appears, the issue likely lies with the PC’s SATA ports, cables or drivers. The HDD itself is likely healthy.
– If HDD does not show up on another system via the adapter, the drive itself is faulty and should be replaced.
Testing the drive on an external dock isolates the HDD from the original PC’s SATA interface and can confirm if the disk is detected at all.
Step 6: Listen for Spin-up Sounds
In some cases, even though the BIOS does not explicitly show the HDD, it may still be initializing and spinning up. You can confirm this through audible cues.
Follow these steps:
– Shut down computer and disconnect power cable. Ensure the HDD is connected.
– Restart the PC and enter BIOS. Now listen closely near the HDD.
– A soft whirring sound indicates the disk platters are spinning up. This suggests the HDD is powered on but not fully detected.
– No spin-up noise likely indicates complete drive failure, or critically low power delivery.
– If you hear platters spinning, there are issues with the electronic SATA communication only. The physical HDD mechanism may be functional.
– Try an alternative SATA port, cable, drivers etc. A powered SATA dock can isolate these factors.
– If HDD stays silent throughout, the drive electronics or motor may be dead or permanently damaged. Requires replacement.
Listen for spin-up sounds as an early indicator of overall HDD health prior to deeper troubleshooting.
Step 7: Test with Antivirus Tools
As an off-chance, HDDs may sometimes not be visible due to interference from disk-monitoring antivirus tools. Temporarily disabling these programs may allow the drive to be detected normally.
Follow these steps:
– Close any open antivirus, antimalware, or HDD monitoring utilities on the PC.
– Some tools need to be fully uninstalled for drive detection to work reliably.
– After uninstalling antivirus programs, restart the PC and immediately enter BIOS.
– Check if the HDD now shows up, before antivirus software gets a chance to restart.
– If HDD appears now, it confirms an access conflict with antivirus tools. Reinstall your preferred antivirus program afterwards.
– Make sure to whitelist the HDD model from monitoring in the antivirus settings to avoid recurrence of detection issues.
Antivirus tools rarely cause complete HDD disappearance from BIOS, but it is worth eliminating this possibility during troubleshooting.
Step 8: Attempt Data Cable Recovery
Damaged SATA cables can cause seemingly sporadic failures of HDD detection. If you have tried multiple SATA ports and want to conclusively rule out the cable, attempt SATA cable pin recovery using simple tools.
Exercise caution and proceed as follows:
– Shut down PC and disconnect all cables from the SATA drive and motherboard end.
– Use a magnifying glass to visually inspect the SATA cable connector pins for any damage, bent pins or debris buildup.
– Use pressurized air to blow out any dust from the SATA cable connectors.
– Straighten any slightly bent pins using tweezers or a credit card edge gently. Avoid using excessive force.
– If pins are completely missing or broken, discard the cable and replace it.
– Insert the recovered cable into HDD and motherboard ports. Reconnect power cable.
– Start PC and check if HDD is now detected in BIOS or during POST.
– Monitor HDD for errors during normal usage. Damaged cables may cause intermittent problems.
With care and patience, mildly damaged SATA cables can be repaired and restored for detecting drives in BIOS.
Step 9: Attempt Data Recovery
If all conventional troubleshooting steps fail, the HDD may be damaged beyond normal repair. As a last resort, attempt to recover data before discarding the drive.
Exercise caution with this:
– Connect the undetected HDD externally using a SATA adapter or USB enclosure.
– Try data recovery software like Recuva, DiskDrill, Stellar Phoenix etc. Select the affected external drive.
– Deep scan the entire HDD thoroughly. This may take hours to complete.
– With luck, some data may be recovered if the drive damage is logical and not physical in nature.
– If the data recovery tool cannot detect the external HDD either, physical failure is confirmed.
– After data recovery is completed, discard the faulty HDD and replace it with a new drive.
While data recovery is unlikely to succeed on a physically dead HDD, it is worth trying as a final backup option before drive replacement.
Step 10: Replace with a New HDD
If all else fails, the HDD may be damaged beyond repair and require replacement. Carefully re-evaluate parts before buying a new drive.
Follow these best practices during HDD replacement:
– If available, try the new replacement HDD in another PC to verify it is functional out of the box.
– Carefully recheck SATA cables and ports for any damage before connecting replacement drive.
– Ensure your system BIOS, chipset drivers and all SATA settings are optimal and up to date before installing replacement.
– After replacement, run extended HDD diagnostics and memory checks overnight to validate system stability.
– Consider investing in enterprise-grade HDDs with longer warranties to minimize future data loss risks.
– Schedule regular backups, monitor SMART parameters, and maintain proper cooling for better HDD health.
With careful selection and installation of a new replacement HDD, accompanied by good computing practices, your system can enjoy years of reliable service.
Conclusion
Troubleshooting an HDD not detected by BIOS requires methodical elimination of possible failure points. The key steps include checking physical connections, trying different SATA ports, updating drivers, testing via USB adapters, listening for spin-up sounds, recovering SATA cable pins and attempting data recovery before ultimately replacing the drive.
Carefully working through each of these steps in sequence helps isolate the true cause of HDD detection issues in BIOS. Proper diagnosis also prevents unnecessary returns or replacements of functional hardware components. Employing sound troubleshooting practices ultimately saves time, money and rescues precious HDD data.
We hope these detailed steps for resolving HDD detection problems are helpful for diagnosing and fixing your own PC’s storage challenges. Let us know if you have any other tips or questions in the comments!
