If you are having issues with your SATA hard drive not being detected, there are a few potential causes and solutions to try. In this comprehensive guide, we will walk through the troubleshooting steps to help get your SATA drive recognized.
Quick Overview
Here is a quick overview of the common reasons a SATA drive may not be detected and possible fixes:
- Loose SATA connections – Check that both ends of the SATA cable are securely plugged in.
- Faulty SATA cable – Try replacing the SATA cable with a new one.
- Incorrect BIOS settings – Enter BIOS and make sure SATA ports are enabled and set to AHCI mode.
- Outdated drivers – Update SATA/chipset drivers to latest available versions.
- Drive not getting power – Try a different SATA power connector from your PSU.
- Failed drive – The drive itself may have failed and needs to be replaced.
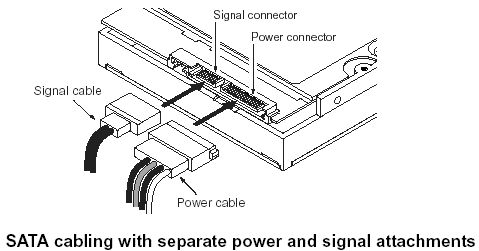
Step 1: Check Physical Connections
The first step is to check that all the physical SATA connections are secure. A loose cable is one of the most common reasons a drive is not detected. Follow these tips:
- Make sure the SATA data cable is firmly plugged into the motherboard SATA port and the back of the drive. You should hear a click when fully inserted.
- Check that the SATA power connector from the power supply is tightly connected to the drive.
- Inspect the SATA cables for any damaged or bent pins.
- Try switching to a different SATA port on the motherboard and use a new SATA data cable if possible.
The SATA connections are very sensitive and a loose fitting can easily cause detection issues. Reseat both ends of the SATA cable and power connector to ensure a snug fit.
Step 2: Verify Drive in BIOS
After checking the physical connections, reboot your computer and enter the system BIOS (typically by pressing F2, F10 or Delete during bootup). This will allow you to see if the BIOS is detecting the drive.
In the BIOS, check if your SATA drive is listed on the boot page alongside your other drives. If it is missing, the drive is likely not being detected properly at a hardware level.
While in the BIOS, you also want to double check these settings:
- SATA ports enabled – Most BIOS will have an option to enable or disable the SATA ports. Make sure the port your SATA drive is connected to is enabled.
- AHCI mode – Set the SATA mode for your ports to AHCI rather than IDE. AHCI mode is required for SATA drives.
Correcting any issues with BIOS settings should help with detection. Be sure to save changes when exiting the BIOS.
Step 3: Try a Different SATA Port
If the drive still isn’t showing up, try plugging it into a different SATA port on your motherboard. Use the primary SATA ports closest to the CPU if possible.
Every motherboard is different, so refer to your manual for the ideal ports to use. For example, on many boards ports 0/1 provide full SATA 3.0 speeds, while other ports may run at lower SATA 2.0 speeds.
Swapping SATA ports can resolve detection issues if there is a problem with that specific port. Make sure to also use a new SATA cable when testing different ports.
Step 4: Update SATA Drivers
Outdated SATA drivers can also cause connection problems with your drive. Follow these steps to update drivers:
- Open Device Manager in Windows.
- Expand the Storage controllers section.
- Right click on any SATA controller/AHCI device and select Update driver.
- Select Search automatically for updated driver software.
- Restart your PC after the update completes.
This will install the latest SATA drivers available for your system which may resolve any incompatibilities. Many motherboard manufacturers also provide SATA drivers through their support site, so check there as well.
Step 5: Check Drive Power Connection
It’s also important to verify the SATA drive power connection. Use these tips:
- Make sure the SATA power connector is fully inserted into the back of the drive.
- Check that the power supply cable/connector is not damaged.
- Connect the drive to a different power connector from your PSU if available.
- Try using a SATA power splitter or molex adapter to connect to a different power source.
- Listen for the drive powering on when connected.
A faulty or loose SATA power connection can prevent the drive from powering on and being detected. Swap cables and connectors to isolate the issue.
Step 6: Test Drive in Another PC
At this point if your SATA drive is still not recognized, it’s a good idea to test it in another computer if possible. This helps determine whether the problem is with the drive itself or something on your system.
Connect the SATA drive to another PC using the same SATA data and power connectors. Boot into BIOS or the operating system to see if the drive is now detected. If it is, then the issue likely lies with your original motherboard, cables, or configuration. If the drive still isn’t detected, then the drive itself is likely faulty or dead.
Step 7: Inspect for Physical Damage
Closely inspect your SATA drive for any signs of physical damage before proceeding further:
- Look for cracks, dents or broken pieces on the exterior case.
- Listen and feel for any scraping or grinding noises coming from the drive.
- Open the drive enclosure and check for burnt components.
- Examine the SATA connector pins for any bent or broken pins.
Severe physical damage usually means the drive components or circuitry have failed and the drive will need to be replaced. Be very careful when handling and do not continue using if you see any damage.
Step 8: Attempt Data Recovery
If no physical damage is present but the drive still isn’t working, you may be able to recover data before replacing it. Try these options:
- Use Data Recovery Software: Applications like Recuva or EaseUS may be able to restore files if the drive is not completely dead.
- Remove from Enclosure: The USB enclosure itself may have failed, so remove the bare drive and connect directly via SATA.
- Professional Recovery Service: For critical data and drives that have failed completely, a professional data recovery service may be able to repair and restore the data.
Data recovery should be attempted before disposing of the drive. But keep in mind, heavily damaged drives may not be recoverable through software or services.
Step 9: Replace Failed or Damaged Drive
If all troubleshooting steps have been exhausted and the drive is still not detected, then the drive itself will need to be replaced:
- Buy a new replacement SATA drive that meets your capacity needs.
- Ensure the new drive is compatible with your PC before purchasing.
- Copy any recovered data from the old drive over to the new one.
- Install the new drive in your PC using proper mounting and connectivity.
- Format and partition the new drive as needed through Disk Management.
It’s recommended to go with a quality replacement from a reputable brand like Samsung, Crucial or Western Digital. Be sure to register any warranty and backup your data regularly.
Common SATA Drive Detection Issues
Here is a summary of the most frequent reasons a SATA drive may not be detected and solutions to fix them:
| Issue | Cause | Fix |
|---|---|---|
| Loose connections | SATA cable not fully inserted | Reseat SATA cable at both ends |
| BIOS not detecting | SATA ports disabled or set to IDE | Enable SATA ports, set to AHCI in BIOS |
| Motherboard compatibility | Wrong SATA port being used | Switch drive to optimized SATA port |
| Outdated drivers | Old SATA controller drivers | Update SATA drivers in Windows |
| No power | Faulty SATA power connector | Try different power connector |
| Dead drive | Failed hardware components | Replace failed SATA drive |
Frequently Asked Questions
Why is my second SATA hard drive not detected?
If your second SATA drive is not being detected, a few things to check are:
- Ensure the SATA cable is properly connected at both ends
- Verify the drive is getting SATA power from the PSU
- Try switching to another SATA port and data cable
- Ensure the BIOS is set to AHCI mode
- Check for drive failure by testing it in another PC
Why do SATA drives suddenly stop working?
Common reasons SATA drives can suddenly fail include:
- Disconnect or failure of the SATA interface
- Not receiving power due to PSU or cable issues
- Mechanical failure of drive components
- Logical failure of the drive firmware or circuits
- Damage from power surges or static electricity
- Corrupted master boot record or other critical data tables
Can a damaged SATA drive be repaired?
It depends on the extent and type of damage:
- Minor damage may be repairable by changing the PCB or components
- Complete electronic failure is usually irreparable
- Severely damaged platters and heads cannot be physically repaired
- Some companies offer data recovery services for mechanically damaged drives
- But heavily damaged drives are typically non-repair able and need to be replaced
Should SATA cables be plugged in tight or loose?
SATA cables should always be fully inserted and plugged in tightly. A loose connection can easily cause detection issues. However, you want to avoid excessive force, which could damage the ports or cable connections. Push the cable in until it clicks securely into place.
Conclusion
Troubleshooting and resolving SATA drive detection problems involves methodically isolating the issue and testing each component. Carefully check the drive connections, controller settings, cable condition, and power supply. Update drivers, switch ports, and inspect for physical damage. If no issues are found, then the drive itself has likely failed and needs replacement.
SATA drives not being detected properly can stem from multiple causes. But following the step-by-step diagnosis tips outlined in this guide will help get to the root of the problem and ultimately fix your SATA drive detection issues.