After installing a new solid state drive (SSD), it can be frustrating to find that your computer is not detecting the SSD. There are several potential reasons why a newly installed SSD is not showing up. This article provides an overview of the issue and explores the common causes.
SSDs provide faster performance and greater reliability compared to traditional hard disk drives (HDDs). However, SSDs function differently than HDDs, so there are some specific steps required during installation and setup. If those steps are skipped, the operating system and BIOS may fail to detect the SSD.
Some of the most common reasons an SSD may not show up after installation include loose connections, driver issues, initialization requirements, and the need to assign a drive letter. We will explore each of these causes in detail throughout this guide. By methodically checking each possibility, you should be able to troubleshoot why your SSD is not detected and get it functioning properly.
Checking Physical Connections
One of the most common reasons an SSD may not be detected is because of a loose connection or faulty cable. First, check that both ends of the SATA cable are securely connected to the SSD and the motherboard’s SATA port. Wiggle the connections gently to ensure they are snugly in place. SATA cables can sometimes work themselves loose over time, especially if there is vibration or movement of the computer.
If reseating the connections does not help, try using a different SATA port on the motherboard and swap out the SATA cable for a new one if possible. SATA cables can fail over time, so a damaged cable could prevent the SSD from being detected properly. Try connecting the SSD to another computer to rule out any issues with the drive itself as well. Using a new SATA port and cable with the SSD connected to another PC will determine if the problem lies with the physical connections.
Sources: https://www.seagate.com/support/kb/the-bios-does-not-detect-or-recognize-the-solid-state-drive-005707en/, https://www.easeus.com/computer-instruction/ssd-not-detected-in-bios.html
Checking in BIOS
One common issue is that the newly installed SSD may not be detected in the BIOS. To check this, you’ll need to enter your computer’s BIOS settings during boot up (typically by pressing F2, Delete, or a function key like F10 or F12). In the BIOS, look for the storage or boot device configuration and see if your SSD is listed.
If the SSD is not showing up in the BIOS, you may need to enable AHCI mode. Many motherboards default to IDE mode, which does not support certain features of SSDs. Go to the storage or SATA settings in BIOS and change the mode to AHCI. Save changes and exit BIOS, then boot back into it to check if the SSD now appears. Enabling AHCI allows the motherboard to fully communicate with the SSD.
Sources:
https://linustechtips.com/topic/223521-why-doesnt-my-bios-detect-ssd/
Update Drivers
One potential reason an SSD may not be detected is because you need to update the drivers on your motherboard or other hardware components like the GPU. Motherboard drivers, especially SATA drivers, play an important role in allowing Windows to recognize connected storage devices. Outdated drivers can sometimes prevent proper SSD detection.
Go to your motherboard manufacturer’s website and download the latest chipset, SATA, and other relevant drivers. Also check GPU and other hardware manufacturers’ sites for available driver updates. Install any updates through Device Manager or your hardware vendor’s provided software. A complete sweep and update of your system’s drivers can often resolve SSD detection issues.
For more information, see:
https://www.makeuseof.com/6-ways-to-fix-the-ssd-not-recognized-error-in-windows-10/
Initialize the Drive
If your SSD is brand new and uninitialized, you’ll need to initialize it in Disk Management before Windows can access it. Initializing the drive prepares it for first use by defining the partition structure. Follow these steps to initialize an SSD in Disk Management:
1. Open Disk Management (press Windows key and type “diskmgmt.msc”).
2. Right-click the disk you want to initialize and select “Initialize Disk”.
3. Choose the partition style: MBR or GPT. MBR is compatible with older operating systems while GPT works better for newer SSDs with larger partition sizes (cite: https://www.easeus.com/partition-master/clone-all-partitions-to-ssd.html).
4. Click “OK” to confirm. The SSD will now show up as an initialized disk.
Once initialized, you can create partitions on the SSD and assign drive letters so it shows up in Windows File Explorer.
Format the Drive
Once the SSD is detected by Windows, the next step is to format it. Formatting erases any existing data on the drive and prepares it for use with your operating system.
It is recommended to format the SSD to the NTFS file system for Windows. NTFS supports key features like permissions, encryption, compression, and disk quotas. To format, go to Disk Management, right-click on the SSD, and select “Format”. Choose NTFS as the file system.1
When formatting, you also want to select the proper allocation unit size, which determines how storage space is allocated on the disk. For SSDs, choose an allocation unit size of 4KB instead of the default 4096KB. This results in more efficient use of space on an SSD.2
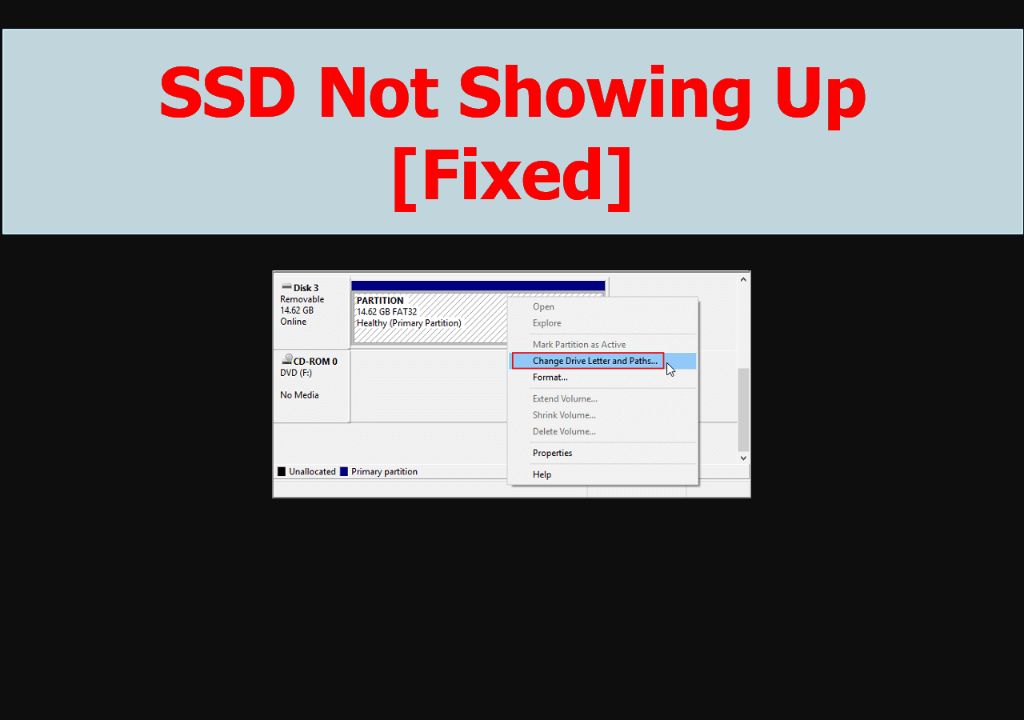
Assign a Drive Letter
If Windows does not automatically assign a drive letter to the new SSD, you can manually assign one using Disk Management.
To open Disk Management, right-click the Start menu and select “Disk Management”. All connected drives will be listed here.
If you see the new SSD listed but it does not have a drive letter, simply right-click on the volume and choose “Change Drive Letter and Paths”. Then click “Add” and assign an unused drive letter like D:, E:, or F:.
Be sure to avoid assigning a letter already in use by another drive.
Once a drive letter is assigned, close Disk Management and restart the computer for the change to take effect. After rebooting, Windows should now recognize the SSD with the new drive letter.
If the SSD still does not show up, continue troubleshooting the other possibilities covered in this guide.
Sources:
Unable to assign drive letter to SSD partition
How to Solve SSD Not Showing Up in Disk Management
Enable TRIM
Enabling TRIM is an important step to ensure optimal performance on your SSD drive. TRIM is a feature that allows the operating system and SSD to communicate about which blocks of data are no longer in use and can be wiped and reused. This helps reduce write amplification on the SSD and prevents performance degradation over time.
Most modern operating systems like Windows 10 and 11 have TRIM support built-in. To enable TRIM, go to Control Panel > System and Security > System > Device Manager. Click on Disk drives, right click on your SSD and select Properties. Go to the Policies tab and check “Enable TRIM support”. You may need to restart your PC for changes to take effect.
You can also use the SSD manufacturer’s toolbox utility to enable TRIM. For example, Samsung provides Magician software to optimize and monitor their SSDs. The utility allows enabling TRIM and optimizing other SSD settings for performance. Refer to your SSD brand’s software tools to ensure TRIM is enabled (Source).
Enabling TRIM ensures your SSD can operate at peak performance by clearing unused blocks. Check your operating system and SSD software utilities to verify TRIM is active.
Secure Erase SSD
Sometimes an SSD may not show up due to corruption or outdated firmware. Performing a secure erase can reset the SSD to a factory-default state which may resolve detection issues. Most SSD manufacturers provide a tool for securely erasing their drives.
For Samsung SSDs, you can use the Samsung Magician software to perform a secure erase. This will completely reset the drive and delete all data. Make sure you have backups before proceeding. Open Samsung Magician, agree to the disclaimer, select your SSD, then click “Secure Erase” and confirm. The process can take 30-90 minutes depending on drive size [1].
Other manufacturers like Crucial and WD provide similar erase tools for their SSDs. Consult your drive manufacturer’s instructions. In some cases, these tools may not work if there are compatibility issues with the drive firmware [2]. Updating to the latest firmware and tool version can help.
After the secure erase completes, reboot and see if your SSD now shows up properly. The secure erase process should reset the drive and restore factory conditions.
Conclusion
In summary, to get your SSD working properly after installation, first check the physical connections and cables to ensure everything is securely connected. Next, enter BIOS to see if the drive is detected there and enable AHCI mode if needed. Updating drivers, initializing and formatting the SSD, assigning it a drive letter, and enabling TRIM can also help get the SSD functioning.
If you have tried all of these troubleshooting steps and the SSD is still not working, then further investigation may be needed. You can try a secure erase on the SSD or consult with the manufacturer. As a last resort, the SSD may be defective and need to be replaced.
With some troubleshooting and correctly configuring the settings, an SSD that is not showing up should be detectable and usable again in most cases. If the issue persists even after following all the steps here, then replacement or professional assistance may be required.
