If you find that the Windows update cleanup tool is not successfully removing old Windows update files from your computer, there are a few potential reasons why this may be happening.
Quick Overview of the Issue
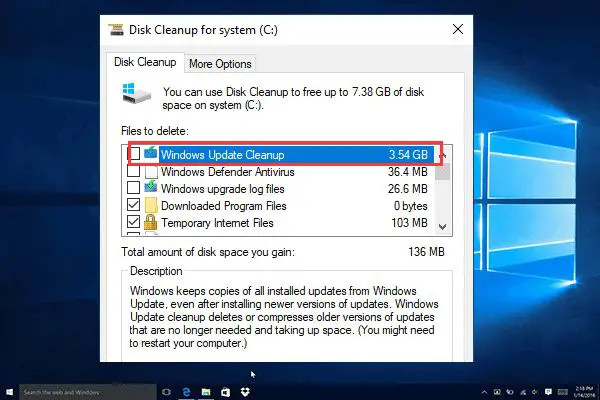
The Windows update cleanup tool (also called the Windows Update Cleanup Utility) is designed to remove unnecessary Windows update files from your computer to free up storage space. This includes deleting outdated .msu and .cab installer files that may have accumulated over time after various Windows updates and upgrades.
However, sometimes this cleanup process does not successfully remove all the intended Windows update files. This can occur for various reasons, including:
- Lack of sufficient user permissions to delete protected system files
- Corrupted system files blocking the cleanup
- Third party apps interfering with the cleanup tool
- Unfinished Windows updates leaving behind temporary installer files
- Buggy Windows updates preventing full cleanup
To get the Windows update cleanup working properly again, you will likely need to investigate the specific cause in your case and then take steps to resolve it. This may involve gaining admin permissions, using DISM and SFC to repair system files, uninstalling problematic software, restarting unfinished updates, or debugging any known glitchy updates.
Understanding the Windows Update Cleanup Tool
The Windows update cleanup utility first appeared in Windows Vista as a means to retain hard drive space by removing the installation files from completed Windows updates. These installer files, such as .msu and .cab files, can accumulate over time and take up significant storage space.
Microsoft recognized this issue, especially for users with small hard drive capacities, and so developed the cleanup tool to automatically clear out these outdated installer files periodically. The tool helps delete the update files that are no longer needed after the updates have already been installed and run on your system.
Specifically, the Windows update cleanup will typically remove the following types of files:
- .msu files – Windows Update Standalone Installer files
- .cab files – Microsoft cabinet files
- .esd files – Electronic Software Download files
- .log files – Log files tracking installation progress
- .sfcache files – Windows update cache files
By removing these outdated installer and temporary files, the cleanup tool can recover a significant amount of hard drive space. For example, if you have installed each Windows update over the course of a year, the total update file buildup could easily occupy 5 GB or more.
How the Cleanup Runs
There are a couple different ways the Windows update cleanup utility may run on your system:
- Automatic cleanup – By default in Windows Update, the cleanup tool is configured to run automatically 14 days after new Windows updates install. An automatic cleanup will run in the background without any user interaction.
- Manual cleanup – You can also choose to manually run the cleanup tool at any time rather than wait for the automatic operation. You can find the option to manually run the cleanup under Settings > Update & Security > Windows Update.
In both cases, the cleanup should begin identifying and removing older, unnecessary Windows update files shortly after initiating. A notification will display alerting you that the cleanup is running.
However, despite this process working smoothly for many people, some users encounter issues where the cleanup fails to actually delete the intended Windows update files.
Why is the Windows Update Cleanup Not Working?
When the Windows update cleanup runs but does not successfully remove the expected installer files, there are a number of potential culprits that could be preventing proper file deletion. Some of the most common reasons include:
Lack of Admin Permissions
One of the most likely reasons the cleanup tool cannot delete files is because it lacks the administrator permissions necessary to remove certain protected system files. The update installer files it targets may be marked as read-only or otherwise restricted.
Standard user accounts often do not have sufficient permissions to alter these protected operating system files. As such, the cleanup process essentially gets blocked from being able to delete them when running under a standard user account.
Granting administrator rights to the Windows update cleanup utility can allow it to override permissions restrictions and fully delete the intended files. You can check if this is the issue by examining the permissions on files not being removed or trying to run the cleanup as an admin user.
Corrupted System Files
Another relatively common reason for an unsuccessful cleanup is corrupted Windows system files blocking the normal operation. The Windows update files themselves or other integral system files may have become damaged or altered somehow.
If critical operating system files are corrupted, this can effectively break the cleanup tool and prevent it from working properly. It may fail to identify all the intended Windows update files or encounter errors trying to delete them.
Using the System File Checker (SFC) and Deployment Image Servicing and Management (DISM) tools can potentially fix the corrupted files. This may allow the Windows update cleanup to run smoothly again after the repairs.
Conflicts from Third Party Apps
Problematic third party applications could also be responsible for interfering with a proper Windows update cleanup. Certain programs may block files from being deleted or otherwise disrupt the cleanup tool from running effectively.
Security software, remote desktop programs, and built-in cleanup utilities from various applications can sometimes prevent Windows update files from being removed as intended. Troubleshooting and uninstalling any third party apps that may be causing conflicts could help resolve this.
Leftover Temporary Update Files
If a Windows update was interrupted or did not install completely, it may have left behind temporary installer files that cannot be removed by the cleanup utility until the update is completed. These unfinished setup files may still be locked or in use by the system in some way.
Going into Windows Update and ensuring there are no failed or pending updates is one way to address this. Allow all updates to fully install, then attempt the cleanup again to see if it can properly remove the temporary files after the updates conclude normally.
Problematic Windows Updates
In some cases, recently installed Windows updates themselves may be faulty and responsible for the failed cleanup operation. Specific buggy or incompatible updates could essentially break the cleanup tool and prevent it from working right.
If you can pinpoint a particular Windows update that coincided with the cleanup problems, you can try uninstalling or rolling back that specific update to see if it remedies the situation. Otherwise, waiting for future patches to the flawed updates may be required.
How to Fix Windows Update Cleanup Not Deleting Files
If you are experiencing issues with Windows update cleanup failing to remove files, here are some troubleshooting steps to help get the tool working properly again on your system:
Gain Administrator Permissions
First, try running the Windows update cleanup as an administrator. This can grant full permissions to delete protected system files. To do this:
- Open File Explorer and go to C:\Windows\System32.
- Right click on clnup.exe and choose Run as administrator.
- Allow the Windows update cleanup to run.
Afterward, check if the intended files were removed successfully with admin rights. If they were, you know permissions were likely the issue.
Use DISM and SFC for Repairs
Using the DISM and SFC utilities could help resolve corrupted system files that may be interfering with the cleanup tool.
DISM can scan, diagnose, and repair system image files. SFC scans for corrupted Windows files and can restore them from a cache.
Open an elevated Command Prompt and run the following scans and repairs:
DISM /Online /Cleanup-Image /ScanHealth
DISM /Online /Cleanup-Image /RestoreHealth
SFC /SCANNOW
Then attempt the Windows update cleanup again after these commands finish.
Uninstall Conflicting Applications
Check for any third party applications that could be blocking the Windows update cleanup tool from deleting files. Uninstall any problem applications and then re-run the cleanup.
Especially look for security programs, remote access software, and other apps that may want to control system file access or deletions.
Restart Failed Windows Updates
Check Windows Update and view your update history for any failed or unfinished updates. Restart and complete any stuck updates. The cleanup may be able to remove temporary files after updates conclude normally.
You can also use the Windows Update Troubleshooter to automatically find and fix common update errors.
Uninstall Problematic Updates
If you believe a specific recent Windows Update is the cause of the cleanup failures, try uninstalling or rolling back that particular update through Programs and Features or Settings.
This could isolate whether an incompatible or buggy update is to blame for the cleaning problems.
Additional Cleanup Tool for Leftover Update Files
If you still find old Windows Update files remain even after troubleshooting the built-in cleanup utility, you can try using a third party cleaner tool to delete any lingering update files.
The Wise Program Uninstaller includes an option to uninstall Windows updates along with a scan to find any related orphaned files. This can provide a secondary cleanup solution if needed.
Other dedicated cleanup utilities may also help target any update files outside of the normal cleanup tool’s scope. Combined with the regular Windows update cleanup, they can help ensure all unnecessary update installers and temporary files are removed.
Preventing Future Windows Update Cleanup Issues
After resolving any current problems with the Windows update cleanup tool, you can take proactive measures to help avoid potential issues recurring in the future:
- Always install Windows updates promptly so temporary files don’t linger.
- Don’t interrupt or cancel updates before they finish.
- Maintain healthy system files with DISM and SFC scans.
- Avoid harmful third party apps that could interfere.
- Periodically run the cleanup manually rather than just relying on automatic.
Staying up-to-date on Windows updates, running regular system maintenance, and monitoring for conflicts can help ensure your Windows update cleanup jobs remain smooth and effective at freeing up your disk space.
Conclusion
When the Windows update cleanup utility fails to remove unneeded installer files, there are various factors that could be responsible – from inadequate permissions and corrupted system files, to third party app conflicts and unfinished Windows updates. Following troubleshooting steps such as gaining admin access, using DISM and SFC for repairs, uninstalling problematic software, restarting failed updates, and debugging known glitchy updates can help get the cleanup tool working properly again. Combining the regular Windows cleanup with third party utilities may also help delete any remaining update files. Staying vigilant for potential issues can further help avoid future cleanup problems.