NVMe (Non-Volatile Memory Express) drives are a type of high-speed solid state drive that connects via PCIe. They offer faster speeds compared to traditional SATA SSDs. Disk Management in Windows is a utility that allows you to view, initialize, format and manage all the disks connected to your PC.
Sometimes when you install a new NVMe drive, it may not show up in Disk Management even though it is detected by your system. There are a few potential reasons for this.
Verify NVMe Drive is Detected
The first step is to verify that your NVMe drive is actually being detected by Windows. To do this, open up Device Manager by pressing Windows + X and selecting it from the menu. In Device Manager, expand the Storage controllers and Disk drives sections.
Check under Storage controllers for an NVMe controller. Most modern NVMe drives will show up as “Standard NVM Express Controller.” If you don’t see any NVMe controller listed here, Windows is not detecting your NVMe drive.
Next, look under Disk drives. Your NVMe drive should be listed here by its model number and size if it is being detected. If you don’t see it, then once again Windows is not picking it up.
According to this Microsoft forum post, sometimes an incompatible NVMe driver from AMD causes detection issues in Windows. Updating to the Standard NVMe controller driver can resolve this.
If your NVMe drive shows up in Device Manager but not Disk Management, the drive is being detected but has not been initialized yet. We will cover this next.
Initialize the NVMe Drive
Initializing the NVMe drive is often required before Windows will recognize it. There are a couple ways to initialize an NVMe drive in Windows 11:
Use Disk Management: Open Disk Management, right-click on the unallocated NVMe drive, and select “Initialize Disk”. This will launch the Initialize Disk wizard where you can select MBR or GPT partitioning and initialize the drive.
Use diskpart: Open an elevated Command Prompt and type diskpart. Then type list disk to identify the NVMe drive. Select it with select disk X (where X is the disk number). Finally, type clean to initialize the drive to a GPT format according to Microsoft.
After initializing the NVMe drive in Disk Management or with diskpart, it should now show up as available storage space in Windows File Explorer.
Assign a Drive Letter
One common reason an NVMe drive may not show up in Disk Management is because it has not been assigned a drive letter. Drives in Windows require a letter to be accessed and recognized by the operating system.
If the NVMe drive shows up as unallocated space in Disk Management, you will need to allocate it and assign a drive letter before it can be used. Here are the steps:
- Open Disk Management (right-click the start menu and select Disk Management).
- Right-click the unallocated space and select “New Simple Volume”.
- Follow the prompts to allocate the full space and assign a drive letter.
Once a drive letter is assigned, the NVMe should show up in File Explorer and be accessible. If it is still not visible, you may need to update drivers or reset the NVMe drive.
Sources:
How to Use and Allocate Unallocated Space in Windows
Update Drivers
One reason an NVMe drive may not show up in Disk Management is because the drivers or firmware are outdated. NVMe drivers and firmware should be updated periodically to ensure compatibility with the latest versions of Windows.
To update NVMe drivers in Windows 11:
- Open Device Manager by right-clicking the Start menu and selecting it
- Expand the Disk drives section
- Right click on the NVMe drive and select Update driver
- Select Search automatically for updated driver software
- Restart your PC once the update is complete
It’s also recommended to update the NVMe drive’s firmware for optimal performance and compatibility. Most manufacturers provide firmware update utilities that can be downloaded from their website. For example, the SanDisk SSD Dashboard can be used to update firmware on SanDisk NVMe drives (1).
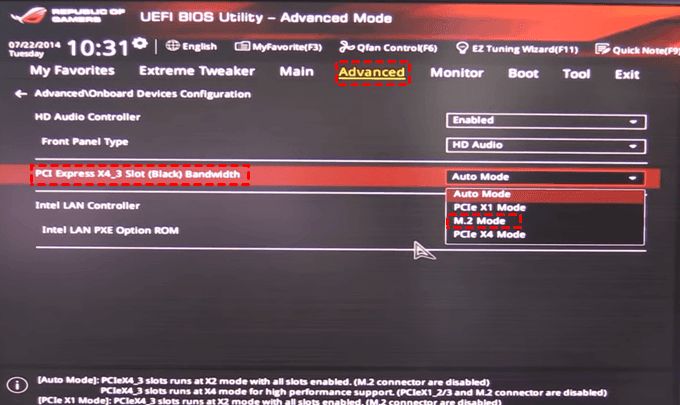
Enable NVMe in BIOS
Many PC motherboards include the option to enable or disable the NVMe storage interface in the BIOS/UEFI settings. If this setting is disabled, the NVMe drive will not be detected even if installed properly.
To enable NVMe in BIOS:
- Restart the computer and enter the BIOS setup utility. The key to press varies by manufacturer, common ones are F2, F10, Del, or Esc.
- Navigate to the advanced settings and look for an option labeled “NVMe”, “M.2”, or “PCIe/M.2”. Enable this setting if it is currently disabled.
- For MSI boards, disable CSM under the boot tab to enable NVMe (source).
- For ASUS ROG boards, look for “M.2_1 Configuration” and set to enabled (source).
- Save changes and exit BIOS.
After enabling NVMe in BIOS, check if the drive appears in Windows Disk Management. If not, a motherboard BIOS update may be required to add NVMe support.
Reset/Reseat the NVMe Drive
One of the simplest solutions to try if your NVMe drive is not being detected is to power down your computer, physically remove the NVMe drive, and then reseat it properly. Here are the steps:
- Shut down your computer and unplug the power cable.
- Open up your computer case and locate the NVMe drive slot on the motherboard.
- Gently remove the NVMe drive from the M.2 slot.
- Check for any debris or dust in the slot and clean it out if needed.
- Reinsert the NVMe drive into the M.2 slot, pressing down firmly so it clicks into place properly.
- Secure the drive with the retainer screw if your motherboard has one.
- Close up the computer case and plug the power cable back in.
- Restart your computer and check if the NVMe drive is now being detected.
Sometimes an NVMe drive can become slightly dislodged or loose inside the M.2 slot, which can prevent the contacts from lining up properly. Reseating the drive ensures a tight fit and secures the electrical connections. This simple step often resolves detection issues if the drive was not fully inserted or came loose. Just be sure to handle the NVMe drive carefully by the edges and avoid touching the components.
Check for Disk Errors
One potential reason an NVMe drive may not show up in Disk Management is if there are errors on the drive preventing Windows from accessing it properly. You can scan for errors using the CHKDSK utility in Command Prompt.
To run CHKDSK on an NVMe drive:
- Open Command Prompt as Administrator.
- Type “chkdsk X: /f” where X is the drive letter of your NVMe drive. If the drive letter is not showing up, you can identify the NVMe drive by its name which is visible in Disk Management.
- Press Enter and let CHKDSK scan the drive and repair any errors.
- After it completes, reboot your computer and check if the NVMe drive appears in Disk Management.
Running CHKDSK scans the file system for errors and attempts to repair them. This may fix problems preventing Windows from detecting the NVMe drive properly. If the drive still does not show up after CHKDSK, move on to other troubleshooting steps like updating drivers, resetting the NVMe drive, or clean installing Windows.
Sources:
[1] https://www.reddit.com/r/techsupport/comments/s0edd9/nvme_drive_not_recognized_by_bios_or_windows/
[2] https://answers.microsoft.com/en-us/windows/forum/all/ssd-not-detected-after-a-failed-chkdsk/186d7d08-b5d8-4dc6-bd98-a4ce52b3fc65
Clean Install of Windows
If all other troubleshooting steps fail, performing a clean install of Windows 11 as a last resort may resolve the issue of an NVMe drive not showing up in Disk Management. This involves wiping the drive and doing a fresh OS installation. Before proceeding, be sure to backup all important data.
To do a clean install, first boot into the Windows 11 installation media. Delete all existing partitions on the NVMe drive during the installation process, leaving it unallocated. Then proceed with installing Windows 11 on the blank NVMe drive.
According to discussions on Reddit and Tom’s Hardware forums, a clean install with the drive wiped is often necessary for Windows to correctly detect and initialize a new NVMe drive. Some users report their NVMe drive not showing up during an in-place upgrade to Windows 11, but a fresh clean install resolved the issue.
However, a clean install should only be tried after exhausting other basic troubleshooting steps. Back up data and be prepared to reinstall apps and programs after the clean OS installation. While frustrating, this step often resolves situations where an NVMe drive is not detected in Disk Management on a new Windows 11 install.
Conclusion
NVMe drives not showing up in Disk Management on Windows 11 can be frustrating, but the issue is usually fixable. The most common solutions include initializing the drive, assigning a drive letter, updating drivers, enabling NVMe in the BIOS, reseating the drive, checking for disk errors, and performing a clean install of Windows.
In summary, verifying the NVMe drive is detected in the BIOS is the first troubleshooting step. From there, initializing the drive in Disk Management often resolves the issue. If the drive still does not show up, try assigning a drive letter or updating drivers. For persistent problems, enabling NVMe in the BIOS, reseating the drive, and scanning for disk errors may help. As a last resort, a clean install of Windows typically resolves any software-related issues.
With patience and by methodically trying each solution, NVMe drives can usually be made to appear in Disk Management on Windows 11. Check forums and contact the drive manufacturer for additional tips if the solutions in this guide do not resolve your specific issue.
