What is RAID?
RAID stands for “Redundant Array of Independent Disks” and refers to a method of combining multiple hard disk drives into a logical unit to improve performance and/or reliability 1. The different configurations of RAID are called RAID levels and provide various combinations of increased data reliability, increased input/output performance, or increased storage capacity relative to single drives.
Some common RAID levels include:
- RAID 0: Disk striping without parity or mirroring. Improves performance but does not provide data redundancy.
- RAID 1: Disk mirroring without parity or striping. Provides data redundancy through duplicating all data on secondary disks.
- RAID 5: Block-level striping with distributed parity. Provides data redundancy while also improving read performance.
- RAID 6: Block-level striping with double distributed parity. Provides fault tolerance up to two failed drives.
- RAID 10: Stripe of mirrors. Combines mirroring and striping to provide both data redundancy and improved performance.
The RAID level determines how data is written and reconstructed in case of drive failures. Understanding the RAID level is key to properly configuring and managing the array.
Why is knowing your RAID configuration important?
Knowing your RAID configuration is important because it determines how your storage array handles disk failures, performance, and capacity. The RAID level used has implications for:
- Fault tolerance – Some RAID levels like RAID 1, 5, 6 can handle disk failures while others like RAID 0 have no fault tolerance.
- Performance – RAID 0 offers better performance for sequential reads/writes while RAID 1 and 5 have slower write speeds due to parity calculation.
- Capacity – RAID 0 makes full use of disk capacity while RAID 1 halves storage capacity for redundancy.
- Rebuild times – The RAID level determines how long it takes to rebuild an array after a disk failure.
Understanding the RAID level enables predicting how the array will perform, planning for disk replacements, and troubleshooting issues. Some RAID types like nested or hybrid RAID involve multiple RAID levels, making the configuration even more crucial to understand.
Additionally, both hardware and software RAID configurations exist, each having pros and cons. Determining which type of RAID is implemented affects management, flexibility, and portability.1
By taking the time to learn about the existing RAID setup, administrators can optimize storage performance, plan failure response, and ensure continuity of operations.
Finding RAID configuration in Windows
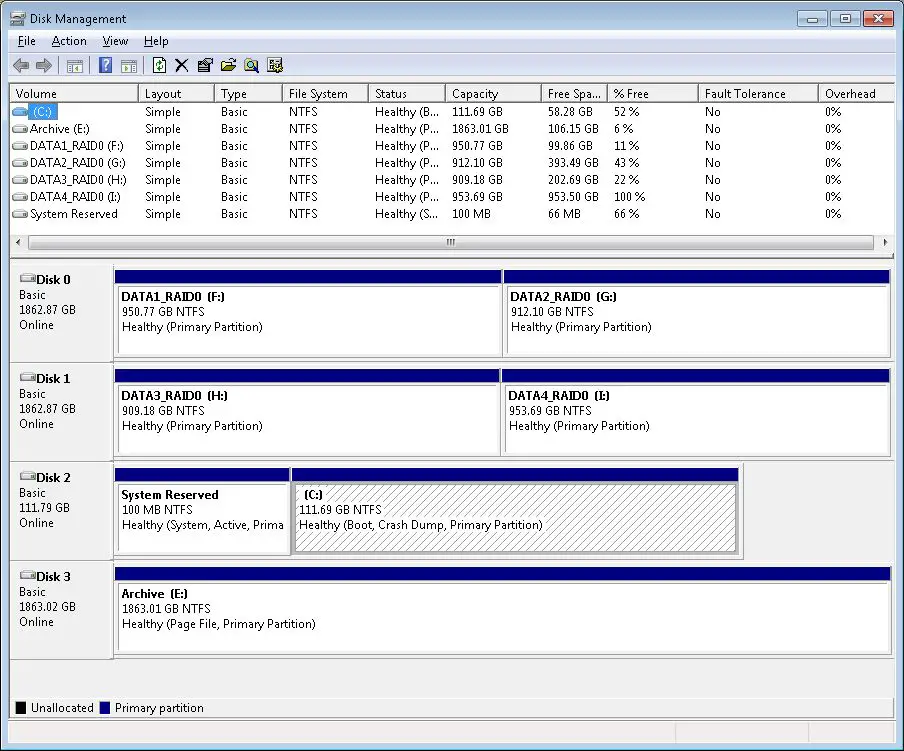
The easiest way to check your RAID configuration in Windows is by using the built-in Disk Management utility. To open Disk Management, right click the Start menu and select “Disk Management”. This will show all disks connected to your system, including any RAID arrays. Look for disks marked as “Dynamic” – these are RAID arrays. You can see details like the RAID level, status, and which physical disks make up the array.
To get more detailed information in Disk Management, right click on the RAID array and select “Properties”. This will show the full name of the RAID array, the RAID level being used, and the status of the array.
There are also several third party tools that can provide additional RAID configuration details in Windows. Some popular options include Starwind Raid Manager and ITL Raid Analyzer. These tools can provide information like current sync status, rebuild progress if recovering from a failed disk, and more.
Overall, the built-in Disk Management utility provides an easy way to get a quick overview of your RAID configuration in Windows. Third party tools offer more in-depth status and analytics.
Finding RAID configuration in Linux
There are a few different ways to find your RAID configuration in Linux operating systems. The most common methods utilize the mdadm and cat commands.
Mdadm is a tool for managing Linux software RAID arrays. You can use the mdadm command to show details about existing RAID arrays on your system. For example:
mdadm –detail /dev/md0
This will show information like the RAID level, number of disks, chunk size, and status for the /dev/md0 array (source).
Looking in the /proc/mdstat file is another way to see RAID info. This contains status information about RAID arrays. You can view it with:
cat /proc/mdstat
This will show arrays, their RAID levels, and component disks (source).
The lsblk command lists block devices including RAID arrays and their underlying disks. It’s a quick way to see which disks are part of an array.
lsblk
Overall, mdadm, cat /proc/mdstat, and lsblk provide comprehensive RAID configuration details in Linux (source).
Finding RAID configuration in macOS
On macOS, you can find your RAID configuration using the System Information and diskutil utilities.
To use System Information, go to Apple Menu > About This Mac > System Report. In the sidebar, select Storage. This will show all your disk sets and RAID arrays. You can expand each disk set to see the physical disks included and other details like the RAID type and status.
You can also use the command-line diskutil tool. To see all disk sets, run:
diskutil list
This will display each logical RAID disk along with the physical disks included in the set.
To see more details on a specific disk set, run:
diskutil info disksetname
Where disksetname is the name of the RAID disk. This provides info like the RAID level, status, and physical disk components (Apple Support).
The Disk Utility app also provides a graphical way to view and manage RAID sets. Open Disk Utility, select the RAID disk, and inspect the information shown.
Finding hardware vs. software RAID configuration
The main difference between hardware and software RAID is that hardware RAID uses a specialized RAID controller card to manage the RAID array, while software RAID relies on the operating system and drivers to manage the array. Hardware RAID configurations can be found in the configuration utility for the RAID controller, which is often accessed during boot up or by pressing a controller-specific hotkey during POST. The utility will show details on the current RAID arrays, disk assignments, RAID levels and other controller-managed settings. Examples of hardware RAID controllers include offerings from LSI, Adaptec, Areca and others.
Software RAID configurations can be viewed within the operating system itself. In Windows, disk management can show software RAID volumes. In Linux, the mdadm utility lists software RAID array details. And in macOS, Disk Utility can be used. Compared to hardware RAID, software RAID lacks a dedicated interface and relies fully on the OS drivers and software capabilities.
It’s important to know whether hardware or software is managing the RAID configuration as it impacts how the array is monitored and managed. Issues with a hardware RAID card would require controller diagnostics and maintenance, while software RAID relies on the OS for management. Checking the RAID configuration utility appropriate for your setup is key to maintaining each type of array. More details can be found on the differences between hardware and software RAID.
Identifying RAID Levels
RAID (Redundant Array of Independent Disks) allows multiple disk drives to be combined together to improve performance and/or reliability. There are several standard RAID levels that provide different combinations of performance and redundancy:
RAID 0 (striping): Stripes data across multiple drives for increased performance. It provides no redundancy.1
RAID 1 (mirroring): Writes identical data to two or more drives to provide redundancy. If one drive fails, data is still available from the mirror.2
RAID 5 (distributed parity): Stripes data and parity information across 3 or more drives. If one drive fails, data can be rebuilt from the parity information.1
RAID 6 (dual parity): Similar to RAID 5 but with parity information stored on two drives, allowing for continued operation if two drives fail.
Nested RAID: Combining multiple RAID levels for added performance and redundancy (e.g. RAID 10 uses mirrored stripes).
Identifying the RAID level provides insights into the performance characteristics and fault tolerance of the storage configuration.
Changing existing RAID configuration
Changing your existing RAID configuration allows you to add or remove disks from your array or switch to a different RAID level. This can help optimize performance, capacity, or redundancy as your needs change over time. Some key things to consider when changing RAID configuration:
Adding or removing disks – To expand capacity, you can add disks to your array. Just make sure to use disks of equal or greater size to existing ones. To reduce disks, you typically have to migrate data off first. Hot swapping disks in a RAID allows adding/removing without downtime.
Changing RAID levels – Switching RAID levels like from RAID 5 to RAID 10 requires migrating data to the new structure. This can be done in some hardware RAID cards, whereas software RAID often requires wiping the array to recreate it.
Maintaining redundancy – When changing RAID level or number of disks, it’s crucial to ensure fault tolerance and avoid losing data. Online RAID migration capabilities and backup prior help avoid downtime.
Know RAID types – Key differences between RAID 0, 1, 5, 6, 10, etc affect how you can change configuration. Factors are minimum disks required, write speed, redundancy, and rebuild time.
Changing existing RAID configuration takes planning but can improve performance and capacity over time as needs change. Check hardware/software capabilities first and ensure proper backups to avoid data loss.
Best practices for RAID configuration
When configuring RAID, it’s important to choose the appropriate RAID level for your needs. Some best practices include:
Selecting a RAID level that provides the right balance of performance, capacity, and fault tolerance. RAID 1 and RAID 10 provide good performance and fault tolerance through mirroring, while RAID 5 provides fault tolerance through parity striping at the cost of some write performance. RAID 0 provides performance but no fault tolerance.[1]
Using hot spares to allow the RAID to automatically rebuild if a drive fails. Having at least one hot spare drive per RAID array is recommended for quick rebuilding.[2]
Monitoring RAID status regularly through software tools. Watching for impending drive failures, rebuild progress, and verifying configurations. Most RAID controllers and operating systems include monitoring software.[3]
Choosing RAID-capable drives that match in terms of performance and capacity. Mixing drive types and capacities can lead to wasted space or performance bottlenecks.
Following vendor recommendations for RAID configuration best practices, as specific controllers or software may have additional guidelines.
Properly backing up data stored on the RAID array, as RAID is not a substitute for backups.
Troubleshooting RAID Issues
Common RAID issues include failed disks, problems recovering data, and rebuilding RAID arrays. If a disk fails in your RAID array, the RAID controller may report the disk as offline or failed. To recover data, replace the failed disk with a new one and allow the array to rebuild using your existing RAID configuration. Some key steps include:
– If a disk has failed, check cables and connections. Reseat cables or try replacing the cable if there are issues.
– Use RAID management software like the Dell OpenManage Server Administrator tool to identify failed disks and the RAID status. This can help avoid data loss.
– Replace the failed disk with an equivalent new disk. The RAID controller will automatically start rebuilding the array using parity data.
– If you have a hardware controller, the rebuild is done automatically. For software RAID, you may need to initiate the rebuild process manually.
– Monitor the rebuild progress. Do not interrupt a rebuild in progress.
– If the rebuild fails or data cannot be recovered, you may need advanced data recovery techniques. Consult a data recovery expert.
For more on troubleshooting RAID issues like failed disks and recovering data, refer to this Dell technical article: How to Troubleshoot a RAID Hard Drive Issue