The iCloud photo library is Apple’s cloud storage service that allows you to store your photos and videos online. It automatically uploads photos and videos from your iOS devices and Mac computers, and syncs them across all your devices. This means you can access your entire photo library on any device connected to your iCloud account.
One key feature of iCloud photo library is it also serves as a backup of your images. So if you lose your phone or computer, you can restore your photo library from iCloud. However, some users run into the issue of trying to access older photos that may not have been synced to iCloud originally. This article will provide solutions on how to get photos from years ago out of your iCloud storage.
Checking iCloud Settings
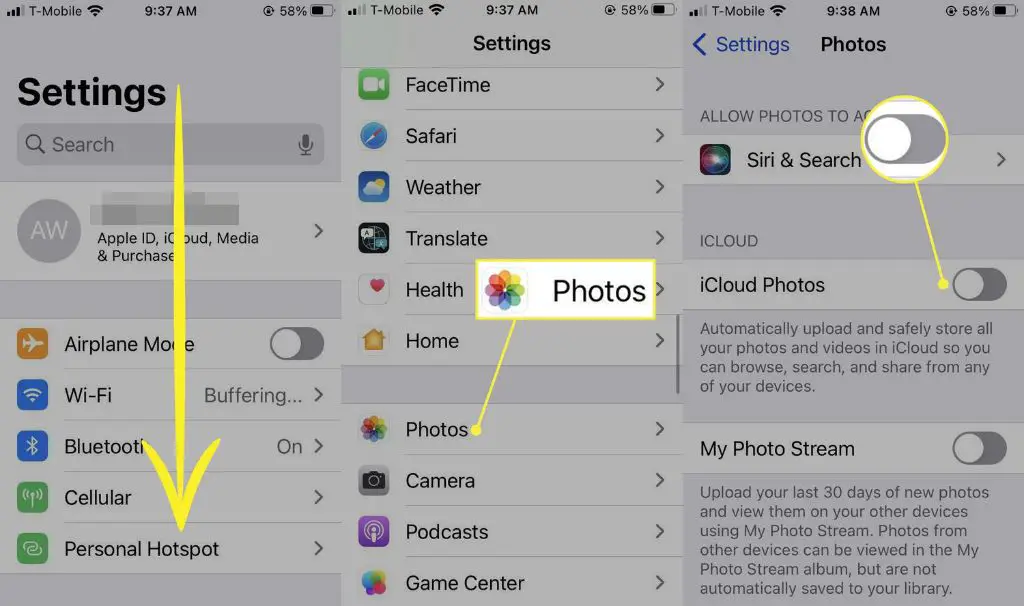
The first step is to check your iCloud settings to see if you have iCloud Photo Library enabled. To find the iCloud settings on an iPhone or iPad, go to Settings > [Your Name] (source: https://support.apple.com/en-us/108782). On a Mac, go to Apple Menu > System Settings and click on your Apple ID name and picture. This will open the iCloud settings.
In the iCloud settings, look for Photos. If the toggle next to “iCloud Photo Library” is green, that means the feature is enabled and your photos should be storing to iCloud automatically. If it’s gray, you’ll need to enable it to start backing up photos (source: https://support.apple.com/guide/icloud/set-up-icloud-photos-mm7e90c1ba48/icloud).
With iCloud Photo Library on, any new photos you take will be automatically uploaded and stored in iCloud. For accessing old photos, continue reading the next sections.
Using iCloud.com
One way to access old photos stored in iCloud is by logging into iCloud.com in any web browser. After signing in with your Apple ID, you can navigate to the Photos section. According to Apple Support, “In Photos on iCloud.com, do one of the following: Click Library in the sidebar to see thumbnails of all your photos and videos.”
Browsing through the photo library on iCloud allows you to view all images stored in your iCloud Photos account. You can search by date or album to find old photos. When you locate a photo you want to download, simply click on it and then click the download icon in the upper right corner. This will save the photo to your computer.
The iCloud website presents an easy way to find and download old iCloud photos without needing to sync devices or use an app.
Using Photos App on Mac
The Photos app comes pre-installed on Mac computers and provides an easy way to access your photos stored in iCloud. To use the Photos app to export your old iCloud photos:
1. Open the Photos app on your Mac. The app will automatically display the All Photos album which contains all your photos synced from iCloud.
2. Browse and find the photos you want to export. You can search by date or use the filters to narrow down your photos.
3. Select the photo(s) you want to export. You can select multiple photos using Shift + Click.
4. Go to File > Export to bring up export options. You can export original image or modified image.
5. Choose file format, quality, and folder location to export the photo(s) to.
The Photos app makes it easy to quickly access your entire iCloud photo library and export the original high-quality photos to your Mac.[1]
[1] https://support.apple.com/guide/photos/export-photos-videos-slideshows-and-memories-pht6e157c5f/mac
Using Image Capture on Mac
The Image Capture utility allows you to import photos directly from your iPhone or iPad to your Mac. Image Capture comes pre-installed on all Mac computers. To use it:
- Connect your iPhone or iPad to your Mac using the USB cable.
- Open the Image Capture app on your Mac. It’s located in the Applications folder.
- In Image Capture, you will see thumbnails of all the photos on your iPhone or iPad. Select the photos you want to import.
- Click the Import button at the bottom right. This will copy the photos to your Mac.
By default, imported photos will go into your Pictures folder. You can change this by clicking the arrow next to Import To at the bottom left.
Image Capture provides an easy way to get photos off your iPhone and onto your Mac. It’s much faster than using iCloud or AirDrop. For more details, refer to Apple’s Image Capture User Guide for Mac (source).
Using iTunes on PC
You can import photos from your iPhone or iPad to your Windows PC using iTunes. To do this, first connect your iPhone or iPad to your computer using the USB cable that came with your device. Open iTunes on your PC and click on the device icon in the top left corner.
In the sidebar, click on “Photos” and check the box for “Sync Photos.” Click “Apply” to import all photos from your device to your PC. The photos will be saved in your Pictures folder in a new folder called “iTunes.” You can also choose to selectively sync photos by clicking “Selected albums, events, and faces” and choosing which specific photos to transfer.
According to Apple’s support guide, this will transfer the photos from your iPhone or iPad to your PC. Make sure you have enough storage space on your computer for the photos. If desired, you can also open the Photos app within iTunes to view and manage the imported pictures.
Using iCloud for Windows
One way to download photos from iCloud to your Windows PC is by using the iCloud for Windows app. This free app allows you to access your iCloud content on a Windows 10 or Windows 11 computer. To use it:
1. Download and install iCloud for Windows from the Microsoft Store [1].
2. Sign in using your Apple ID and password.
3. Click on “Photos” and make sure the feature is enabled. You can choose to optimize storage and only download some photos, or you can download your entire iCloud photo library.
4. Your iCloud photos will now be accessible in File Explorer under iCloud Photos. You can open them or save copies to your PC.
The iCloud for Windows app integrates iCloud with the Windows file system. Once set up, it provides an easy way to transfer photos from iCloud to your PC for backup or editing. Just open File Explorer to access your iCloud photo library.
Using Third-Party Apps
In addition to Apple’s built-in tools, there are various third-party apps that can help transfer photos from an iPhone to a computer:
iMazing (https://imazing.com) is a popular iOS device manager that provides full access to the files on your iPhone, including the ability to export photos and videos. With iMazing you can easily drag and drop photos off your iPhone onto your computer.
iExplorer (https://www.macroplant.com/iexplorer/) is another app that lets you browse and export photos and other media from your iPhone. It works on both Mac and Windows.
AnyTrans (https://www.imobie.com/anytrans/) is an all-in-one iPhone manager that makes it easy to migrate content between iPhones and computers. The photo manager feature allows you to export photos in bulk off your iPhone.
These third-party tools provide more flexibility and control when transferring photos off an iPhone compared to Apple’s built-in options. They allow you to selectively choose which photos to export, preserve metadata like timestamps, and export in bulk. For someone looking to extract a large library of photos from their iPhone to a computer, these apps are very useful.
Photo Storage Limits
Apple provides 5GB of free iCloud storage for photos, videos, documents, backups, and more. This storage is shared across all of your iCloud-connected devices. According to Apple Support, each photo takes up around 3MB of space and each video takes up approximately 60MB at minimum quality settings (1).
So with the free 5GB of storage, you could store around 1,500 photos or 80 one-minute videos at average file sizes before hitting the limit. Exceeding the free storage will prevent you from backing up new photos and videos to iCloud until you delete items or purchase more storage.
To increase your iCloud storage, you can subscribe to a paid iCloud+ plan. These start at $0.99/month for 50GB of additional storage and go up to 2TB for $9.99/month (2). With a 2TB plan, for example, you could store around 666,000 photos or 33,000 videos. The higher storage tiers are best for anyone with large photo and video libraries they want to keep in iCloud.
If you don’t want to pay for more iCloud storage, you’ll need to actively manage your photo library size. Options include offloading original photos to local storage or another cloud service, using iCloud’s Optimize Storage setting, turning off iCloud Photo Library, and regularly deleting unwanted images and videos.
(1) https://www.multcloud.com/tutorials/icloud-photos-space-limit.html
(2) https://support.apple.com/en-us/HT201238
Conclusion
This article covered the various methods available for accessing your older photos stored in iCloud. The easiest way is to log into iCloud.com and view your photos online. You can also use the Photos app on a Mac to browse all images synced to iCloud. On a Mac, Image Capture allows you to view and download iCloud photos. Windows users can utilize iCloud for Windows or iTunes to access photos. Third party apps like iMazing also let you explore your iCloud photo library.
The key is to check your iCloud settings and make sure you have iCloud Photos enabled, which will store all images in iCloud. As long as you have sufficient storage available, your photos should persist in iCloud indefinitely and remain accessible through the methods described here.
