What is an SSD?
An SSD, or solid-state drive, is a type of computer storage device that uses flash memory to store data, applications, and files. SSDs differ from traditional hard disk drives (HDDs) in that they have no moving mechanical components. Instead, data is stored on integrated circuit boards that contain memory chips.
Some key differences between SSDs and HDDs:
- SSDs are much faster than HDDs for reading and writing data due to the lack of moving parts. They can access data almost instantly.
- SSDs are more durable since they don’t rely on fragile moving mechanical parts. This makes them better suited for portable devices.
- SSDs are typically more expensive per gigabyte compared to HDDs. However, prices have been dropping over time.
- SSDs have higher read/write endurance meaning they can withstand many read and write cycles before failure.
Overall, the pros of SSDs are faster speeds, better durability and reliability. The main downside is the higher cost per storage capacity compared to HDDs. However, the extra speed and performance SSDs provide make them ideal for boots drives, applications, and tasks that require fast data access.
When to Initialize an SSD
There are a few common scenarios where you may need to initialize a new SSD:
- When using an SSD for the first time out of the box – An SSD will need to be initialized before it can be used as a boot drive or storage drive.
- When installing an SSD into a PC that previously only had an HDD – Initializing erases any residual data left on the SSD from manufacturing or transit.
- When moving an SSD to a new PC – Initializing erases all previous data so the SSD is ready for the new system.
- When switching boot drive from HDD to SSD – Initializing prepares the SSD properly for an operating system installation.
- When upgrading from a smaller SSD to a larger one – Initializing sets up the full capacity of the new larger SSD for usage.
In most cases, initializing is an important step to prepare an SSD fully before first use. It erases any leftover data, ensuring a clean slate.
Back Up your Data First
It’s extremely important to back up your data before initializing an SSD. The initialization process will delete all data on the drive. So if you don’t have backups, you risk permanent data loss.
Follow these steps to back up your data before initializing an SSD:
- Connect the SSD to your computer if it isn’t already.
- Use Windows File Explorer or a third party tool like Macrium Reflect to create backups of all data on the SSD you want to keep. Back up to an external drive or cloud storage.
- Verify the backups completed successfully and all your data is there by browsing the backup files.
If the SSD is your boot drive with your Windows installation, make sure to back up the entire drive or create a system image. This will allow you to restore Windows if needed after initializing the SSD.
Backups give you peace of mind when initializing an SSD. You can initialize with confidence knowing your data is safely stored elsewhere. See this SuperUser post for more on the importance of backing up before initializing an SSD.
Steps to Initialize an SSD in Windows 11
Here is a step-by-step guide to initialize a new SSD in Windows 11 using the Disk Management tool:
-
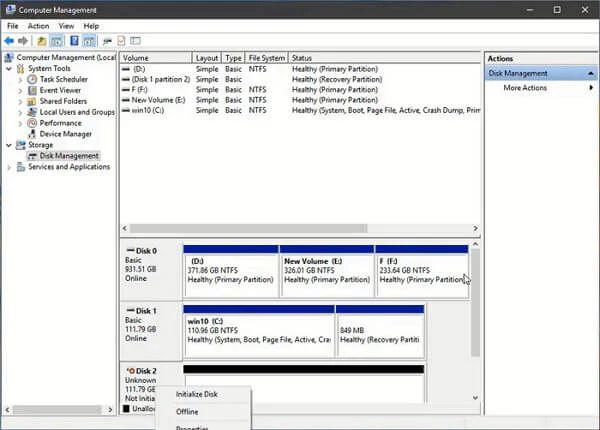
Open the Disk Management tool. The easiest way is to right-click the Start menu and select “Disk Management”.
-
Locate the new SSD disk that says “Unallocated”. This is the disk that needs to be initialized.
-
Right-click on the unallocated SSD disk and select “Initialize Disk”.
-
In the Initialize Disk dialog, select either “MBR (Master Boot Record)” or “GPT (GUID Partition Table)” depending on your preference. GPT is newer and recommended for SSDs over 2TB.
-
Allow the initialization process to complete. The disk status will change from “Unallocated” to “Online”.
-
Right-click on the SSD disk again, select “New Simple Volume” and go through the wizard to create a new partition and format it.
And that’s it, the SSD is now initialized and ready to use in Windows 11. The process is quick and simple using the built-in Windows Disk Management utility.
Secure Erase vs Quick Format
When initializing an SSD in Windows 11, you have two main options: performing a secure erase or doing a quick format. Both methods wipe the drive and allow you to set up a fresh file system, but they work in different ways.
A secure erase completely resets the SSD to its factory state. It overwrites all data on the drive by filling it with zeros or random data patterns. This process can take several hours to complete, but it ensures no trace of your original data remains. The pros of secure erase are that it’s more secure and may marginally improve performance. The downside is it takes much longer than a quick format.
A quick format simply clears the file system and marked the disk space as empty and available for new data. It does not actually overwrite existing files on the SSD. The advantage of a quick format is it only takes seconds to complete. However, data could potentially still be recovered using specialized tools. For most consumer uses, a quick format is adequate for preparing an SSD for a fresh OS install.
In summary, secure erase is preferred if security is critical and you’re willing to wait. Quick format works faster but does not fully sanitize the drive. Choose the method based on your specific needs.
Choosing the Right File System
When initializing an SSD, you need to choose the right file system. The main options are NTFS, exFAT, and FAT32. NTFS is the default file system for Windows and offers several benefits like compression and encryption. However, it has some downsides like limited file size support and slow format times [1].
exFAT lacks some of the advanced features of NTFS but works across both Windows and Mac. It also has no file size limit and is optimized for flash memory like SSDs [2]. FAT32 is an older file system without NTFS features but has the widest device compatibility.
For most SSD use cases on Windows, NTFS is recommended as it fully supports all OS features. But if you need cross-platform compatibility with Mac or Linux, exFAT is a good option too. Avoid FAT32 unless you specifically need it for older devices [3].
Verifying Successful Initialization
After initializing your SSD, it’s important to verify that the process completed successfully. Here are a few ways to confirm your SSD is initialized correctly in Windows 11:
Open Disk Management again and check that your SSD is listed as “Online” and shows the full capacity. Initialize Disk should no longer be an option when right-clicking on the SSD (Crucial).
Open Windows Explorer and confirm the SSD drive letter appears and you can access the full capacity. Create a test folder/file on the SSD to verify read/write functionality.
Open Command Prompt as Administrator and run “diskpart”. Use the “list disk” command to check if your SSD is listed with the correct size and marked as GPT or MBR depending on how you initialized it (MiniTool).
Run the Disk Management troubleshooter to automatically detect and fix any errors. Search for “Disk Management” in Windows and launch the troubleshooter.
Overall the SSD should display properly across Windows, indicate full capacity, and allow read/write operations to confirm successful initialization.
Post Initialization Tips
After initializing an SSD in Windows 11, there are some additional steps you can take to optimize performance and ensure long-term reliability:
Enable TRIM – Enabling TRIM allows the SSD to more efficiently handle garbage collection and keeps write speeds optimized. You can enable TRIM by using the Optimize Drives utility in Windows 11 according to this guide.
Update Firmware – Check for and install any SSD firmware updates from the manufacturer. Firmware updates often improve performance and fix bugs according to this guide.
Disable Superfetch and Prefetch – Windows services like Superfetch and Prefetch that optimize spinning hard drive performance often have no benefit for SSDs. Disabling them can minimize unnecessary writes and fragmentation as explained here.
Change Virtual Memory – Adjusting the paging file size and moving it from the SSD to another drive can reduce unnecessary writes as covered in this guide.
Disable Indexing – Indexing speeds up searches on spinning drives but provides minimal benefit for SSDs while generating excessive writes. Instructions to disable indexing on the SSD are provided here.
Troubleshooting Issues
There are a few common problems that can occur when initializing an SSD in Windows 11:
- SSD not detected – Make sure the SSD is properly connected and shows up in Disk Management. You may need to try a different SATA port or USB cable. See this guide for more troubleshooting steps.
- Input/Output error – This could indicate a faulty SSD. Try initializing with the Quick Format option first. If that fails, your SSD may be defective and need replacing. See this Microsoft forum thread for more info.
- Access denied – You may need to take ownership of the SSD before initializing if you get an access denied error. Right-click the SSD, go to Properties > Security tab > Advanced > Owner.
- MBR rebuild failed – Sometimes the Master Boot Record can become corrupted on an SSD. You may need to attempt rebuilding the MBR before initializing. See this guide from DiskPart.
Be prepared to replace the SSD if initialization continues to fail after troubleshooting. Also make sure to back up your data first before initializing an SSD.
Initializing an SSD on Other Operating Systems
The process for initializing an SSD is similar on other operating systems like Mac OS and Linux, with a few minor differences:
On Mac OS:
- Open Disk Utility
- Select the SSD drive
- Click “Erase” and choose a format like APFS or Mac OS Extended (Journaled)
- Give the SSD a name and click “Erase”
On Linux:
- Use a tool like GParted to delete any existing partitions
- Create a new partition table (like GPT)
- Create partitions and filesystems like ext4 as needed
- Optionally encrypt or add LVM as desired
The steps are straightforward but make sure to back up existing data first. Choosing the proper file system for your OS and use case is also important.
Overall the process is quite similar – it mainly involves erasing any existing partitions, creating fresh ones, and selecting compatible file systems.
