Disk Cleanup is a built-in utility in Windows that helps free up hard drive space by removing unnecessary and temporary files. It can help improve system performance by clearing out clutter and recovering valuable storage space. There are a few different ways to access Disk Cleanup manually, depending on which version of Windows you are running.
Opening Disk Cleanup in Windows 10
Here are the steps to open Disk Cleanup in Windows 10:
- Open the Start menu and search for “Disk Cleanup”. Select the Disk Cleanup desktop app from the search results.
- In the Disk Cleanup window, select the drive you want to clean up. This is usually your C: drive.
- Click “OK”. Disk Cleanup will scan your drive and show you how much space you can recover.
- Check the boxes next to the file types you want to delete. Make sure not to delete any files you may still need.
- Click “OK” and then “Delete Files” to permanently remove the selected files.
An alternative method is:
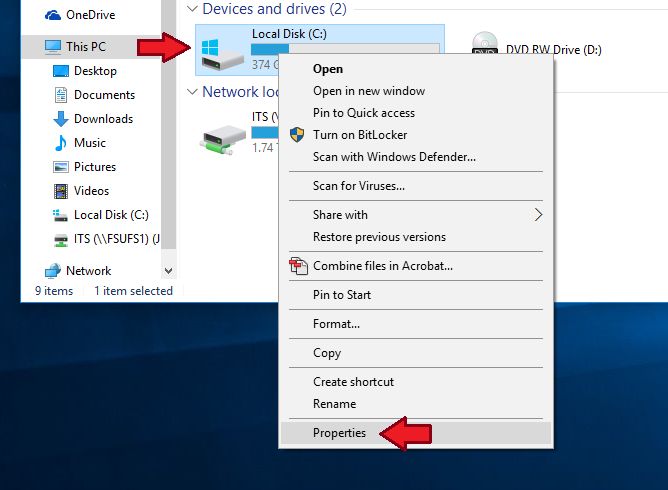
- Right-click the drive you want to clean up in File Explorer.
- Select “Properties” from the right-click menu.
- In the Properties window, select the “Disk Cleanup” button.
- Follow steps 3-5 above.
This will open the Disk Cleanup utility directly on the selected drive.
Opening Disk Cleanup in Windows 8/8.1
The steps for accessing Disk Cleanup in Windows 8/8.1 are:
- Open File Explorer and right-click on the drive you want to clean up.
- Select “Properties” and then click on the “Disk Cleanup” button.
- In the Disk Cleanup window, click the “Clean up system files” button if you also want to remove Windows system files.
- Check the file types you want to delete and click “OK”.
- Click “Delete Files” to confirm the deletion.
Alternatively, you can search for “Disk Cleanup” in the Start screen or just start typing “Disk Cleanup” on the desktop.
Opening Disk Cleanup in Windows 7
For Windows 7, here is how to access Disk Cleanup:
- Click the Start button and select Computer or My Computer.
- Right-click the drive you want to clean up and choose Properties.
- In the Properties window, click the Disk Cleanup button.
- Select the file types to delete and click OK.
- Click Delete Files to confirm.
You can also find Disk Cleanup using the Start menu search bar in Windows 7.
Types of Files Disk Cleanup Can Delete
Here are some of the main file types and system files that Disk Cleanup targets for deletion:
- Temporary internet files
- Recycle Bin contents
- Windows temporary files
- Windows update log files
- System error memory dumps
- Previous Windows installation files
- Temporary Windows files
- System generated log files
- Thumbnail cache
Deleting these unnecessary system and temporary files can recover significant disk space as well as remove clutter from your system. Make sure not to remove any files you may still need or are actively using.
Benefits of Using Disk Cleanup
Here are some of the key benefits of running Disk Cleanup periodically:
- Frees up hard drive space – Recovers gigabytes of space in some cases.
- Removes clutter – Deletes unneeded files that accumulate over time.
- Improves performance – With more free space, reads/writes are faster.
- Increases available storage – Make room for more files and applications.
- Enhances security – Deletes potentially sensitive temporary files.
- Faster boot times – Less data to load at startup can quicken boot.
Overall, Disk Cleanup helps keep your system running quicker and more efficiently by removing useless file buildup.
Tips for Using Disk Cleanup
Follow these tips when running Disk Cleanup:
- Scan all fixed drives – Run it on all disks (C:, D:, etc) that accumulate junk.
- Regular schedule – Monthly or quarterly cleans help stop file buildup.
- Check file selections – Don’t blindly delete all file types without checking.
- Preview files – Use the preview function to view contents before deletion.
- External drives too – Clean USB sticks and external drives that amass temp files.
Developing a regular maintenance schedule with Disk Cleanup is vital to maximizing disk space, performance, and system health over time.
Common Disk Cleanup Errors
Here are some common errors you may encounter with Disk Cleanup and how to resolve them:
| Error Message | Solution |
|---|---|
| There is insufficient disk space to complete operation | Free up additional disk space and run Disk Cleanup again |
| An unspecified error occurred | Restart computer and relaunch Disk Cleanup |
| The drive cannot be cleaned | Make sure drive is not full, damaged, or infected |
| Access denied error | Run Disk Cleanup as administrator |
| Disk Cleanup does not launch | Restart computer and check for corrupt files |
Disk Cleanup is generally very stable, but these fixes should resolve most issues that arise during cleaning.
Alternative Tools to Disk Cleanup
Here are some alternative cleanup tools if you want options beyond the built-in Disk Cleanup utility in Windows:
- CCleaner – Feature-rich tool for deleting junk files and optimizing PC
- Wise Disk Cleaner – Quickly cleans entire system with advanced options
- BleachBit – Open source disk cleaner that shreds files for security
- WinDirStat – Visualizes disk usage to help delete large data hogs
- Puran Utilities – All-in-one suite featuring drive cleaner tools
- SD Maid – Optimized Android cleaner designed for mobile devices
While Disk Cleanup does a good job for basic cleaning needs, advanced users may benefit from a more robust third-party cleanup utility with extra speed, features and configuration options.
Conclusion
Disk Cleanup is an essential utility on Windows for reclaiming wasted hard drive space by deleting temporary and unnecessary files built up over time. It helps boost storage capacity while improving system performance and stability. Remembering the methods for manually launching Disk Cleanup detailed above allows you to run cleaning on demand when disk space runs low or the system feels sluggish. Combining the standard Windows cleanup tool with the tips and fixes outlined here provides a great strategy for optimizing your PC’s disk usage and keeping your drives running fast and smoothly.
