Reinstalling your Mac operating system after replacing the hard drive can seem daunting, but it’s actually a straightforward process if you follow the right steps. When you replace the hard drive, your Mac essentially has a “clean slate” with none of your files, settings or apps installed. Reinstalling the Mac operating system (and restoring a backup) will get your Mac functioning like normal again.
In this 5000 word guide, we’ll walk through everything you need to know to reinstall macOS and get your Mac up and running after a hard drive replacement. We’ll cover:
- How to physically install the new hard drive
- Options for reinstalling macOS
- Steps to reinstall macOS using Recovery Mode
- Steps to reinstall macOS using a bootable installer drive
- How to restore data and settings from a backup
- How to reinstall apps and other software
Follow the steps in this guide and you’ll have your Mac working again after replacing the hard drive. Let’s get started!
Preparing the New Hard Drive
Before reinstalling macOS, you’ll need to physically install the new hard drive in your Mac. The steps for this will vary depending on your Mac model:
Installing a Hard Drive in an iMac
To install a new hard drive in an iMac, you’ll need to open up the chassis to access the internal components. iFixit has excellent step-by-step guides for installing a hard drive in all iMac models:
https://www.ifixit.com/Device/iMac
The process involves using a suction cup to detach the screen, removing screws to access the internal components, replacing the hard drive cables, and securing the new drive in place. Be very careful working inside your iMac – go slowly and follow Apple’s safety guidelines.
Installing a Hard Drive in a MacBook Pro/Air
For MacBooks, you can replace the hard drive by removing the bottom case. Again, iFixit has detailed guides:
https://www.ifixit.com/Device/Mac_Laptop
The process will vary slightly depending on which MacBook model you have, but generally involves removing screws from the bottom case, detaching connectors and cables, and then swapping in the new drive. Be extremely careful during disassembly and follow a reputable guide.
Installing a Hard Drive in a Mac Pro/Mac Mini
The Mac Pro and Mac Mini allow easy access to the internal hard drive bay for replacing the drive. With both models, you can simply slide out the hard drive casing after removing an access panel. iFixit has disassembly instructions available for these models too:
https://www.ifixit.com/Device/Mac_Pro
https://www.ifixit.com/Device/Mac_mini
When installing any new hard drive, be very careful not to damage any cables or connectors inside your Mac. Always discharge any static electricity first by touching a metal grounded surface. With the new drive installed, you can move on to reinstalling macOS.
Options for Reinstalling macOS
Once you’ve replaced the hard drive, you’ll need to reinstall the Mac operating system to get your computer functioning again. You have two options for reinstalling macOS:
1. Reinstall macOS Using Recovery Mode
All modern Macs come with a built-in Recovery Mode that you can boot into to reinstall the OS. Recovery Mode downloads the macOS installer files directly from Apple.
2. Reinstall macOS Using a Bootable Installer Drive
You can also reinstall macOS by creating a bootable USB installer drive. This allows you to perform a clean install of the OS.
The Recovery Mode method is simpler, but using a bootable installer drive gives you more flexibility. You can choose this method if you want to install an older macOS version, or if your Mac isn’t starting up correctly.
Next, we’ll go through the steps for both methods of reinstalling macOS after replacing your hard drive.
How to Reinstall macOS Using Recovery Mode
Here are the steps to reinstall the Mac operating system using Recovery Mode:
Step 1: Start Up in Recovery Mode
To boot into Recovery Mode:
- Start or restart your Mac, and immediately hold down Command + R on your keyboard. Keep holding until you see the Apple logo or spinning globe appear.
- Your Mac will shortly boot into the Recovery environment.
Step 2: Select Reinstall macOS
In the Recovery Mode menu:
- Select “Reinstall macOS” and click Continue.
- Follow the onscreen prompts to start the reinstallation process.
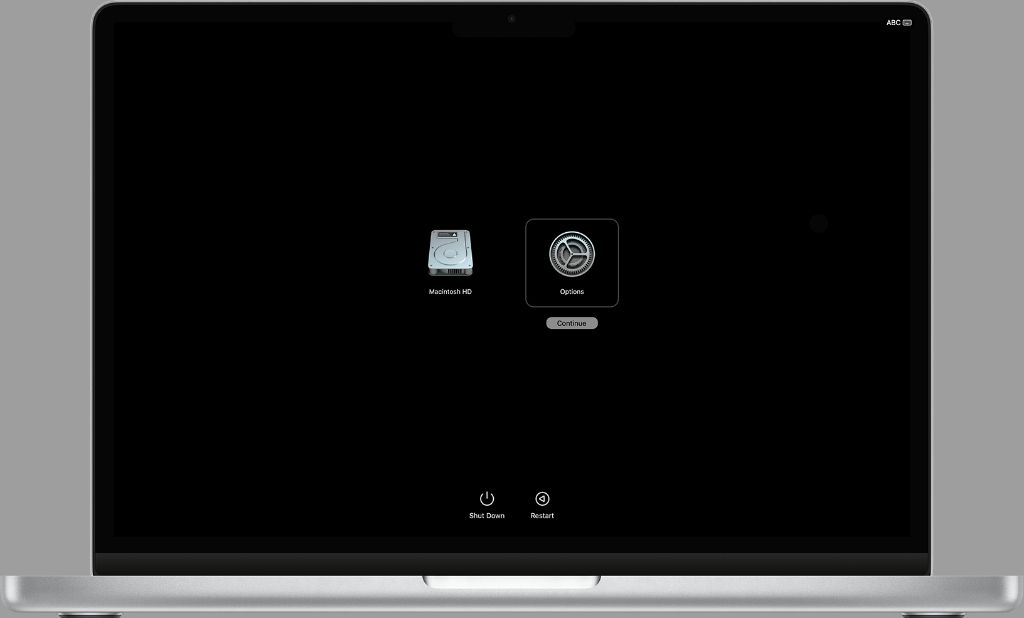
Step 3: Select Your Drive and Install
The macOS installer will display a list of available drives.
- Select the drive you replaced – it will likely be named “Macintosh HD” by default.
- Click Install to begin the installation process.
This will completely reformat the new drive and install a clean version of the Mac operating system.
Step 4: Allow Installation to Complete
The reinstallation process will take some time to fully complete. Let the process run until your Mac reboots itself into setup assistant. You may see messages that your Mac is being optimized – this is normal.
When your Mac restarts, you’ll be walked through the initial setup steps like:
- Selecting your country/language
- Agreeing to terms and conditions
- Creating a user account
After finishing setup assistant, your freshly reinstalled macOS will boot up and you’ll see the desktop.
You now have a clean working Mac OS system after replacing your hard drive. Next, we’ll look at how to reinstall macOS from a bootable installer drive.
How to Reinstall macOS from a Bootable Installer Drive
Creating a macOS bootable installer drive allows you to perform a clean install of the operating system. Here are the steps:
Step 1: Download macOS Installer from App Store
You’ll need to download the version of macOS you want to install from the App Store on a different Mac.
- Open the App Store app and find the macOS installer for the version you want.
- Click Download. This will download the installer application to your Applications folder.
Step 2: Create Bootable Installer Drive
Next, you’ll create the bootable USB drive:
- Plug in an 8GB or larger USB drive into your Mac.
- Launch Disk Utility (in Applications > Utilities folder)
- Select your USB drive in the left pane and click Erase in the toolbar.
- Name it “macOS Installer” and make sure format is Mac OS Extended (Journaled).
- Click Erase to format the drive.
Next, run the createinstallmedia command in Terminal app to make your drive bootable:
- Launch Terminal (in /Applications/Utilities)
- Enter this command (replace “Install macOS Big Sur” with the name of your installer):
sudo /Applications/Install\ macOS\ Big\ Sur.app/Contents/Resources/createinstallmedia --volume /Volumes/macOS\ Installer - Enter your admin password when prompted.
- Let the command run – this will take a while as it copies installation files.
You now have a bootable macOS installer drive.
Step 3: Boot from the Installer Drive
To boot your Mac from the installer drive:
- Plug the installer drive into your Mac
- Power on your Mac and immediately hold the Option key
- Select the installer drive when you see the boot manager screen
- Click the arrow below the drive name and your Mac will boot to the installer
Step 4: Install macOS on Your New Drive
In the macOS installer:
- Select your new drive when prompted to choose a destination.
- Click Install to begin the clean install process.
- Follow the prompts to complete the installation.
Your Mac will reboot a few times and walk you through setup assistant to create your account and configure settings.
When the desktop appears, you’ll have a freshly installed macOS system on your new hard drive.
How to Restore Data and Settings After Reinstalling macOS
Once you have a working macOS installation on your new hard drive, you can restore your data and settings from a backup.
Restore from Time Machine Backup
If you have a Time Machine backup:
- Open Time Machine from System Preferences
- Select your backup drive and click Restore
- Choose which files/folders to restore
Time Machine will restore your data, settings, and apps that were backed up. Keep in mind Time Machine does not save absolutely everything – so you may need to reinstall some apps and tools.
Restore from Cloud Backup
If you use cloud backup services like iCloud or Dropbox, you can download your synced files/folders to your Mac. Make sure to download the latest versions of all your files from the cloud to your new drive.
Manually Copy Important Files from External Drive
If you don’t have backups, connect an external drive that contains any important files you need. Manually copy documents, photos, music, and other files you need to save to your new Mac hard drive.
Use Migration Assistant to Transfer from Old Drive
If your old hard drive is still intact, you can connect it to your Mac via an external dock or enclosure. Then you can use Migration Assistant to selectively transfer files, settings, and user accounts from the old drive to the new drive.
Migration Assistant is the best way to quickly get back up and running with all your apps, settings, and configurations.
Between your backups and migration tools, you should be able to get all your critical data moved over to the new hard drive.
How to Reinstall Apps and Other Software
The final step is to reinstall all the applications, utilities and tools you need.
App Store Apps
Open the App Store app and go to the Purchases tab. Here you can download and install any apps you previously purchased from the App Store. Your download history and licenses are stored in your Apple ID account.
Sign into the App Store with your Apple ID to download your purchased apps.
Non-App Store Apps
For apps you installed manually:
- Go to the developer’s website and re-download the app
- Copy back any license keys, activation codes, etc.
- Reinstall and activate the app
You may need to contact the vendor if you can’t find your registration information.
Other Software and Utilities
Check your old drive and backups for any other software tools, utilities, plugins, or components you need:
- Browser extensions
- Graphics/design assets
- Documents/media libraries
- Development tools
You may have downloadable software, fonts, plugins, or other assets that you’ll want to reinstall. Track down the original download links and re-download as needed.
Conclusion
Reinstalling your Mac’s operating system and apps after replacing your hard drive takes time but is straightforward if you follow the right steps. Allow yourself several hours to complete the OS installation, data migration, and software installation. Go slowly and carefully during the process.
The exact steps will vary based on your specific Mac model, macOS version, backup solution, and other software. But in general, you’ll:
- Physically install the new hard drive
- Boot into Recovery Mode or a bootable installer drive
- Erase and install macOS on the new drive
- Use Migration Assistant and/or your backups to transfer data
- Re-download and install your applications
Following this guide, you should be able to get your Mac newly operational again after replacing the hard drive. Be sure to make a full Time Machine or clone backup once your Mac is setup to your liking, in case you need to recover from drive failure again.
