What is SMART and what does it do?
SMART (Self-Monitoring, Analysis and Reporting Technology) is a monitoring system built into computer hard disk drives and solid-state drives. The SMART system collects and analyzes data on things like internal temperature, bad sectors, spin-up time, and many other parameters related to the drive’s health and reliability. This allows it to detect and report on various issues that could indicate a pending drive failure (Backblaze, 2016).
The primary purpose of SMART is to act as an early warning system for deteriorating drive conditions. By monitoring attributes like reallocated sectors, spin retries, and offline reallocation, SMART provides advanced notice of problems before a catastrophic failure occurs. This helps users back up data and replace potentially failing drives prior to an outage.
Why would you want to turn off SMART?
One reason some users choose to disable SMART is to stop error reporting that may be unnecessary or cause performance issues. SMART monitors your hard drive and looks for signs of potential problems. If it detects anything out of the ordinary, it will report a SMART error or warning.
Sometimes these errors can be false positives – the drive is actually fine but SMART incorrectly flags an issue. Constant error popups can be annoying and worrying for users. By turning off SMART, you stop receiving these warnings. This prevents performance slowdowns caused by excessive drive scans looking for problems that likely don’t exist.
However, be aware that disabling SMART also means you lose early detection of real drive problems. Relying on SMART is recommended to identify failing drives before complete failure. Consider whether occasional false positives are worth losing this predictive capability [1]. Weigh the pros and cons before turning off your drive’s health monitoring system.
What are the potential downsides of turning off SMART?
The main downside of disabling SMART is that you lose the advance warning of potential drive failures. SMART continuously monitors your hard drive and looks for signs of issues like bad sectors, spin up time, and read/write errors. If problems are detected, SMART will generate a warning or error message, allowing you to take action before complete failure occurs. Without SMART enabled, failures can happen suddenly with no advance notice.
As this Quora post explains, disabling SMART means you’ll never know if something is going wrong with your drive. The inevitable degradation and failure will happen without any alerts.
According to discussions on SuperUser, SMART warnings are very good indications of imminent drive problems. The full failure may still be weeks or months away, but at least you have a chance to take preventative steps.
Overall, disabling SMART increases the chances of sudden drive failures and data loss. It removes the early warning system that could give you time to backup data and replace the drive.
How to check if SMART is enabled
There are a couple ways to check if SMART is enabled on your hard drive:
Use the Disk Utility app on Mac or Windows. Open Disk Utility, select your hard drive, and click “First Aid.” This will run a SMART check and show if SMART is enabled and working properly (source).
Download SMART monitoring software like CrystalDiskInfo (source). These tools can check SMART status and give you detailed info about your hard drive’s health.
Overall, SMART is enabled by default on most modern hard drives. Checking with disk utility or SMART software is the best way to verify the status.
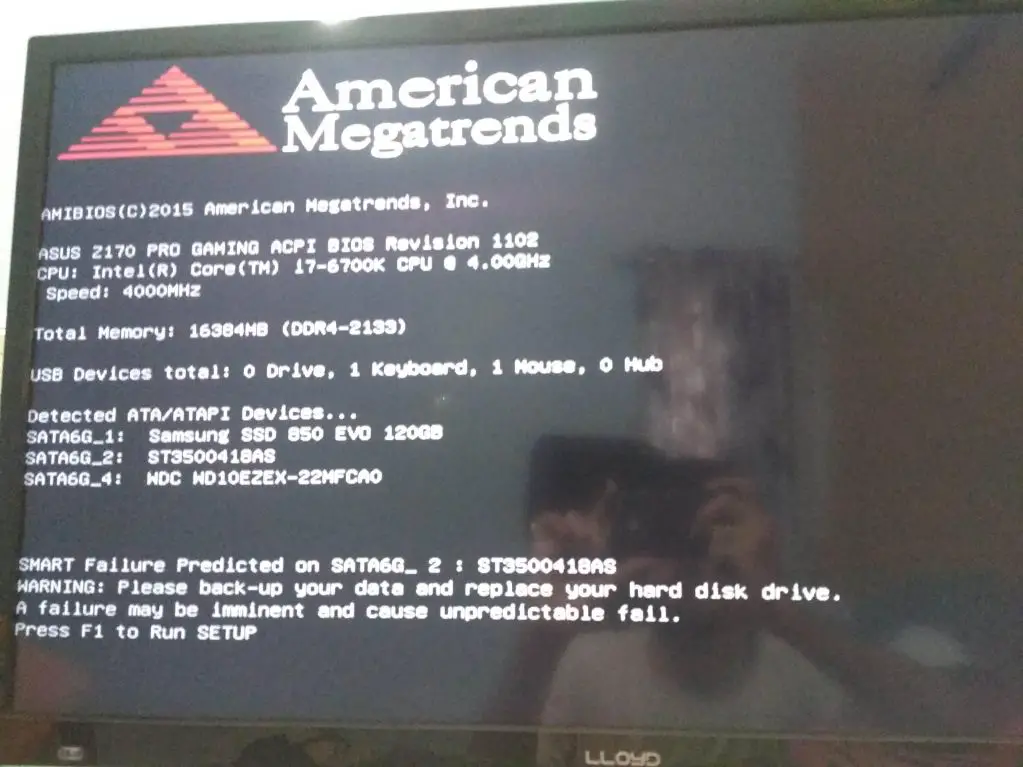
Disable SMART in BIOS (for internal drives)
One way to disable SMART is through your computer’s BIOS settings. On boot, enter the BIOS setup screen by pressing a key like F2, F10, or Delete. The exact key depends on your manufacturer – consult your motherboard manual for details.
Once in the BIOS, navigate to the settings related to hard drives and S.M.A.R.T. On many systems, this will be under an “Advanced” tab. Look for options like “S.M.A.R.T”, “SMART Self Test”, or “SMART Monitoring” and disable these settings. Some manufacturers like ASUS may label this setting “S.M.A.R.T Status Bad”.
Select “Disabled” or “Off” for any SMART options. Then save changes and exit BIOS. Now SMART monitoring and testing will be disabled for internal hard drives.
Do note that access to BIOS depends on your system manufacturer. Consult your motherboard manual or system manufacturer if you have trouble entering BIOS.
Disable SMART in OS X
One way to disable SMART on a drive in macOS is by using the diskutil command in Terminal. Here are the steps:
- Open Terminal (found in /Applications/Utilities/).
- Enter the following command to identify the disk identifier of the target drive:
diskutil list - With the disk identifier, enter this command to disable SMART:
diskutil disableSMART /dev/diskX(replace X with the disk identifier)
This will disable the SMART status checking on that drive. To re-enable SMART, use the command diskutil enableSMART /dev/diskX
One caveat is that this doesn’t persist across disk removals. If the drive is disconnected or reset, SMART will be re-enabled when reconnected. For a more permanent solution, you may want to disable SMART in the drive’s firmware settings if available.
Source: https://discussions.apple.com/thread/1463910
Disable SMART in Windows
There are a couple ways to disable SMART checks and reporting in Windows. One method is to use the fsutil command in an elevated Command Prompt window. The command is:
fsutil behavior set disabledeletenotify 1
This will disable SMART and stop Windows from monitoring the drive and warning about potential failures (source: https://www.sevenforums.com/hardware-devices/389261-any-way-disable-smart-reporting-during-install.html).
Another way is to modify the Windows registry. You can navigate to HKEY_LOCAL_MACHINE\SOFTWARE\Policies\Microsoft\Windows\WindowsErrorReporting and add a new DWORD value called DisableSmartReporting with a value of 1 to disable it. Restart for changes to take effect.
Disabling SMART in Windows stops the prompts about disk health and predicted drive failures. However, it also means you lose the proactive monitoring and alerts, so be cautious when disabling.
Disable SMART on external drives
For external hard drives, you may need to use OS tools or manufacturer software to disable SMART. This is because external drives often have their own proprietary disk controllers that interface with the OS, unlike internal SATA drives that connect directly to the motherboard. Here are some options:
On Windows, open Disk Management and right-click on the external drive. Select “Properties” then the “Policies” tab and check “Turn off SMART”. Click OK to save.
On Mac OS X, download and install the Macs Fan Control app. Under the “S.M.A.R.T.” tab, select your external drive and uncheck the “Enable SMART” box.
Check if the external drive manufacturer provides software for disabling SMART. For example, WD drives come with WD Drive Utilities that can toggle SMART on or off.
If no native OS or software options exist, some USB/SATA bridge chips allow SMART to be disabled by holding down a button combination during boot up. Refer to the user manual.
As a last resort, open the external drive enclosure and locate the SATA-to-USB bridge board. Look for jumpers or DIP switches that possibly alter the SMART behavior. Consult documentation.
Alternatives to fully disabling SMART
Instead of fully disabling SMART, you can adjust the sensitivity so that only serious errors are reported. This allows you to still get warnings for imminent drive failures, while ignoring minor issues.
On Windows, you can use a tool like CrystalDiskInfo to change the threshold for reporting SMART errors. Generally, you want to set the threshold to a level where only issues at 10% or lower will trigger a warning.
For Macs, you can use a tool like DriveDX to customize SMART settings. This allows you to disable reporting for certain attributes or set custom thresholds.
Adjusting SMART sensitivity prevents constantly getting errors for minor issues. Your drive will alert you if serious problems arise, but ignore inconsequential fluctuations.
Re-enabling SMART
If you decide you want to re-enable SMART monitoring and error reporting after previously disabling it, the process is straightforward. You essentially just need to reverse whatever steps you initially took to turn off SMART.
For SATA drives connected directly to your motherboard, go back into your BIOS settings and re-enable the SMART options. The specifics will vary based on your motherboard manufacturer and model, but look for settings like “SMART Reporting” or “SMART Self Test” and be sure they are enabled or set to run.
If you disabled SMART through your operating system, you will need to re-enable it there as well. In Windows, go back to the same Disk Management utility and re-check the “Enable SMART” box. On Mac OSX, open Disk Utility and check that SMART Status is shown as “Verified.”
For external drives, reconnect the USB cable while the drive is powered off, then turn the drive back on. This should reinitialize communication between the drive and computer, including SMART reporting. Alternatively, you may need to reinstall drivers or management software that comes with your external drive enclosure.
Once you have reversed the original steps taken to disable SMART, you can confirm it is re-enabled by running a SMART status check using your OS tools or third party utilities like CrystalDiskInfo. The drive should once again report SMART attributes and errors as expected.
