Excel allows users to edit spreadsheets and make changes as needed. However, sometimes mistakes happen or you change your mind after altering a spreadsheet. The purpose of this article is to teach readers how to undo changes made to a previously saved Excel file.
Being able to reverse edits in Excel provides flexibility and peace of mind. You can experiment, knowing any unwanted changes can quickly be undone. Whether you want to go back one step or undo multiple changes, Excel offers capabilities to restore your spreadsheet.
This guide will cover locating previous versions of your file, opening older saves, comparing versions side-by-side, restoring earlier edits, and recovering unsaved changes. With these techniques, you can rollback unwanted alterations and recover valuable data thought to be lost.
When You Might Need This
There are several common situations when you may need to revert an Excel file to a previous version or state:
Accidental changes – If you make changes to a spreadsheet that you later realize were mistakes, like deleting important data or formatting cells incorrectly, you may want to undo those changes.
Workflow interruptions – If you get interrupted while working in Excel and accidentally make changes, closing and reopening the file will undo those changes.
File corruption – Sometimes Excel files can become corrupted due to system crashes, power outages, or errors. Reverting to an earlier auto-saved version can help recover lost data.
Multiple authors – When collaborating on a shared Excel file, one person’s changes may unintentionally overwrite another’s work. Undoing changes helps get back to a good version.
Macro problems – Errors in macros can sometimes make unintended changes to Excel files that are hard to manually fix. Reverting the file can undo these problematic changes.
Undesirable edits – If someone else edits your Excel file and makes changes you don’t want, you may need to undo their changes to get your original work back.
Software bugs – Occasionally bugs in Excel can lead to data loss or formatting issues. If software bugs have corrupted your file, reverting to an earlier version can help.
As you can see, there are many scenarios in which undoing previous changes in Excel can be extremely useful for recovering lost work or fixing problems.
Locate Your File’s Versions
To access previous versions of a file in Excel, you first need to locate the Versions feature.
Go to the File tab and select Info. In the right pane, you should see aVersions section. This allows you to view and restore previous versions of the current file you have open (Microsoft, 2022).
If you don’t see the Versions section, it’s likely that the feature is disabled. Go to File > Options > Save and check the box next to “Keep the last AutoSaved versions of files for the next __ days”. This will enable versioning in Excel.
Once enabled, Excel will save a version of the open file at certain intervals. You can then access these versions whenever needed from the Info pane.
Open an Older Version
To open a previous version of an Excel file that has been saved over, click the “File” tab and select “Info.” Next, click “Manage Versions” and then click “Recover Unsaved Workbooks” if the file was recently overwritten, or click “Version History” to view and restore older file versions.
In the Version History pane, you will see a list of all the saved versions of the file. Click the version you want to restore, then click “Restore” to open it. The older version will open in a new workbook window so you can view, edit, and compare it side-by-side with the latest saved version if needed.
Restoring an older version will not overwrite your current file right away – it simply allows you to view and copy data from a previous version if you need to revert or retrieve something. You’ll need to “Save As” to actually overwrite the current file if desired after evaluating the older version.
Compare Versions Side-by-Side
To compare two versions of an Excel file side-by-side, you can use Split View to view both versions simultaneously.
First, open both versions of the Excel file you want to compare. Click the View tab and select View Side by Side in the Window group. This will open both workbooks side-by-side.
You can then scroll through each worksheet and visually compare the differences between the two versions. Any differences will be obvious as you look at both files at the same time. The vertical scroll bar will stay in sync so scrolling in one file scrolls the other file as well.
To help compare, you can also use features like the zoom slider to increase the font size and cell width to spot discrepancies more easily. Additionally, you can freeze certain rows or columns so they remain visible when scrolling through large sheets.
If you need to see more than two workbooks, you can open multiple files and click View Side by Side to view them all simultaneously. This gives you a quick visual comparison between multiple versions.
Overall, Split View provides an easy way to quickly spot differences, edits, changes and discrepancies between two versions of an Excel file by viewing them side-by-side. This allows you to visually compare versions without needing to switch back and forth.
Source: https://www.ablebits.com/office-addins-blog/compare-two-excel-files-sheets/
Restore a Previous Version
If you want to completely revert an Excel file back to a previous version, you can restore an older version. Here are the steps:
1. Open the Excel file and click on File > Info.
2. On the Info screen, click the Manage Versions button and select Revert to Previous Version.
3. In the Revert to Previous Version dialog box, select the version of the file you want to restore from the list. You can see details about each version, like when it was saved.
4. Click Restore to revert back to the version you selected. This will overwrite your current version of the file with the previous one.
5. A confirmation dialog will appear. Click Continue to finalize restoring the previous version. This cannot be undone.
Following these steps will completely revert your Excel file back to a previous point in time. Just be careful, as this overwrite your more recent changes.
Recover Unsaved Versions
If you accidentally close an Excel file without saving, there are a couple options to try to recover your work:
First, when you reopen Excel, check the Recent Files list under the File tab. Unsaved files may still appear here for quick access. If you see your file, simply open it and save properly.
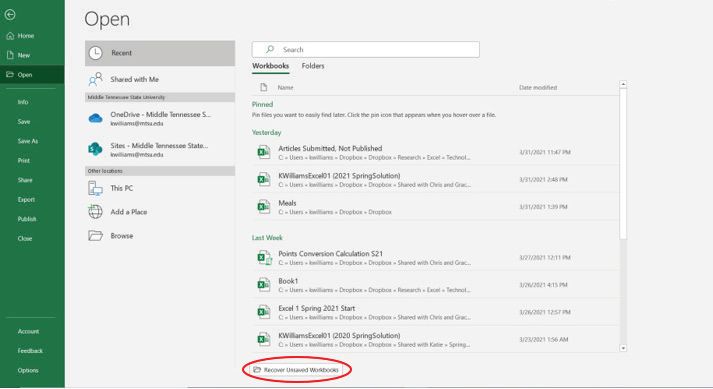
If it’s not listed in Recent Files, go to File > Open > Recover Unsaved Workbooks. This will display a list of unsaved file drafts that Excel automatically creates as a backup. Look for your file name and double click to open it.
You can also go to File > Info > Manage Versions > Recover Unsaved Workbooks. Scan the versions listed and click Restore to pull up any unsaved drafts.
Finally, you can try manually searching your computer’s temporary files for Excel auto-saves. Go to File Explorer and navigate to \Users\[yourname]\AppData\Roaming\Microsoft\Excel. Sort by date modified to find the latest unsaved versions.
However, recovering unsaved files only works if you enabled AutoRecover in Excel’s settings. Make sure to enable this feature under File > Options > Save if you want a backup of unsaved work.
Limitations
Excel’s version history feature does have some limitations to be aware of:
The number of versions that can be stored is limited. According to Excel specifications and limits, Excel can store up to 32,767 versions by default, however this can be customized.
The length of time versions are stored is also limited. By default, versions are kept for 30 days before being deleted, but this retention period can be adjusted in the settings.
With SharePoint/OneDrive, there are similar limits on the number of versions retained and length of time they are stored. According to Microsoft, SharePoint libraries can store up to 500 major versions by default, while OneDrive can store up to 500 versions of a file.
So while the version history is useful, it’s not infinite and older versions will get removed over time. It’s a good idea to save important versions separately if you need to store them long term.
Additional Tips
Here are some other tips for working with version history in Excel:
You can increase the number of versions Excel saves by going to File > Options > Save and increasing the number under “Save AutoRecover information every:”. The default is 10 versions, but you can save up to 64 versions [1].
Turn on AutoSave in Excel to automatically save your workbooks every 10 minutes or so. This way, you’ll have recent automatic backups if you ever need to restore a previous version [2].
Keep in mind version history only tracks changes made and saved within Excel. It does not include unsaved drafts or changes made and saved in other programs [3].
If you delete a file, the version history will also be deleted. However, you may be able to recover deleted files from your Recycle Bin [4].
Recap & Summary
Undoing changes to a saved Excel file is possible in a few different ways. Here’s a quick recap of the key steps covered:
- Go to File > Info > Manage Versions to view and restore previous versions of a file.
- Open an older version of the file to recover its state before recent changes.
- Compare versions side-by-side to see specific differences.
- Use Ctrl + Z immediately after saving to undo the save.
- Try file recovery software to retrieve unsaved versions.
Following these tips, you can often recover overwritten Excel files. Just act quickly before older versions are permanently deleted. Saving frequently and backing up files can also help avoid losing work.
