When formatting a hard drive for use with a Mac, the recommended file system to use is APFS (Apple File System). APFS was introduced in 2017 and is optimized for solid state drives (SSD) and flash storage. It offers strong encryption, space sharing, fast directory sizing, and improved file system snapshots. Most modern Macs running macOS High Sierra or later will default to APFS when formatting a drive. Here are some quick answers about formatting hard drives for Mac:
Quick Answers
What is the best format for Mac external hard drives?
APFS is the recommended format for external hard drives used with Macs running macOS High Sierra or later. It replaces the older HFS+ format.
Does formatting a hard drive erase everything?
Yes, formatting a drive erases all data and partitions on the drive and allows it to be reformatted with a new file system.
How do I format an external hard drive for Mac and PC?
To share an external hard drive between Mac and PC, the best format is exFAT. This is compatible on macOS and Windows.
What happens when you format a hard drive?
Formatting a hard drive erases all data, resets the drive’s file system, and prepares it for use with the formatting system, like APFS for macOS.
Choosing a Format for a Mac Hard Drive
When preparing a new hard drive for use with your Mac, one of the first decisions you need to make is which format to use. The file system format defines how data is stored and retrieved on a drive. Macs and Windows PCs have used different default file systems for many years, but they are compatible with additional formats besides their defaults.
For Macs running macOS High Sierra or later, including modern MacBook Air and MacBook Pro models, Apple recommends using the Apple File System (APFS). APFS offers many improvements over the older HFS+ file system used on older Macs. However, there are some situations where using HFS+ or the exFAT system common on Windows PCs may be preferable.
Apple File System (APFS)
APFS is the default file system used for solid state drives and flash storage on modern Macintoshes running macOS High Sierra or later. It is optimized specifically for these faster forms of storage. APFS replaces HFS+ as the new default system for Macs with solid state or flash storage.
Key advantages of APFS for Mac users include:
- Strong encryption – APFS uses advanced encryption for both data at rest on the drive and data in transit through the system.
- Space sharing – Available space can be shared across volumes on the same drive.
- Fast directory sizing – Directory sizes are calculated faster.
- Snapshots – Improved file system snapshots allow easy backup and rollback.
- Crash protection – Metadata is immediately saved to ensure consistency.
- Cloning and copying – APFS makes duplicating data at the file system level simple.
For drives used to boot macOS, APFS allows features like System Integrity Protection to be enabled. This provides security and anti-malware capabilities. Overall, APFS is the best format for modern Macs with solid state or flash storage.
HFS+
HFS+ (Hierarchical File System Plus) was the primary file system format used by Macs for many years. It is optimized for magnetic hard disk drives rather than solid state storage. HFS+ is still used as the default format for magnetic hard drives on older Macs running OS X or macOS Sierra or earlier.
HFS+ has some disadvantages compared to APFS. It uses less advanced encryption, lacks snapshot support, has slower directory sizing, and fewer crash protection capabilities. However, there are still some use cases for choosing HFS+ on a Mac:
- Older Macs – Macs from 2012 or earlier need HFS+ to start up from the drive.
- Magnetic hard drives – HFS+ is optimized for magnetic hard drives.
- Cross-platform – Shared drives may need HFS+ for Time Machine backup support.
- Legacy software – Some older software may not recognize APFS formatted drives.
While APFS is preferable in most cases, HFS+ may still be useful for older Macs or magnetic hard drives where maximum backwards compatibility is needed.
exFAT
exFAT is a good choice for external drives that will be used across both Mac and Windows computers. It is compatible with all modern versions of macOS and Windows. macOS includes read and write support for exFAT without any additional software.
Like APFS and HFS+, exFAT allows drive capacities up to 16 exabytes. It also has better corruption resistance in the event of power failures thanks to journaling. However, maximum file sizes are smaller at 16 terabytes and there is no built-in encryption support.
The advantages of exFAT for cross-platform external drives include:
- Read & write on both macOS and Windows.
- No extra software needed on macOS.
- Good corruption resistance.
- No file size or volume limits like FAT32.
The simplicity and plug-and-play nature of exFAT makes it a good choice for hard drives and flash drives that need to work on both Macs and PCs when transferring data between them.
How to Format a Hard Drive on a Mac
Macs provide a couple different options for formatting drives. You can use Disk Utility for any drive, or the Finder for external removable drives. Here are the steps to format a drive on Mac:
Using Disk Utility
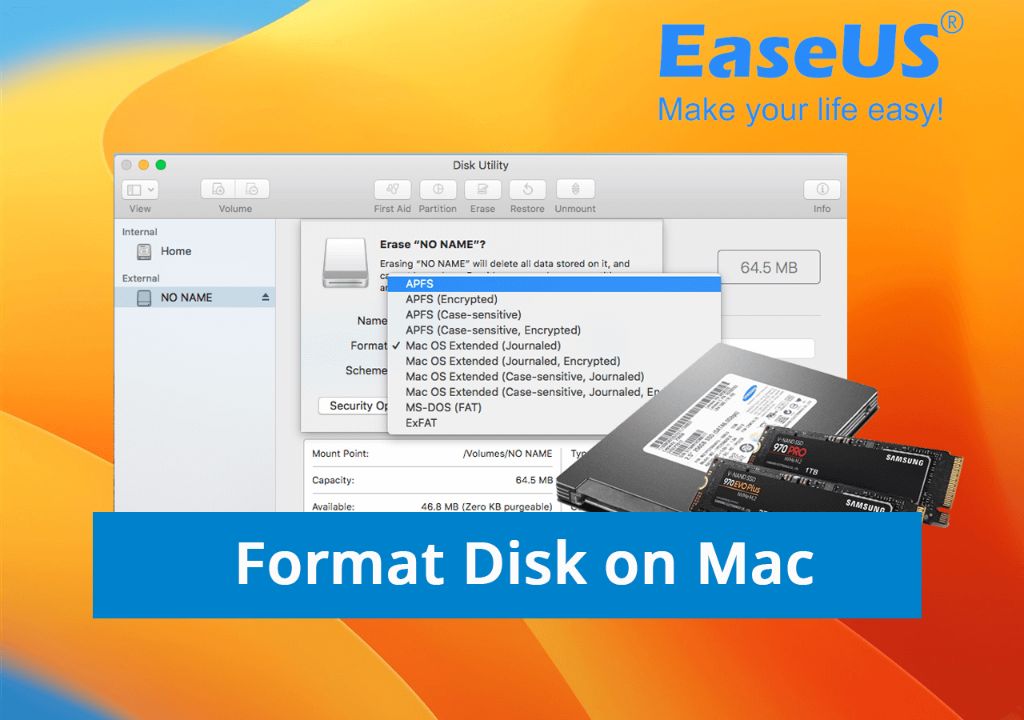
- Open Disk Utility (in Applications > Utilities).
- Select the drive you want to format in the left sidebar.
- Click Erase at the top.
- Choose a format (APFS is default).
- Enter a name.
- Click Erase to format the drive.
This will completely erase the selected drive and format it with the new file system. Any existing data on the drive will be lost. Be sure to select the correct drive before erasing!
Using Finder
- Connect the external drive you want to format.
- Open Finder and select the drive.
- Right click and choose Format.
- Enter a name.
- Click Format to format the drive.
The Finder method can only be used on external drives. The Finder will automatically choose an optimal format for the drive. This is a quick way to erase and reformat an external drive.
How to Partition a Hard Drive on Mac
In addition to formatting an entire drive, it is also possible to divide a drive into multiple partitions. Each partition acts as a separate volume that can have its own format and operating system. Reasons to partition a drive include:
- Dual booting macOS and Windows.
- Keeping your Time Machine backup separate from other data.
- Having separate volumes for personal data, work data, backups, etc.
Here are the steps to partition a drive on Mac:
- Open Disk Utility.
- Select the drive you want to partition.
- Click Partition.
- Enter the number of partitions to create.
- Adjust the size of each partition if needed.
- Select formats for each partition.
- Click Apply to partition the drive.
This will divide the drive into the specified number of partitions. You can then format each partition independently before using it. Any existing data on the drive will be erased when it is partitioned.
Tips for Formatting Hard Drives on Mac
Here are some useful tips to keep in mind when formatting hard drives for use with Macs:
- Use APFS for internal hard drives and SSDs on modern Macs. Older Macs may need HFS+ instead.
- Drives used for Time Machine backups should use a Mac formatted partition (APFS or HFS+).
- Partition drives used for both Mac and Windows into separate formats for each OS.
- Use exFAT for removable media like flash drives to be used on both Mac and PC.
- Format drives using Disk Utility on the Mac for greater flexibility and options.
- Be sure to regularly back up your data before formatting or erasing drives.
Following these tips will help ensure maximum compatibility and optimal performance when using different types of hard drives with a Mac system.
Reasons to Format a Hard Drive on Mac
There are a variety of reasons you may want or need to format a hard drive that will be used with a Mac computer. Common situations include:
New hard drive
Brand new internal or external hard drives out of the box will not have any formatting. They will need to be erased and formatted with a file system like APFS before they can be used to store files on a Mac.
Old file system
Drives that were formatted many years ago may have an outdated file system like HFS that is slow or lacks features like encryption found in APFS. Reformatting the drive allows it to use a more modern file system.
Cross-platform use
If you need to use the drive between Mac and Windows computers, reformatting it with exFAT enables plug-and-play compatibility on both operating systems.
Troubleshooting issues
A drive that is having corruption errors, connectivity issues, or other problems can often be fixed by reformatting to fresh file system. This erases any underlying file system problems.
Before selling or gifting
To protect your private data before selling, gifting, or disposing of a hard drive, you should reformat it to erase all your personal files completely.
Operating system upgrade
When upgrading to a major new version of macOS, it is often recommended to format the startup drive with the new default file system (like APFS for High Sierra or later) for optimal performance.
Considerations Before Formatting a Hard Drive
While formatting a hard drive can provide benefits in many cases, it also carries risks. Formatting a drive will erase all data on the drive. Files, applications, photos, music, and everything else will be erased. Some things to consider before formatting a hard drive include:
- Backup important data – Be sure to back up any important files and data from the drive before formatting. Once erased, data is very difficult to recover.
- Partition if needed – If you only need to erase and reformat part of the drive, partition it first so you don’t lose everything.
- Reinstall applications – Any applications or operating systems on the drive will be erased and need to be reinstalled after formatting.
- Check for compatibility – If formatting a drive used for Time Machine or older devices, check it will still work with the new format.
- Have install media ready – Have your macOS installer USB drive or other necessary media on hand to reinstall after formatting.
Formatting a drive erases its contents, so being prepared and having important data backed up is critical before proceeding. Be absolutely sure formatting is needed, and that you have selected the correct drive to avoid accidentally erasing data.
How to Recover Data After Formatting a Hard Drive on Mac
If you accidentally formatted a hard drive without properly backing up the data first, it may still be possible to recover the deleted files. However, the quicker you act, the greater the chance of significant data recovery.
Stop using the drive
First, stop any activity on the affected drive immediately. Continuing to write new data can overwrite your deleted files making them harder to recover.
Use data recovery software
Install reputable data recovery software that can scan the drive and restore deleted files. Some options include:
- Disk Drill
- EaseUS Data Recovery
- Stellar Data Recovery
- Data Rescue
Be prepared to scan the entire drive which can take hours for large drives. Any files found can be previewed before choosing to recover them.
Send drive to a recovery service
For greatest chance of recovery on a damaged drive, consult a professional data recovery service. They have specialized tools and clean room facilities to potentially recover even more lost data.
Learn from experience
Going forward, be sure to always backup your data before formatting. Keep regular backups on a separate drive or in the cloud. And be extra cautious when erasing drives to avoid similar mishaps.
Conclusion
Formatting a drive for use with Mac offers benefits like modern file systems and removing data for privacy. In most cases, Apple’s APFS is ideal for Mac internal hard drives and SSDs. For sharing external drives between Mac and Windows, exFAT offers a compatible cross-platform format.
No matter the reason for formatting on Mac, be sure to have backups and take precautions against accidentally deleting important data. With careful use, formatting hard drives allows them to be optimized for use with Apple desktop and notebook computers.
