Quick Answers
There are a few common reasons why your PC may not be recognizing a second solid state drive (SSD):
- The SATA cable is not properly connected between the SSD and motherboard
- The SSD is not getting power from the power supply
- The SSD is not enabled in the BIOS
- The SSD has not been initialized and formatted in Disk Management
- The SSD is faulty or incompatible with your system
The most likely causes are an improper connection, lack of power, or the SSD not being detected in the BIOS. Carefully check all connections, power cables, and BIOS settings to ensure the second SSD is properly installed. Initializing and formatting the disk in Disk Management can also help troubleshoot recognition issues. If those steps do not work, the SSD itself may be defective and need to be replaced.
What causes a second SSD to not be recognized?
There are several potential causes for a second solid state drive not being recognized in Windows:
Improper physical connection
One of the most common reasons an SSD is not detected is because it is not properly plugged into the motherboard SATA port. SSDs require both a physical SATA data connection as well as a SATA power connection from the power supply.
If either of these connections is loose, faulty, or disconnected entirely, the SSD will not be visible to the system. Re-seat both the SATA data cable and SATA power cable to ensure snug, secure connections. Make sure the data cable is not damaged and is connected to the correct SATA ports on both the motherboard and SSD.
Lack of power
Similar to an improper physical connection, an SSD requires power in order to operate. Most modern power supplies have multiple SATA power connectors available, but if other storage drives are connected, you may need to use a SATA splitter to add more power connectors.
Verify the second SSD is getting consistent power by checking for damage to the SATA power cable and connections. Try swapping to another SATA power cable if necessary to rule out defects.
Not enabled in BIOS
For the PC to communicate properly with a connected SSD, it must be enabled in the system BIOS. In the BIOS settings menu, look for options related to SATA, onboard devices, or storage configurations.
The BIOS may have the second SATA port disabled by default, or the SSD may not be auto-detected. Enable the SATA port the SSD is connected to, or manually select it if there is an option to force detection. Save changes and reboot to see if the SSD is now visible.
Not initialized in Disk Management
Once an SSD is connected and powered on, Windows still needs to initialize it and format it before it can be used for storage. Until this process is completed, the SSD will not show up in Windows File Explorer.
Go into the Disk Management utility and check for any disks shown as “Unallocated”. If you see the full size of your SSD drive here, you just need to right-click it and select Initialize. This will allow you to create a new volume on the disk so it can be formatted and assigned a drive letter.
Incompatible or faulty SSD
In some cases, an SSD may not be recognized due to compatibility issues with the make of the drive, interface type, or firmware. Brand new SSDs should work with any recent motherboard, but double check documentation if using an older SATA interface.
If another disk is detected when connected to the same SATA port and cables, the SSD itself likely has a hardware defect causing the issue. SSD failure rates are low, but it is possible for them to malfunction right out of the box. You may need to replace the SSD if initialization attempts consistently fail.
Step-by-step troubleshooting guide
Follow these steps to thoroughly troubleshoot and attempt to resolve an unrecognized second solid state drive:
1. Check physical connections:
– Make sure the SATA data cable running from the SSD to the motherboard is securely attached at both ends, and that the connectors are properly oriented. There are usually foolproof notches that only line up one way.
– Verify the SATA power cable between the SSD and power supply is firmly connected.
– Try swapping the SATA data cable with a spare cable, in case the current cable is faulty.
– If currently daisy-chaining power from another drive, connect the SSD directly to the power supply instead.
2. Check for proper power:
– Make sure the power supply is switched on and operational.
– Check that the specific SATA power cable you are using is not damaged and functions properly.
– Try connecting the SSD to another available SATA power connector on the PSU instead.
– Use a SATA power splitter adapter if additional connections are needed.
3. Enable the SATA port in BIOS:
– Boot into the system BIOS, accessible on startup by pressing a key like F2, F10, or Delete.
– Navigate to the storage, onboard devices, or SATA configuration sections.
– Make sure the SATA port that the SSD is using is enabled. Ports are sometimes disabled by default.
– If the SSD is still not visible, try forcing a manual detection or selecting the port specifically.
– Save changes and reboot. The SSD should now be detectable.
4. Initialize and format the SSD in Disk Management:
– Go into the Disk Management utility within Windows. Right click the Start menu and select “Disk Management”.
– See if the full SSD capacity is shown here as an “Unallocated” drive. If so, you need to initialize it.
– Right-click the unallocated space, choose Initialize, and select a disk type of GPT. Allow initialization to complete.
– Right-click the volume again and choose New Simple Volume. Go through the steps of the wizard to create and format a volume on the entire SSD capacity. Assign a drive letter when prompted.
– The SSD should now appear in File Explorer with the assigned drive letter.
5. Test with another SATA port/PC:
– If the above steps do not resolve the issue, try connecting the SSD to a different SATA port and power connector to rule out a damaged controller or port.
– Test the SSD by installing it in another computer if available to determine if the drive itself is faulty.
– If the SSD fails to be recognized uniformly across different machines and connections, it is likely defective and needs to be replaced.
Software troubleshooting methods
If you have exhausted all hardware-related troubleshooting, there are some additional software checks and tools that may help identify issues:
Update storage controller drivers
While rare, occasionally an outdated storage driver can cause detection issues with a new SSD. Update to the latest chipset, SATA controller, and storage driver’s available for your motherboard from the manufacturer’s website.
Check for SSD firmware update
SSDs require firmware just like other computing devices. The SSD maker may have released a firmware update that fixes compatibility bugs. Check online for an available update.
Scan for errors with CHKDSK
If your SSD shows up but has performance issues or unusable sectors, try running the CHKDSK scan tool. It will detect and repair filesystem errors.
Use diskpart Clean command
The diskpart command line tool has a Clean function that completely wipes partition data from a selected disk. This can fix corrupt partition information preventing recognition.
Try disk surprise removal and refresh
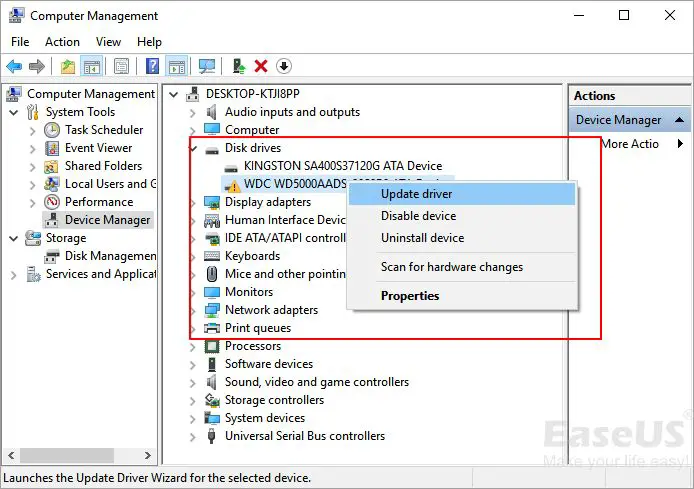
Within the Device Manager utility, find the SSD, right-click it and select Uninstall. Then scan for hardware changes to reload the driver and detect the SSD again like new.
When to seek professional help
If you have worked through all of the above troubleshooting steps and the second SSD still refuses to show up or function properly, it is time to seek additional insight from a professional:
– Computer repair technicians have access to diagnostic tools and insider knowledge that can better identify quirky issues.
– They can test components with known working parts to isolate failure points.
– Computer repair shops may be able to access advanced data recovery options to salvage data from failed drives.
– Computer builders and enthusiasts often have experience with finicky SSD compatibility and performance problems.
– Technical support staff from the SSD manufacturer are experts on configuring their hardware.
Paying for professional computer repair is worthwhile to determine if your SSD itself is defective or compatible, or whether there is a more complex underlying problem. Trying multiple DIY fixes first helps isolate the issue and minimizes diagnostic time you’ll pay for.
When to replace the SSD
If professional troubleshooting concludes that your SSD itself is malfunctioning or incompatible with your PC’s hardware, replacement is the definitive solution:
– Internal SSDs have no user-serviceable parts. A failed drive cannot be disassembled and repaired.
– Replacing a SATA SSD is straightforward. Just cleanly detach the old unit, then plug in an identical replacement.
– For the operating system drive, you will need to reinstall or clone your OS to the new SSD.
– When replacing your boot drive, it’s a perfect time to upgrade capacity. Migrate your data to a larger, faster modern SSD.
– Use cloning software to migrate data and applications from an old smaller SSD to a new higher-capacity replacement.
– Verify the warranty policy on the failed SSD. Many come with 3 to 5 year warranties for free replacement of defective units.
While diagnosis can be complicated, actually replacing a bad SSD is quite simple if that proves to be the ultimate solution. A fresh high-quality SSD will likely resolve your disappeared drive issues for years to come.
Data recovery from a failed SSD
Because SSDs have no moving parts, mechanical failures are rare. But when an SSD starts malfunctioning or corrupting data, there are some data recovery options to salvage your files:
– If the drive is still partially visible, you may be able to copy data to another drive with cloning software.
– Try removing the SSD and connecting it externally via USB enclosure or adapter cable. External connection often helps stabilize flaky drives.
– Extremely advanced users can potentially access raw NAND flash chips directly and read data off them. This requires expert skills and specialty tools.
– Data recovery specialists have proprietary software and cleanroom facilities to repair drives and extract data at the lowest level. This can be expensive but may be your last resort.
– Data centers rely on redundant SSD arrays (eg. RAID 5/6) to protect against individual drive failures. Keep local backups and consider a resilient bulk storage solution.
– An SSD used for backups itself still needs its own form of backup! Have an additional external drive to duplicate irreplaceable data.
When in doubt, always seek professional assistance for SSD data recovery rather than risk losing personal data through DIY experimentation. Prevention via backups is ideal, but specialists can often recover even RAID-failed drives.
Conclusion
Troubleshooting an unrecognized second solid state drive generally starts with ensuring proper physical connections, power delivery, and checking for detection in the BIOS. Once visible to the system, the SSD will need to be initialized and formatted through the operating system before it can be used.
If those steps fail to resolve the issue, testing the SSD with alternate ports or devices can verify if replacement is required. Professional repair services may be needed to fully validate your system’s hardware compatibility or recover data from a truly dead SSD. But in most cases, you can get a new SSD functioning as secondary storage again through careful diagnosis and selective replacement of any defective components.
| Error Message | Likely Cause | Solution |
|---|---|---|
| “Disk not initialized” | SSD lacks partition and filesystem | Initialize disk in Disk Management |
| “No volumes found” | Disk contains unallocated space | Create new volume in unallocated space |
| “Disk unknown, not initialized” | SSD not detected by operating system | Check physical connections and power |
| “Disk not accessible” | Corrupted partition table or filesystem | Scan for errors with chkdsk or third-party tool |
| “No disks available” | SATA port disabled in BIOS | Enable SATA port in system BIOS |
