It can be frustrating when you install a new solid state drive (SSD) in your computer, expecting to see increased storage space, but the drive doesn’t show up or is not accessible. There are several potential reasons why your SSD may not be visible or functional.
Quick Diagnosis Steps
Here are some quick things to check if your SSD is not detected:
- Verify the power and data connections are properly attached. SSDs require both a power cable and data cable connected. If either is loose or disconnected, the drive will not show up.
- Inspect the cables for any bent pins or other damage. Damaged cables can prevent the SSD from being detected.
- Try connecting the SSD to another SATA port on the motherboard. Use a different SATA data cable if possible.
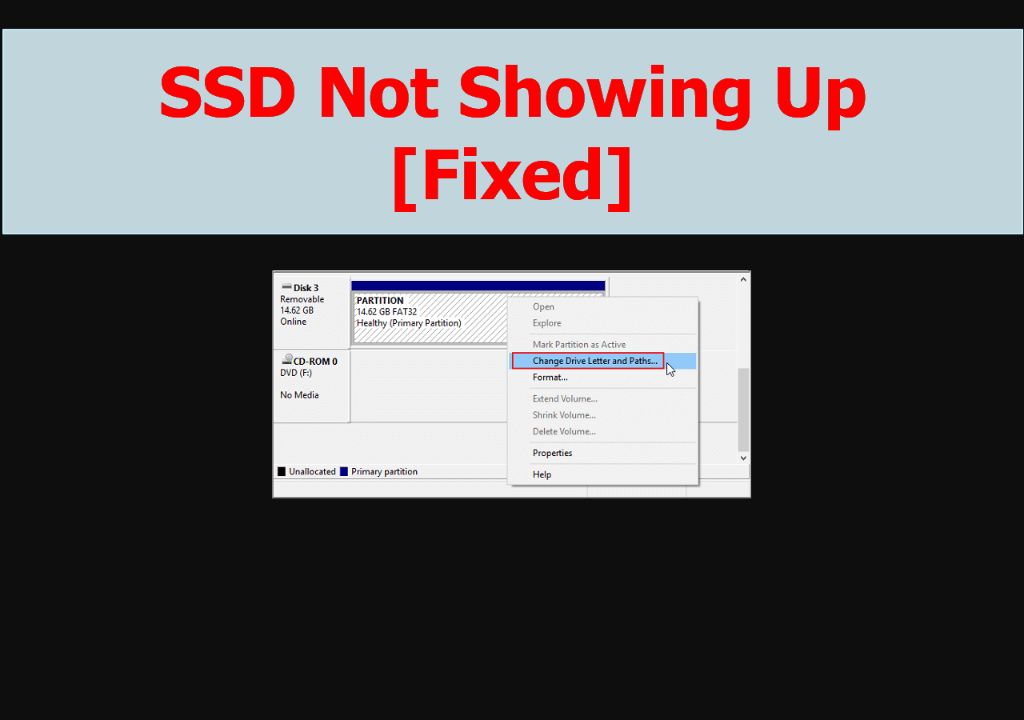
- Check in Disk Management (Windows) or Disk Utility (macOS) to see if the disk shows up there but without a drive letter assigned.
- Update your motherboard firmware and storage drivers to the latest available versions.
- Reboot your computer and enter BIOS to verify the SSD is detected by the BIOS.
If the above steps do not resolve the issue, continue reading for additional troubleshooting tips.
Loose Connections
One of the most common reasons an SSD is not detected is because it has come loose from its data or power cable connections. SSDs require both a power cable and data cable to function. If either cable is not properly attached, the computer will not see the SSD.
Carefully check both connections to make sure the cables are fully inserted into the SSD and connected to the computer’s power supply and motherboard. Listen and feel for a firm “click” when attaching the cables to ensure a tight fit. Cables can sometimes come loose if they were not firmly attached or from physical jostling of computer case.
Tip for Finding Loose Data Cables
One trick to find a loose data cable is to look at the tape on SATA cables. Colored tape is often placed on one end of the cable to indicate Pin 1. If the tape is upside down compared to the other SATA devices, that indicates the cable was connected incorrectly. Reconnect right-side up and the SSD should appear.
Damaged Cables
While rarer than loose connections, it is possible for SATA data cables to become damaged in a way that interrupts communication between the SSD and computer. This can prevent the SSD from being detected properly. Damage often occurs from frequent cable inserts/removals or tightly bundled cables putting stress on the connectors.
Carefully inspect the SATA data and power cables for any bent pins, cracked housings, cuts, missing pins, or corrosion that could impede the connection. Try swapping the suspect cable with a known working one if available. Proper SATA connections require intact pins/connectors and cables in good condition.
Signs of Damaged Cables
- Bent or missing pins on connectors
- Cracked or damaged housing around connectors
- Cuts, tears or excessive wear on cable insulation
- Corrosion on pins or connectors
- Inflexible, crimped or otherwise deformed cables
Incorrect SATA Port
Another possibility is the SSD is connected to the wrong SATA port on the motherboard. While SATA ports may look alike, not all are created equal. Some SATA ports share bandwidth and can interfere with proper drive detection if used incorrectly.
Consult your motherboard manual to find which SATA ports should be used for primary storage devices like SSDs. Typically there will be some ports labeled as SATA 6 Gb/s that are optimal for SSDs. Plugging into a slower SATA 3 Gb/s port could cause detection issues.
Additionally, some SATA ports share bandwidth. If another device like an optical drive is connected to a shared bus it can restrict bandwidth to the SSD and prevent it from being detected. Try switching the SSD to another exclusive SATA port if possible.
Tips for SATA Port Selection
- Use ports labeled SATA 6 Gb/s for SSDs
- Avoid ports that share bandwidth if the SSD is not detected
- Consult motherboard manual for ideal port selection
- May need to disconnect other SATA devices to isolate bandwidth
Incorrect Drive Initialization
SSDs typically need to be initialized and formatted before their full capacity is visible to the operating system. This requires using disk management tools.
In Windows, open Disk Management and check for an unallocated disk. If present, you can right-click it to create a new volume. This will allow Windows to detect the full capacity of the SSD and assign a drive letter.
On Macs, use Disk Utility to erase and format the SSD, assigning GUID Partition Map and APFS format. Once complete, the full SSD should mount and become available.
If the SSD is showing the full capacity but still has issues, also try full drive formatting to wipe and refresh the drive.
Tips for Initializing New SSDs
- Use Windows Disk Management to create a new volume
- Macs require formatting SSDs in Disk Utility first
- Check capacity to ensure full amount is reporting
- May need to reformat again if issues persist
Outdated BIOS/Drivers
Outdated motherboard firmware and storage drivers can also be responsible for SSD detection problems. New SSDs may not be properly recognized by older BIOS versions not designed to support them.
Go to your motherboard manufacturer’s website and look for a BIOS update specific to your model. Follow instructions to flash the latest BIOS version, reboot, and check if your SSD is now detected. Updated BIOS provides improved device compatibility and support.
Also update storage drivers for SATA controllers, chipsets, and connectors to the latest versions. Updated drivers optimize SSD performance, compatibility and connectivity. Install through Device Manager or your manufacturer’s utility.
Tips for Updating BIOS and Drivers
- Get latest motherboard BIOS update from manufacturer
- Use their instructions to safely flash BIOS
- Update SATA and other storage drivers to latest
- May require multiple driver updates
- Reboot after updates to load new versions
Faulty Power Cable or Port
As mentioned previously, SSDs need both data and power connections for proper operation. If the SATA data cable is fine, problems could be due to a faulty power supply cable or port instead.
Carefully inspect the power cable connections at both the SSD and power supply ends. Wiggle the cable to check for any looseness indicating a poor connection. Also check the power supply end to make sure it is firmly inserted into the modular port if applicable.
Try using a different power supply cable if you have spares available. Swap it with another device’s cable that you know works properly. This can isolate the issue to just the suspect cable.
Failing cables are possible if the wires inside are damaged or broken. There may be enough power for limited functionality but not full operation. A damaged cable should be replaced.
Signs of Power Issues
- Loose power cable connections
- Intermittent SSD detection
- Power cable damage or splits
- Burn marks on connectors
- Overly warm or hot cables
Non-Optimal SSD Interface
While most SSDs use the standard SATA interface to connect, some newer models may use the faster NVMe interface instead. Using the wrong interface type for your SSD can impede performance or prevent detection entirely.
SATA SSDs plug into a dedicated SATA port with a data and power cable. NVMe SSDs slot directly into PCIe lanes and do not require cables. Make sure you are using the correct interface for whichever SSD type you have.
Some motherboards also have M.2 slots that support both NVMe and SATA SSDs. Ensure the correct mode is enabled in the BIOS depending on your SSD. An incorrect mode set for the slot could impede detection.
SSD Interface Types
- SATA – Uses SATA data and power cables
- NVMe – Slots directly into PCIe lane
- M.2 – Can support either SATA or NVMe
Defective Data or Power Ports
Though less likely, failed SATA or power ports themselves could also be the culprit. If different cables and SSDs still fail to be detected in a particular port, the port itself may be damaged.
For SATA ports, inspect the plastic housing for any cracks or bent pins. Try carefully re-aligning any pins that may have become askew. Also watch for broken pins or connector pieces that may have broken off inside the port.
With modular power supply ports, gently wiggle connectors in the socket to check for looseness. See if it makes proper contact when an SSD power cable is inserted. Proper connection requires a snug fit between the two.
You may need to have the motherboard or power supply repaired or replaced if ports have failed. This generally requires sending to the manufacturer or service center.
Signs of Damaged Ports
- Visible cracks, damage or missing pieces in ports
- Loose connections or lack of snug fit with cables
- Multiple drives fail detection in same port
- Scorch marks or melted plastic on ports
Dead SSD
If you have exhausted all other troubleshooting steps, the SSD itself may be dead or defective. SSDs can fail for several reasons:
- Faulty Components – Low quality controllers, memory chips or other components can fail, especially on cheap SSDs.
- Physical Damage – Drops, impacts, water exposure, connectors breaking, etc. can kill SSDs.
- Exceeded Usage Limits – SSDs have limited write endurance. Excessive writes will wear them out.
- Power Surge – Electrical spikes can fry SSD circuits and render them inoperable.
- Manufacturing Defect – Sometimes just bad luck with a defective SSD from the factory.
If no troubleshooting allows your SSD to be detected, it likely has failed catastrophically. Data recovery services may be able to rescue files off failed drives in some cases. Otherwise the SSD will need to be replaced.
Signs of a Dead SSD
- No activity lights or spins when powered on
- Not detected in BIOS or operating system
- Burnt electronic smell coming from SSD
- Obvious physical damage like cracks or broken parts
External Enclosures
One other common reason an SSD may not show up is if an external enclosure is being used. External SSD enclosures connect via USB or Thunderbolt, adding additional hardware and connections that could cause issues.
Ensure the external enclosure is powered on if it has a separate power supply. Check that the data cable is properly fitted between the enclosure and computer. Try disconnecting and reconnecting it.
Connect the enclosure to another computer if possible to rule out problems with that system. Also try a different USB/Thunderbolt port on the computer in case an individual faulty port is to blame.
Finally, take the SSD out of the enclosure and connect it internally to isolate the enclosure as the cause. External enclosures add complexity that can hinder drive detection.
External SSD Troubleshooting
- Verify external enclosure is powered on
- Inspect data cable connections
- Try different USB/Thunderbolt ports
- Test enclosure on another computer
- Connect SSD internally without enclosure
Conclusion
SSDs not showing up can stem from issues like loose connections, outdated firmware, using incorrect ports, or external enclosure problems. Methodically verifying cables, connections, ports and drivers can help identify and resolve the problem.
Following the specific troubleshooting steps above to isolate potential points of failure can get your SSD successfully recognized. If all else fails, a defective SSD or hardware component may simply need replacing.
With the right diagnosis approach and process of elimination, you can get your missing SSD to show up and be accessible again.
